Last Epoch
Monolith of Fate Guide
Introduction
Time travel is a big part of Last Epoch's lore and gameplay. The game allows us to live through all the different possibilities of Eterra's history and even create new timelines by affecting the past. A large part of this mechanic is related to the Monolith of Fate, which is one of the Last Epoch's major End-Game features. In this guide, we'll explain what the Monolith actually is, how it works, and what different Timelines are there for you to live through.
Monolith of Fate Explained
The Monolith of Fate is comprised of 10 different timelines. Each of these timelines tells an alternate flow of events. They can be progressed by completing their Echo Missions. Each of these missions takes place in a specific Zone and has a distinct Quest Objective. There are three missions per Timeline. Enemies inside the Echoes will often have modifiers, granted by the Echoes, that improve their drops and affect Experience gained; these modifiers can last a set number of Echoes. To complete the Timeline, you have to finish its 3rd Quest Echo. New Timelines are unlocked as you progress through them.
If you are already progressing through the Monoliths yourself, you might have noticed the Corruption that can spread across your Timelines. This mechanic and the corresponding Orobyss Boss that's associated with it has been described in a separate article that can be found here: Monolith of Fate Corruption and Orobyss Boss Guide
Now, with the basics out of the way, let's take a closer look at Monolith of Fate's mechanics and features:
|
Monolith of Fate is accessed from The End of Time, which is a Town Zone that serves as the main player hub and the location for many end-game features.
- You will first enter The End of Time after defeating the Ruined Emperor's Corpse at the end of the Ruined Era.
- The End of Time contains 2 Stashes, a Gambler NPC, Passive Talents Re-spec NPC, an NPC who sells Runes of Shattering, a Target Dummy, The Monolith of Fate, and more.
- You progress through The Monolith of Fate by making your way through the Echo Web.
|
|
The Echo Web is an expanding web of choices you have during a Timeline, with a visible path demonstrating your journey through it. On this Web, you'll find Islands that are individual Echoes with their own modifiers and exclusive rewards (which include Unique Items!).
- Web Echoes available to you are randomly generated. Completing them will grant you Stability, and gaining enough Stability will allow you to access Quest Echoes of the Timeline you're currently progressing through - simple as that!
- As you progress through Echoes, more of them will unlock. Echo Nodes further from the Island grant more stability but are also substantially more difficult because of their Modifiers.
- The Echo Web also contains Special Echoes that can be used to influence the properties of you're current timeline or to gather some much-needed information.
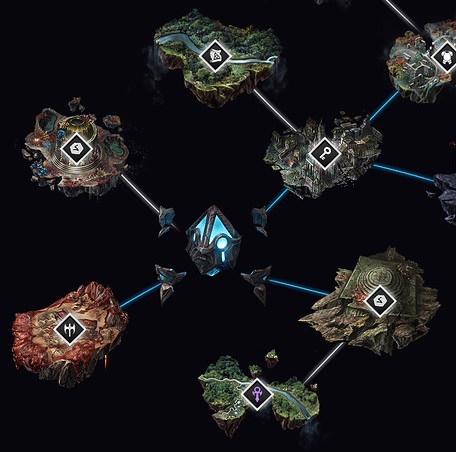
The Echo Web.
|
|
To start an Echo, all you have to do is Right-Click on it. Hovering over an Echo icon will make a pop-up window with Echo Information appear.

Echo In shows active Modifiers (and for how long will they last), and possible Echo Rewards.
|
|
Special Echoes are a major part of the Monolith system, you should use them to your advantage! They include:
- Echo of a World - Resets the Echo Web and adds Corruption to the Timeline. More on Corruption in a separate guide!
- Vessel of Memory - Uncompletes the Echo Web, allowing you to claim the Reward from the Discovered nodes for an additional time. This allows you to farm more efficiently.
- Vessel of Chaos - Rerolls the Echo Rewards of uncompleted nodes. Use this one to roll for Unique Items you're interested in!
- Beacon - Reveals multiple Echoes around the node by illuminating a large area of the Web. This will let you strategically plan out your route.
|
|
Modifiers are buffs granted to Monsters that inhabit the Echoes. They make them tougher, more dangerous, and harder to beat in general. Modifiers can increase Monsters' statistics, improve their damage, or add various on-hit effects to them.
- As a reward for the extra challenge that comes from this, each Modifier will also grant you increased experience and improve the average item rarity (so, more rare items will drop).
- Modifiers last for a set number of Echoes and cycle out as Echoes are completed.
|
|
Quest Echoes are story missions that can be accessed through the Echo Web. They lay out the game's lore and offer unique scenarios for the player to play through. Each Timeline contains three of them, and they must be played through in the set order.
- You can attempt a Quest Echo once you've accumulated enough Stability by completing the regular Echoes.
- If you fail a Quest Echo, you will lose some of your accumulated Stability. You can attempt it again as long as you meet the Stability requirements.
- The last Quest Echo of each Timeline always involves a Boss Fight. Defeating a Timeline Boss guaranteed an item drop from the Boss's drop table, as well as a blessing that buffs the player's character.
- Each boss has four items to offer: two common items, one scaling with item rarity, and a very rare one available in the Empowered timelines.
- We've chosen the most noteworthy Items and Blessings from each timeline and featured them in our Timelines section.
|
|
After defeating a Boss, you will be awarded a choice of one of three Blessings. Blessings are permanent buffs for your character, which can be rerolled/swapped out by completing the timeline again.
- You can have only one blessing equipped per timeline.
- The number of Blessings offered at the end of a Timeline scales with Corruption.
|
|
After completing an Echo, you will be rewarded with a Treasure Chest. Its contents scale with the Echoe's difficulty (Modifiers, etc.) and the number of enemies you've defeated. The Chest may contain any type of item, runes, and glyphs.
Echoes also grant an additional Echo-Specific drop, if they are completed on the first attempt.
- Normal Echoes simply grant additional loot (Tomes of Experience, Gold, Glyphs, Runes, Shards, Arena Keys, Unique Items, Set Items, and Rare Items).
- Uniques and Set Pieces are rolled from a pre-determined list and are Timeline-specific.
- Vessels of Memory and Vessels of Chaos grant a large stability rate (twice of that of a regular node).
|
|
Completing all Level 90 Timelines will unlock The Empowered Timelines for you.
- You can activate them by touching the crystal at their junction, opening up Legendary timelines. You can always switch between the Normal and the Legendary versions of the Timeline - each one will have a separate Echo Web.
- Legendary Timelines are scaled to level 100 and their minimum Corruption is set to 100.
- Empowered Quest Echo Bosses have a chance to drop their most exclusive items.
- Empowered Timelines will award you with Grand Blessings instead of regular ones.
|
The List of Monolith Timelines
|
Fall of the Outcasts
This timeline takes place in the Imperial Era. In it, the Outcasts rebel against the Immortal Empire and are subsequently defeated by the Emperor's undead armies. Your task is to save the Outcast from their impending doom.
|
| General Info |
Level 58 Difficulty
- How to Unlock: It's unlocked automatically
- Maximal Stability: 400
- Minimal Corruption: 0
- Maximal Corruption: 50
Level 100 Difficulty
- How to Unlock: Complete level 90 Timelines (The Last Ruin, The Age of Winter, and Spirits of Fire)
- Maximal Stability: 1500
- Minimal Corruption: 100
- Maximal Corruption: n/a
|
| Timeline Boss |
Abomination
Found in The Altar of Flesh, the Abomination is a powerful Undead Boss. Its body is a result of the Empire's experiments on flesh and blood. Abomination's brute force and magical powers are very formidable, so prepare for a difficult fight.
|
| Noteworthy Boss Loot |

- Woven Flesh (Level 51 Body Armour) - If you're looking for Life Leech, Crit Avoidance, and some extra Health, you won't find a better item than Woven Flesh. This is one of the most well-rounded gear pieces in the entire game.

- Flayer's Pride (Level 65 Shield) - This Unique Shield will definitely find uses in your bleed-based builds as it provides a lot of extra Bleed Chance and it increases Bleed Effect. It also reduces the HP cost of Spells, which is extremely important for some characters.

- Strands of Souls (Level 82 Belt) - A Unique Belt which will fit any build that relies on Ward generation and retention. With it, your Ward will last for longer (it provides up to +70% Ward Retention). Moreover, Strands of Souls will generate a lot of it by itself in multiple ways (Ward per Second, Ward on Kill, Ward on Mana Use, and Ward on Potion Use).
|
| Noteworthy Blessings |
This timeline offers a range of Idol Drop Rate-increasing Blessings. If you want to farm for Idols, Fall of the Outcasts Blessings will come in handy, otherwise, they are nothing to write home about.
|
| Noteworthy Echo Rewards |

- Flight of the First (Level 58 Rogue-exclusive Bow) - This Unique Bow will give you a range of powerful modifiers when you move after attacking. These include +100% Crit Chance and +100% Crit Avoidance(!). While this is not the easiest item to use to its full potential, it's definitely worth mentioning.
|
| Quest Echoes |
| The Ransacked Camp |
In this timeline, the Immortal Empire secured a decisive victory over the forces of Outcasts to quell their rebellion. You have to return to what's left of the Outcast Camp to search for survivors.
- Level: 55
- Stability 50 (normal), 150 (empowered)
|
| Maj'Elka Streets |
In this timeline, the Immortal Empire secured a decisive victory over the forces of Outcasts to quell their rebellion. Maj'Elka Streets are the place of Outcasts' final stand against the forces of the undead. Your task is to fight for the survival of the living in these desperate times.
- Level: 55
- Stability 120 (normal), 400 (empowered)
|
| The Altar of Flesh |
In this timeline, the Immortal Empire secured a decisive victory over the forces of Outcasts to quell their rebellion. Immortal Empire is planning to use the bodies of captured Outcasts to create an abomination that would help in their research into immortality. Your task is to rescue the captured Outcasts before they meet their terrible fate.
- Level: 55
- Stability 250 (normal), 750 (empowered)
|
|
The Stolen Lance
This Timeline takes place in the Divine Era. In it, the Osprix were not stopped at the Burning Pier and they continue their fight for the Lance of Heorot and the Blessed Horn. Your task is to stop them before they obtain these powerful relics.
|
| General Info |
Level 62 Difficulty
- How to Unlock: Complete the Fall of the Outcasts
- Maximal Stability: 500
- Minimal Corruption: 0
- Maximal Corruption: 50
Level 100 Difficulty
- How to Unlock: Complete level 90 Timelines (The Last Ruin, The Age of Winter, and Spirits of Fire)
- Maximal Stability: 1600
- Minimal Corruption: 100
- Maximal Corruption: n/a
|
| Timeline Boss |
God Hunter Argentus
Argentus is a powerful caster, capable of harnessing the power of the frozen Lance and combining it with his Solarum powers. Beware, he's not alone during the fight as six ballistae will periodically fire at you from the edges of his arena, and after he reaches 50% health, He'll call Osprix Warriors to his aid and recover His wounds.
|
| Noteworthy Boss Loot |

- Throne of Ambition (Level 1 Adorned Idol) - This is one of the most commonly used items in the game, and for a good reason: It can give you unbelievably high amounts of increased Armour, which is enough to make it viable for any build (even if the rest of its bonuses are of little to no use). In builds that deal Fire and/or Cold Damage, Throne of Ambition is a Best in Slot item during fights against bosses. Just be aware that it requires you to hit a Boss or a rare enemy to stack up.

- Wings of Argentus (Level 82 Body Armour) - This powerful unique body armor will be of use for any build that utilizes cold and/or fire melee skills. With it, you'll gain a lot of extra Fire and Cold Damage as well as +1 to your Cold and Fire Melee Attacks. It will also substantially improve your defenses, provided that you keep moving (by reducing incoming damage by 40% while you're on the move).
|
| Noteworthy Blessings |
This timeline offers a range of Helmet, Body Armour, Gloves, Boots, Shields, Off Hand, Ring, Amulet, Belt, and Quiver Drop Rate-increasing Blessings. If you want to farm for Gear, The Stolen Lance Blessings will come in handy, otherwise, they are not worth going for.
|
| Noteworthy Echo Rewards |

- Omnividence (Level 70 Two-Handed Staff) - If you want to play as a caster that deals Void Damage, this Unique Staff might come in handy for you. It not only gives up to +300% Void Spell Damage, but also increases Void Spell Casting Speed and provides +1 to all your Void Spells.

- Cinder Song (Level 40 Wand) - This is a must-have for any build that uses Fireball, as it adds 2 additional projectiles to the spell. It also greatly improves your ability to efficiently deal Fire Damage by reducing the cost of all Fire spells and substantially improving their power.
|
| Quest Echoes |
| The Blessed Horn |
Osprix forces had interfered with the retrieval of the Lance of Heorot. Now, they are after the Blessed Horn - you have to claim it before they do!
- Level: 60
- Stability 50 (normal), 150 (empowered)
|
| The Siege of Farwood |
Osprix forces are trying to interfere with the retrieval of the Lance of Heorot. Stop them before they lay their filthy hands on the precious artifact!
- Level: 60
- Stability 200 (normal), 400 (empowered)
|
| God Hunter Argentus |
Osprix forces have stolen the Lance of Heorot. Your task is to retrieve it by defeating the God Hunter Argentus.
- Level: 60
- Stability 350 (normal), 800 (empowered)
|
|
The Black Sun
This Timeline takes place in the Ruined Era. In it, the Void has devoured all of humanity, but some other living creatures remain. Osprix, while beaten, have survived in great numbers and they now use the power of the void to push forward their nefarious agenda.
|
| General Info |
Level 66 Difficulty
- How to Unlock: Complete the Fall of the Outcasts
- Maximal Stability: 550
- Minimal Corruption: 0
- Maximal Corruption: 550
Level 100 Difficulty
- How to Unlock: Complete level 90 Timelines (The Last Ruin, The Age of Winter, and Spirits of Fire)
- Maximal Stability: 1600
- Minimal Corruption: 100
- Maximal Corruption: n/a
|
| Timeline Boss |
Rahyeh, the Black Sun
Rahyeh, the Black Sun is the Void god of the Fallen Osprix. As a void god should, He is able to use massive AoE void-based attacks that will sweep you off His arena if you're not careful. Even if His void attacks seem easy to dodge, don't lower your guard as He also has some fire abilities up His sleeve.
|
| Noteworthy Boss Loot |

- Eternal Eclipse (Level 72 Two-Handed Sword) - This is one of the most powerful weapons for a build that mixes Fire and Void damage as it provides substantial bonuses to both (up to +240%!). It also promotes rotating between Fire and Void attacks as it adds powerful effects to both every 2 seconds. On top of that, you'll get +40% Fire and Void resistance from it.

- Dark Shroud of Cinders (Level 66 Body Armour) - This armor can potentially skyrocket your Void Damage. All you need to do to fully utilize it is stack multiple Fire Auras (you'll receive up to +50% Void Damage for every single one). To make things more interesting, Dark Shroud of Cinders can cast a Fire Aura by itself each time you get hit (with a 1-second internal cooldown).
|
| Noteworthy Blessings |
There are multiple powerful Blessings available in this Timeline:
- Echo/Grand Echo of Solarum - Increases Void Resistance
- Shadow/Grand Shadow of the Eclipse - Increases Dodge Rating
- Whisper/Grand Whisper of Orobyss - Increases Void Damage
- Flames/Grand Flames of the Black Sun - Increases Ignite Chance on Hit
- Hunger/Grand Hunger of the Void - Spell Damage Leeched as Health
- Emptiness/Grand Emptiness of Ash - Crit Multiplier
- Thirst/Grand Thirst of the Sun - Increased Leech Rate
- Strength/Grand Strength of the Mountain - Health Gain on Block (especially effective in combination with the Bastion of Honour!)
- Winds/Grand Winds of Oblivion - Increased Critical Strike Chance
|
| Noteworthy Echo Rewards |
- Calamity (Level 7 Helmet) - This Unique Jeweled Circlet is a staple of Ignite Builds. With it, your chance to Ignite enemies is increased by 150% and your fire damage receives a substantial boost as well. If you want to make an Ignite Fireball Sorc, this item is a must-have!

- Bastion of Honour (Level 50 Shield) - This is one of, if not the best, defensive Shields in the entire game. It will greatly increase your survivability and sustain. With it, you'll have a +100% (!) chance to Block nearby enemies and you'll gain up to 14 Health each time you Block an attack (yes, this is as crazy as it sounds).
|
| Quest Echoes |
| The Void has Come |
The Void has devoured all of humanity and the Osprix plan to use it to bring back their god. Fight off the Fallen Osprix and Void Cultists that have descended on the town of Ledria.
- Level: 65
- Stability 50 (normal), 150 (empowered)
|
| Cult of the Black Wing |
The Void has devoured all of humanity and the Osprix plan to use it to bring back their god. Climb the mountain and stop the cultists before they can resurrect their god - Rahyeh, the Black Sun.
- Level: 65
- Stability 200 (normal), 450 (empowered)
|
| The Black Sun |
The Void has devoured all of humanity and the Osprix have managed to bring back their god. Slay Rahyher's new physical body before He gains enough strength to become unstoppable.
- Level: 65
- Stability 350 (normal), 800 (empowered)
|
|
Blood, Frost, and Death
This Timeline takes place in the Imperial Era. In it, armies of the Immortal Empire march to the north to conquer and recruit the Wengari to bolster their ranks. Wengari are split into two rival tribes, you can help only one of them in their fight against the undead tide.
|
| General Info |
Level 70 Difficulty
- How to Unlock: Completed the Stolen Lance
- Maximal Stability: 600
- Minimal Corruption: 0
- Maximal Corruption: 50
Level 100 Difficulty
- How to Unlock: Complete level 90 Timelines (The Last Ruin, The Age of Winter, and Spirits of Fire)
- Maximal Stability: 1600
- Minimal Corruption: 100
- Maximal Corruption: n/a
|
| Timeline Boss |
Formosus the Undying
Formosus the Undying is the leader of the Empire's invading forces who wants to assimilate the Wengari into the Immortal ranks, turning them into mindless undead. He is a powerful Lich with the power to combine necromantic and frost magic, so be prepared to face a lot of adds and slowing mechanics while fighting him.
|
| Noteworthy Boss Loot |

- Eulogy of Blood (Level 83 One-Handed Axe) - This One-Handed Axe will come in handy in any Bleed-based melee build. It not only improves your Bleeds (chance to Bleed, Bleed Duration, and a chance to cast Rip Blood) but also affects your Minions which makes it very interesting indeed.
|
| Noteworthy Blessings |
This timeline offers a range of Wand, Sceptre, Dagger, and Two-Handed Weapons (Staff, Sword, Axe, Mace, Spear, and Bow) Drop Rate-increasing Blessings. If you want to farm for Gear, The Blood, Frost, and Death Blessings will come in handy, otherwise, they are not worth going for.
|
| Noteworthy Echo Rewards |

- Titan Heart (Level 41 Body Armour) - If you like Two-Handed weapons, you'll fall in love with this Body Armour. On top of increasing your Health pool and improving your Melee Damage, it will provide you with a 15% Damage Reduction while you have a Two-Handed Weapon equipped. The downside is that you won't regenerate Health while you have it equipped.

- Valeroot (Level 35 Body Armour) - This Body Armor is a staple of reflect builds. If you like Thorn Shield and reflecting damage back to attackers is your thing, you should definitely add Valeroot to your collection. We realize that it's a rather niche item, but it's also BiS for the specific build it fits in.
|
| Quest Echoes |
| A Brand of Frost / A Pact of Blood |
Immortal Empire is marching into the north to recruit Wengari to support their efforts. Two Wengari Tribes are split as they struggle to hold on against the Empire's attack. Choose one of the Tribes and help it in its struggle against the Immortal Empire.
- Level: 70
- Stability 50 (normal), 150 (empowered)
|
| Vengeance for Heoborea |
Immortal Empire is marching into the north to recruit Wengari to support their efforts. One of the Wangari tribes fell in with the Empire. Protect the other Tribe's home against the assault of their Undead kin.
- Level: 70
- Stability 200 (normal), 450 (empowered)
|
| Blood, Frost, and Death |
Immortal Empire is marching into the north to recruit Wengari to support their efforts. One of the Wangari tribes fell in with the Empire. Venture into the Formosus' Lair and rescue the living Wengari.
- Level: 70
- Stability 400 (normal), 800 (empowered)
|
|
Ending the Storm
This Timeline takes place in the Divine Era. In it, the Osprix forces have managed to thrust deep into the western regions, devastating Deep Harbor, and Etendell. To push them back, Lagon unleashes a storm that will wash away everything and everyone on its path.
|
| General Info |
Level 75 Difficulty
- How to Unlock: Complete The Black Sun and Blood, Frost, and Death
- Maximal Stability: 750
- Minimal Corruption: 0
- Maximal Corruption: 50
Level 100 Difficulty
- How to Unlock: Complete level 90 Timelines (The Last Ruin, The Age of Winter, and Spirits of Fire)
- Maximal Stability: 1700
- Minimal Corruption: 100
- Maximal Corruption: n/a
|
| Timeline Boss |
Lagon
Lagon is Last Epoch's god of the sea, moon, and storms. He rules the western seas and appears as a massive sea giant with a scaly body and great webbed claws. Being a God, he can't really be killed, but he can be stopped and that's what you have to do. The fight against Lagon consists of three phases, so prepare for a lengthy duel.
|
| Noteworthy Boss Loot |

- Stormcarved Testament (Level 78 Relic) - While this Relic looks to be very specialized, it's actually quite universal, because of how it works. It increases Lightning Damage, Lightning Penetration, and Shock Chance for you and your totems, and it may summon you a Storm Totem. Thanks to this, its bonuses are self-contained and fit any build that deals Lightning Damage.

- Eye of Storms (Level 85 Amulet) - This powerful amulet is a staple of Maelstrom builds. If you stack multiple Maelstroms while you have it equipped, your Lightning Damage will skyrocket (it gives up to +8% Lightning Damage per active Maelstrom and has a chance to cast Maelstrom every 5 seconds).
|
| Noteworthy Blessings |
There are multiple powerful Blessings available in this Timeline:
- Bastion/Grand Bastion of Divinity - Increases Lightning Resistance.
- Chaos/Grand Chaos of Lagon - Increases Lightning Damage.
- Might/Grand Might of the Sea Titan - Increases Cold Damage.
- Cruelty/Grand Cruelty of Meruna - Chance to Shock on Hit.
- Mysteries/Grand Mysteries of the Deep - Chance to Shred Lightning Res on Hit.
- Resonance/Grand Resonance of the Sea - Ward per Second.
|
| Noteworthy Echo Rewards |

- Salt the Wound (Level 62 Gloves) - These are dual purpose; they will be effective in two types of Damage over Time builds - Poison and Bleed. Their unique property is that they convert Critical Strike Multiplier to Bleed and Poison Effectiveness. Because of this, they are great for characters that can take a lot of Crit Multiplier from Talents, but what they really need is Bleed and Poison scaling.

- Fighting Chance (Level 15 Gloves) - These simple level 15 gloves are actually extremely powerful, as they not only give you a considerable boost to Melee Damage (up to +75%) but also restore up to 25 of your Health Points each time you slay an enemy. In a build that uses Melee AoE Attacks, they will cover both defense and offense, and they will do it as effectively as some of the higher-level uniques.
|
| Quest Echoes |
| Thetima, the Drowned City |
Lagon is attacked by Osprix forces and was forced to unleash a storm that will destroy His enemies... and His allies alike. Your task is to save survivors in a flooded Thetima that's infested by Merunae.
- Level: 75
- Stability 50 (normal), 150 (empowered)
|
| Storming the Isle |
Lagon is attacked by Osprix forces and was forced to unleash a storm that will destroy His enemies... and His allies alike. Lagon has managed to stop the Osprix invasion. Your task is to find a way to the Lagon's temple.
- Level: 75
- Stability 250 (normal), 500 (empowered)
|
| Ending the Storm |
Lagon is attacked by Osprix forces and was forced to unleash a storm that will destroy His enemies... and His allies alike. You've found Lagon's temple, how you have to defeat Him to end the storm.
- Level: 75
- Stability 450 (normal), 850 (empowered)
|
|
Fall of the Empire
This Timeline takes place in the Ruined Era. In it, the Void descends, overwhelms, and consumes the Immortal Empire. However, with the help of Yulia remnants of the Empire are saved from complete annihilation.
|
| General Info |
Level 80 Difficulty
- How to Unlock: Complete Ending the Storm, and Blood, Frost, and Death
- Maximal Stability: 800
- Minimal Corruption: 0
- Maximal Corruption: 50
Level 100 Difficulty
- How to Unlock: Complete level 90 Timelines (The Last Ruin, The Age of Winter, and Spirits of Fire)
- Maximal Stability: 1700
- Minimal Corruption: 100
- Maximal Corruption: n/a
|
| Timeline Boss |
Harton's Husk
Harton was once an Imperial Admiral. Now, consumed by the Void, he has fallen victim to the everlasting shadowy corruption. All that remains of Him is a Void Husk infused by dark powers. Harton retains some of His sanity, but he can't be reasoned with. He employs a range of Void abilities in combat, so prepare for a difficult fight.
|
| Noteworthy Boss Loot |

- Anchor of Oblivion (Level 80 Relic) - This Relic will fit perfectly in multiple Void Damage-based builds. It not only boosts your Void DPS but also greatly increases your Endurance Threshold which should make you much more resilient. Also, it improves your character's Strength by up to +14, which is very powerful for some builds.

- Bulwark of the Last Abyss (Level 80 Shield) - This Unique Shield will consume a part of your character's vital strength to boost its Void-based powers in return. If you combine it with a lot of Health Leech, you can potentially get constant buffs to your Crit Multiplier and Void Damage from it.
|
| Noteworthy Blessings |
This timeline offers a range of Blessings that increase the drop rate of various types of Affix Shards. If you want to farm for upgrade materials, they might come in handy. Otherwise, they are not worth going for.
|
| Noteworthy Echo Rewards |

- Jungle Queen's Chaps of Holding (Level 14 Belt) - This interesting little belt will fit in a build that utilizes Physical Damage minions and can deal some Physical Damage on its own. If you like "on potion use" effects, it has you covered as well as it increases Dodge Rating by up to +50% on Potion Use.

- Chains of Uleros (Level 32 Belt) - This Unique Belt offers a unique property of making your Potions grant Ward instead of Health. This effect can be highly synergistic in a build that utilizes Ward as its primary defensive tool. It also provides high Necrotic Resistance which may come in handy.
|
| Quest Echoes |
| Immortal Empire's End |
The Void has overwhelmed the Immortal Empire that is now in its final days. Your task is to help Yulia break the Soul Vessels of the hopeless undead before the Void consumes them.
- Level: 80
- Stability 50 (normal), 150 (empowered)
|
| Last March of the Dead |
The Void has overwhelmed the Immortal Empire that is now in its final days. Your task is to intercept the Imperial Caravan that is transporting prisoners to save them from the imperial remnants and the all-consuming Void.
- Level: 80
- Stability 250 (normal), 500 (empowered)
|
| The Ruin of the Dreadnought |
The Void has overwhelmed the Immortal Empire that is now in its final days. Admiral Horton has embraced the Void in a desperate attempt to save His own skin. Your task is to defeat Him on board His Void-infused Dreadnought.
- Level: 80
- Stability 500 (normal), 850 (empowered)
|
|
Reign of Dragons
This Timeline takes place in the Divine Era. In it, Dragons were not exterminated by the gods of Eterra and managed to survive for several thousand years. Desperate humanity, terrorized by rampant Dragons tries to appeal to the gods and convince them to deal with the fiery threat.
|
| General Info |
Level 85 Difficulty
- How to Unlock: Complete Ending the Storm and Fall of the Empire
- Maximal Stability: 900
- Minimal Corruption: 0
- Maximal Corruption: 50
Level 100 Difficulty
- How to Unlock: Complete level 90 Timelines (The Last Ruin, The Age of Winter, and Spirits of Fire)
- Maximal Stability: 1700
- Minimal Corruption: 100
- Maximal Corruption: n/a
|
| Timeline Boss |
Emperor of Corpses
Emperor of Corpses is a mighty Dragon that dwells in the Rotting Hoard. He is one of the few Dragons that have gained necrotic powers. As a result, He can not only scorch you with all-consuming flame but can also raise corpses and use undead magic. When you face Him, be prepared to repel waves of Slaughtered Thralls.
|
| Noteworthy Boss Loot |

- Twisted Heart of Uhkeiros (Level 80 Relic) - This powerful Amulet is a staple of most Necrotic Damage builds. It not only increases the level of your Necrotic spells by +1, but it also gives you another +1 to all of your Spells! Moreover, it converts a portion of your Health into Ward when you cast an Elemental or a Necrotic Spell. This effect works extremely well with Health Leech. If that wasn't enough, it also provides a solid boost to Strength.
|
| Noteworthy Blessings |
There are multiple powerful Blessings available in this Timeline:
- Resolve/Grand Resolve of Humanity - Increases All Resistances.
- Survival/Grand Survival of Might - Increases Critical Avoidance.
- Binds/Grand Binds of Nature - Increases Poison Damage.
- Despair/Grand Despair of Flesh - Increases Necrotic Damage.
- Cruelty/Grand Cruelty of Strength - Increases Physical Damage.
- Hunger/Grand Hunger of Dragons - Melee Damage Leeched as Health.
|
| Noteworthy Echo Rewards |

- Eye of Reen (Level 70 One-Handed Sword) - This Unique Katana will take your Melee Ignite Chance to a whole new level by providing up to a +200% boost to it. Thanks to its high Melee Fire Damage modifier, it will fit perfectly into Fire/Ignite-based Spellblade builds.

- Gladiator's Oath (Level 31 One-Handed Sword) - This specialized Unique Broadsword will greatly improve your Dancing Strikes ability. On top of increasing their AoE, it will also create an area in which Dancing Strikes receive a +100% Crit Chance!

- Death's Embrace (Level 75 Two-Handed Axe) - This Scythe will come in handy if you want to cosplay as a Grim Reaper... jokes aside, it's a powerful weapon that works extremely well with builds that utilize Necrotic Damage. Its Grim Harvest property will let you deal unbelievably high amounts of Damage at the cost of losing up to 36% of your Current Health.

- Aurelis (Level 50 One-Handed Sword) - This powerful One-Handed Sword is a must-have if you plan on creating a Smite build. It can give you up to +2 to both Smite and Multistrike, which is simply amazing. Moreover, it gives you a 100% chance to cast Smite after you use Multistrike on a Boss or a Rare. It works best with Lightning versions of Smite builds as it increases Lightning Damage as well.
|
| Quest Echoes |
| The Burn of Deceit |
The gods have failed to exterminate Dragons. As a result, Dragons continue to terrorize humanity. Your task is to find Heorot inside His temple.
- Level: 85
- Stability 50 (normal), 150 (empowered)
|
| Lair of Storms |
The gods were overthrown by Dragons that now usurp the role of the gods in history. Your task is to find and destroy a clutch of Storm Dragon eggs.
- Level: 85
- Stability 350 (normal), 450 (empowered)
|
| Emperor of Corpses |
The gods were overthrown by Dragons that now usurp the role of the gods in history. They've got corrupted by necrotic powers and now try to create their own reign of the undead. Your task is to stop them by slaying the Emperor of Corpses.
- Level: 85
- Stability 550 (normal), 850 (empowered)
|
|
The Last Ruin
This Timeline takes place in the Ruined Era. In it, the Void runs rampant in the Last Refuge, threatening to end all life on Eterra. To preserve the remains of humanity, the Shard must be found and used to stop the advancing Void.
|
| General Info |
Level 90 Difficulty
- How to Unlock: Complete Reign of Dragons
- Maximal Stability: 1000
- Minimal Corruption: 0
- Maximal Corruption: 50
Level 100 Difficulty
- How to Unlock: Complete level 90 Timelines (The Last Ruin, The Age of Winter, and Spirits of Fire)
- Maximal Stability: 1800
- Minimal Corruption: 100
- Maximal Corruption: n/a
|
| Timeline Boss |
Elder Gaspar
Gaspar is a member of the Elders of the Council and can be found in the Council Chambers and The End of Time. He is a powerful mage, able to cast a variety of devastating spells. He specializes in Void-imbued AoE attacks, so you'll have to be quick on your feet. His encounter consists of just one phase in which He will continue to cast His spells until defeated.
|
| Noteworthy Boss Loot |

- Ravenous Void (Level 91 Gloves) - These amazing Unique Gloves give you Void Barrier, a stacking buff that reduces damage taken by 5% per stack (up to 3 stacks). Stacks are doubled when we are taken below our Endurance threshold, but it comes at a cost of receiving Void Damage over time for 15 seconds after the effect ends. Using these gloves as a main defensive utility tool is often a great idea, but it comes at a cost.

- Sacrificial Embrace (Level 81 Gloves) - These Unique Gloves stop you from dealing any additional damage with Critical Strikes... instead, they grant you stacks of Abyssal Rite when you land a Crit (up to 28% Chance to gain a stack). When you cast an Elemental Spell, all stacks are consumed and each one grants the spell +10 Spell Void Damage and +10% Void Penetration. This effect is quite hard to utilize but very powerful. Also, Sacrificial Embrace increases your Void Damage by up to +128%.
|
| Noteworthy Blessings |
This timeline offers a range of Blessings that increase the drop rate of various types of Item Shards (Shield, Helmet, Body Armor, Class-Specific, Gloves, Off-Hand, and Skill). If you want to farm for upgrade materials, they might come in handy. Otherwise, they are not worth going for.
|
| Noteworthy Echo Rewards |

- Valdyr's Chalice (Level 64 Relic) - This powerful Relic not only increases the effectiveness of your Bleed Effects but also allows you to Leech Health from your Bleeding DoTs. If you're looking for a single item that would make your Bleed-based build more powerful defensively and offensively, look no further.

- Soulfire (Level 34 Relic) - This Grave Lantern changes how the Hungering Souls work, effectively converting them into an Igniting Fiery Spell. With it, you can create an Ignite Hungering Souls Acolyte that will scorch His enemies instead of making them decay with his usual necrotic powers.
|
| Quest Echoes |
| Fall of Last Refuge |
The Shard that protected the Last Refuge was lost. Without it, there was nothing to stop the Void from invading and ravaging the city, leaving just a few survivors. Your task is to help the survivors.
- Level: 90
- Stability 50 (normal), 150 (empowered)
|
| Erza's Last Stand |
The Last Refuge has fallen to the Void. Elder Gaspar has barricaded himself in the Council Chambers and destroyed all of its entrances. Reach Him.
- Level: 90
- Stability 300 (normal), 500 (empowered)
|
| The Chambers of Ruin |
The Last Refuge has fallen to the Void and Elder Gaspar has lost all hope and betrayed the survivors. Defeat Him, liberate him from his nightmare, and save Last Refuge.
- Level: 90
- Stability 650 (normal), 900 (empowered)
|
|
The Age of Winter
This Timeline takes place in the Divine Era. In it, the clash between Heorot and Rahyeh went very differently than in the main timeline, as Rahyeh was slain by Heorot. With His arch-enemy gone, Heorot is free to unleash a never-ending snowstorm on the world, challenging the other gods' rule.
|
| General Info |
Level 90 Difficulty
- How to Unlock: Complete Reign of Dragons
- Maximal Stability: 1000
- Minimal Corruption: 0
- Maximal Corruption: 50
Level 100 Difficulty
- How to Unlock: Complete level 90 Timelines (The Last Ruin, The Age of Winter, and Spirits of Fire)
- Maximal Stability: 1800
- Minimal Corruption: 100
- Maximal Corruption: n/a
|
| Timeline Boss |
Heorot
Heorot is the god of winter, cold, and the north, and the master of tundra wanderers. He appears as a massive elk with a frozen-over mane, made of the purest crystals of ice. While kind and protective in nature, He must be stopped or Eterra will fall into an endless winter.
|
| Noteworthy Boss Loot |

- Reign of Winter (Level 70 Rogue-exclusive Bow) - This bow offers an amazing bonus to Bow and Spell Cold Damage as well as some Cold Penetration, Attunement, and a good chance to cast Icicle on Bow Hit. If built around, it offers a fun and very chill experience (pun intended).

- Yulia's Path (Level 79 Boots) - If you'd like to make your Summon Beastmaster a bit more... Necromantish, these boots will definitely come in handy. They will convert your Maelstrom's Damage to Necrotic and give your minions +2 to +4 melee necrotic damage each time a Maelstrom is cast (from any source!), for the maximum duration of the Maelstrom.
|
| Noteworthy Blessings |
There are multiple powerful Blessings available in this Timeline:
- Resolve/Grand Resolve of Grael - Increases Physical Resistance.
- Vigor/Grand Vigor of Jormun - Increases Endurance Threshold
- Fury/Grand Fury of the North - Chance to Shred Physical Resistance on Hit.
- Rage/Grand Rage of Winter - Chance to Shred Cold Resistance on Hit.
- Bones/Grand Bones of Eternity - Increases Block Effectiveness.
- Bulwark/Grand Bulwark of the Tundra - Increases Armor by Percentage.
|
| Noteworthy Echo Rewards |

- Sunwreath (Level 21 Ring) - This unbelievably strong Unique Ring turns Flame Reave's AoE into a Nova that hits everything around you! Moreover, it provides a high increase to your Fire Damage and increases Flame Reave's Mana Cost (which can be turned into a benefit if the proper passives are chosen). If you want to try the Flame Reave Spellblade build, this ring is a must-have.

- Bleeding Heart (Level 4 Amulet) - This Amulet will take your Health Leeching capabilities to a whole new level. It's so powerful that it simply can't be skipped in a build that takes Leech seriously. It works best with builds that offer high AoE damage output.

- Devotion (Level 71 Amulet) - This amazing Unique Amulet increases your Cast Speed with Smite by 1% per 2% Missing Mana and adds +1 Adaptive Spell Damage with Smite per 5 Missing Mana. If you want your Smite Paladin to feel powerful, you simply have to use it. Just remember to always stay on the brink of running out of mana.
|
| Quest Echoes |
| The Frozen Dissident |
Rahyeh was slain by Heorot. With His enemy gone, Heorot has unleashed an unending winter on the world and now marches to overthrow His remaining rivals.
- Level: 90
- Stability 50 (normal), 150 (empowered)
|
| Grael's Assault |
Rahyeh was slain by Heorot. Grael has led an army of Heoborean warriors to Thetima under Heorot’s orders, leaving nothing but destruction in his wake. You must stop them at all costs.
- Level: 90
- Stability 350 (normal), 550 (empowered)
|
| Heorot |
Rahyeh has been slain by Heorot. After dealing with His enemy, Heorot brought destruction to the people of Solarum, coating the world in ice. He must be stopped!
- Level: 90
- Stability 650 (normal), 900 (empowered)
|
|
Spirits of Fire
This Timeline takes place in the Imperial Era. In it, a cabal of necromancers runs rampant, bringing death and destruction to all of Eterra. The Immortal Shamans want to eradicate all life, and they will succeed unless you stop them!
|
| General Info |
Level 90 Difficulty
- How to Unlock: Complete Reign of Dragons
- Maximal Stability: 1000
- Minimal Corruption: 0
- Maximal Corruption: 50
Level 100 Difficulty
- How to Unlock: Complete level 90 Timelines (The Last Ruin, The Age of Winter, and Spirits of Fire)
- Maximal Stability: 1800
- Minimal Corruption: 100
- Maximal Corruption: n/a
|
| Timeline Boss |
Immortal Shamans
Immortal Shamans are a band of three powerful Necromancers who have joined together to unleash devastation on Eterra. They wield powerful fire magic and will continue to fight after being slain for as long as at least one of them remains alive, so beware.
|
| Noteworthy Boss Loot |

- Logi's Hunger (Level 82 Amulet) - This powerful amulet will come in handy in any build that deals fire damage. It offers an amazing bonus to Leech Rate and gives up to 8% Fire Damage Leech on Crit. If you're looking for something that will improve the survivability of your glass-cannon fire builds, this is it.

- Trinity of Flames (Level 1 Adorned idol) - This handy little idol has a unique property of making every 3rd fire spell you cast a guaranteed Critical Strike at the cost of lowering its Crit Multiplier by 36%. With this, you can forgo Crit Chance and invest everything into Crit Multiplier, as doing so will outweigh the drawback and you'll know exactly when you'll land a Crit.
|
| Noteworthy Blessings |
There are multiple powerful Blessings available in this Timeline:
- Body/Grand Body of Obsidian - Increases Armor by a set amount.
- Embers/Grand Embers of Immortality - Increases Endurance.
- Swiftness/Grand Swiftness of Logi - Increases Dodge Rating.
- Spirit/Grand Spirit of Command - Increases Minion Damage.
- Flames/Grand Flames of Calamity - Increases Fire Damage.
|
| Noteworthy Echo Rewards |

- Lessons of the Metropolis (Level 1 Boots) - These well-rounded boots will considerably increase your survivability by offering you a significant boost to Dodge Rating. If you can take a Hit, they'll work even better as they give up to a +300 Dodge Rating if you've been hit recently.

- Fiery Dragon Shoes (Level 67 Boots) - These incredible Unique Boots not only increase your survivability by making you take much less Damage from Critical Strikes but also synergize extremely well with Ignite-related items and effects.
|
| Quest Echoes |
| The Flame-scarred City |
Immortal Shamans rule the world with fire and necromantic powers. They've brought destruction to Maj’elka and won't stop until the whole of Eterra burns unless someone interrupts them.
- Level: 90
- Stability 50 (normal), 150 (empowered)
|
| Lair of Storms |
Immortal Shamans rule the world with fire and necromantic powers. They have ordered their minions to perform an apocalyptic ritual. You must stop them before the ritual is concluded.
- Level: 90
- Stability 350 (normal), 450 (empowered)
|
| Shamans of the Eruption |
Bhuldar, Herkir, and Logi, known as Immortal Shamans, stand atop the caldera and their world-shattering ritual is nearly complete. Slay them before it's too late!
- Level: 90
- Stability 650 (normal), 900 (empowered)
|
|
END NOTE
If you've found this guide helpful and informative, don't hesitate to leave a comment below, it will motivate us to continue our work. If you have a question regarding a part of the guide, or if something is unclear, please let us know and we'll do our best to answer it! Also, please note that this is an early version of our guide, and we will be happy to receive constructive criticism, that will help us improve it, so leave your suggestions in the comments section below.
|
Pictures used in this article are the intellectual property of Eleventh Hour Games