Forbidden Rite Totem
Hierophant Build
Updated for Patch 3.15
The Best Crafty Guides by Odealo
Estimated budget: medium

| Guide notes |
July 29, 2021
-Build created
July 31, 2021
-Added gameplay video |
Forbidden Rite is a newly added Chaos Spell that fires multiple projectiles at nearby enemies. It consumes a portion of your Maximum Life and Energy Shield to increase its' base damage. While it could normally kill you, if you use Totems, the damage will be increased at the cost of your Totem's Life instead. This combination offers insanely high Chaos Damage while negating the Forbidden Rite's downside. Also, since Forbidden Rite deals its damage with Hits, you can further increase it by Critical Strikes. This Hierophant setup offers not only very high damage from summoning up to 7 Totems but also very strong defenses. You are going to utilize Mine over Matter and Agnostic Passives. Mine over Matter reduces damage taken from Hits greatly and Agnostic quickly regenerates your missing Life. It's all possible thanks to Hierophant Ascendancy and Mana/Mana Regeneration Passives that you are going to allocate on your Passive Tree.
This build also utilizes the popular Soul Mantle armor that grants you an extra 7th link. It will also apply Curses to your character, but by using two Kikazaru Rings with caster Catalysts, the effect of the Curses will be reduced by 96%. Thanks to that, and plenty of Curses active on you at all times, you will be able to use Self-flagellation Unique Jewel that will greatly boost your damage.
You can also check our other Path of Exile builds right over here Odealo's Crafty Guides - Full List
1. Gameplay
This is a beginner-friendly Totem build that basically uses two active Skills on top of mobility Skills. You are going to summon up to 7 Spell Totems (assuming you have the Shield and Soul Mantle) and channel Wither yourself to apply powerful debuffs on enemies that will increase Chaos Damage they take from other sources (basically your Totems). You will be also using Flame Dash to travel faster, and possible Shield Charge with Fortify to buff your defenses - but that's completely optional, decide for yourself if you need it. All other Skills will be triggered automatically or almost automatically and include Despair Curse, Immortal Call, Withering Step, Tempest Shield, and Steelskin (assuming you place it under your left-mouse button slot which makes it feel like a triggered spell or link it with Cast when Damage Taken or Cast when Stunned Support). It all makes it an exceptionally easy build to play and progress with.
|
This video was recorded on a level 92 Hierophant. The exact gear can be found in the POB link below. This build offered very good DPS, clear speed, and felt very tanky with nearly 3,000 Unreserved Mana for the Agnostic and MoM Passives. Overall, this is the best build we played in 3.15 and we can definitely recommend it for both League Start and end-game
|
|
 
Odealo is a secure trading platform for MMO gamers. Here you can buy, sell, and trade PoE Currency for real cash.
|
2. Build's PROS & CONS
| PROS |
- good single target and AoE
- amazing clear speed thanks to multiple Totems firing tons of projectiles at enemies
- excellent defenses due Mind over Matter and Agnostic Passive
- can do most Map mods
|
| CONS |
- Totem playstyle does not fit everyone
- can't do No Regen/Reduced Regen Maps
|
3. Leveling tips
Leveling with Totems is exceptionally easy. For the first 16 levels until Forbidden Rite becomes available you can play with Holy Flame Totems and Freezing Pulse (or basically any combination of Spells that fits you, content should be easy enough for anything you face it with). At level 16 you should start using Forbidden Rite Totems, and since Multiple Totems aren't available that early, just rush for Ancestral Bond Passive on your Tree.
Suggested leveling Gem setups:
| Holy Flame Totem setup |
 |
Holy Flame Totem - you can use Holy Flame Totems for the first 16 levels. It's one of the first Totem skills available in the game that deals solid Physical Damage with extra Fire conversion |
 |
Infused Channeling Support - one of the best Support Gems for Channeling Skills. |
 |
Added Fire Damage Support - adds more Fire Damage to your totems |
| Forbidden Rite Totems setup |
 |
Forbidden Rite Totems - the main source of damage in this build. Because of the high amount of Life it consumes, it should be used solely with Totems (at least in the following setup) |
 |
Spell Totem Support - allows you to create Totems that will cast Forbidden Rite for you |
 |
Void Manipulation Support - one of the core Support Gems for this purely Chaos DPS build |
 |
Lesser Multiple Projectiles - increases the number of Forbidden Rite's projectiles. At higher levels, you can replace it with  Greater Multiple Projectiles for better effect Greater Multiple Projectiles for better effect |
| Wither setup |
 |
Wither - a channeled Spell that applies a powerful stacking debuff to enemies affected |
 |
Faster Casting Support - allows you to apply Withered debuff quicker on enemies |
| Flame Dash/Despair setup |
 |
Despair - the best Curse for this build. On lower levels can be cast manually against Bosses for extra damage |
 |
Arcane Surge Support - a buff that grants Spell Damage, Cast Speed, and Mana Regeneration. Keep it at a low level so that it's triggered after each one/two casts of linked Spells |
 |
Flame Dash - your main Mobility Skill, one of the best in the game. It offers instant travel to the targeted location but has a cooldown |
| Utility Gems |
 |
Clarity - core Aura for this build which grants a high Mana Regeneration bonus |
Bandits:
Help Alira - you'll be rewarded with Mana Regeneration, Critical Strike Multiplier, and Elemental Resistances
Leveling Skill Trees:
34 Points Skill Tree
Priorities: 1) Retribution 2) Discipline and Training 3) Quick Recovery 4) Ancestral Bond
62 Points Skill Tree
Priorities: 1) Constitution 2) Cruel Preparation 3) Annihilation 4) Heart and Soul
Important: Do not take MoM until you're able to sustain Mana
Recommended leveling items:
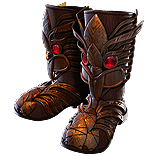
 Victario's Flight - a great leveling pair of Boots that grant high bonus Movement Speed and additional Mana Recovery mechanic Victario's Flight - a great leveling pair of Boots that grant high bonus Movement Speed and additional Mana Recovery mechanic |
+15 to Dexterity
+15 to Intelligence
(100-150)% increased Evasion Rating
15% increased Movement Speed
(5-10)% of Damage taken gained as Mana over 4 seconds when Hit
10% increased Movement Speed for you and nearby Allies |
 Le Heup of All - great leveling Ring, the stats it provides are much needed during leveling Le Heup of All - great leveling Ring, the stats it provides are much needed during leveling |
(10-30)% increased Damage
+(10-30) to all Attributes
(10-30)% increased Rarity of Items found
+(10-30)% to all Elemental Resistances |
 Goldrim - best unique leveling Helmet you can get, mainly due to Elemental Resistances it provides Goldrim - best unique leveling Helmet you can get, mainly due to Elemental Resistances it provides |
+(30-50) to Evasion Rating
10% increased Rarity of Items found
+(30-40)% to all Elemental Resistances
Reflects 4 Physical Damage to Melee Attackers
Level Requirement reduced by 100 (Hidden) |
 Tabula Rasa - 6-linked Body Armour you can use as soon as level 1. It costs around 1 Divine Orb which is really affordable Tabula Rasa - 6-linked Body Armour you can use as soon as level 1. It costs around 1 Divine Orb which is really affordable |
Item has no level requirement and Energy Shield (Hidden)
Item has 6 White Sockets and is fully linked (Hidden) |
|
 Trolltimber Spire - cheap but powerful Shield for leveling your Totem builds. Greatly Increases your survivability Trolltimber Spire - cheap but powerful Shield for leveling your Totem builds. Greatly Increases your survivability
|
(130-150)% increased Armour
+(40-60) to maximum Life
0.5% of Life Regenerated per second
15% increased Area of Effect for Skills used by Totems
0.5% of Damage dealt by your Totems is Leeched to you as Life |
4. Final Skill tree, Ascendancy Points, and Pantheon
Final Skill Tree:
114 Points Final Skill Tree (doesn't include Cluster Jewels Passives)
114 Points Path of Building(PoB) link
Ascendancy points:
Preferably in that order:
- Pursuit of Faith
- Ritual of Awakening
- Conviction of Power
- Divine Guidance
Pantheon:
Major God: Soul of the Brine King 1% additional Physical Damage Reduction for each nearby Enemy, up to 8%; 1% increased Movement Speed for each nearby Enemy, up to 8%
Minor God: Soul of Gruthkul 1% additional Physical Damage Reduction for each Hit you've taken Recently up to a maximum of 5%
5. Final Gems links
[DPS] Forbidden Rite Totem setup
(socketed in Soul Mantle) |
|
Forbidden Rite - the primary Spell used in this build. It has increased base damage based on the caster's Life which in this case will be your Spell Totems, which you should have a total of 7 |
|
Spell Totem Support - allows you to create Totems that will cast linked Spells. In this case, Forbidden Rate. This Gem should be granted by Soul Mantle, allowing you to use an extra Support Gem |
 |
Multiple Totems Support - increases your maximum number of Totems by two and allows you to summon two Totems with each cast |
|
Void Manipulation Support - increases Chaos Damage significantly but makes supported Spells deal no Elemental Damage |
 |
Increased Critical Strikes Support - increases the Crit. Chance of linked skills |
 |
Greater Multiple Projectiles Support - increases the number of Forbidden Rite's projectiles. You can also replace it with  Greater Volley Support which has a similar effect but offers an alternative Projectile "AI" Greater Volley Support which has a similar effect but offers an alternative Projectile "AI" |
 |
Increased Critical Damage Support - increases Crit. Multiplier of linked Skills |
| [UTILITY] Wither setup |
|
Wither - a channeling ability that applies Withered debuff on enemies that can stack up to 15 times. It increases your Chaos Damage and grants additional bonuses thanks to the Support Gems used |
 |
Infused Channelling Support - after channeling Wither you will deal increased Chaos Damage but also take reduced damage from the sources that match your Wither Gem tags |
|
Faster Casting Support - increases the Cast Speed, allowing you to apply Withered stacks faster |
 |
Increased Duration Support - increases the duration of your Wither debuffs |
| [UTILITY] Flame Dash/Shield Charge |
|
Flame Dash - main mobility skill for faster movement through Maps. It's instant and can be used up to three times in rapid succession |
 |
Shield Slam - a secondary mobility skill that is slower than Flame Dash but has no cooldown. It will also grant you the Fortify buff, and apply Curse via a Ring affix, so you should use it commonly against tougher enemies |
 |
Faster Attacks Support - increases the Movement Speed of Shield Charge |
 |
Fortify Support - grants you the Fortify buff on Hits with Shield Charge that reduces all your damage taken |
| [UTILITY] Steelskin/Withering Step |
 |
Steelskin - the best Guard Skill for this build that grants a protective shield that absorbs some of the incoming damage |
 |
Cast when Damage Taken Support - will cast Withering Step for you. Keep it at level 1 |
 |
Withering Step - applies Withered debuff to nearby enemies and grants you Elusive for extra Dodge. Do not upgrade it above level 8 |
 |
Increased Duration Support - increases the duration of Immortal Call effect |
| [UTILITY] Auras |
|
Clarity - increases your Mana Regeneration Rate which is essential for all Agnostic builds |
 |
Summon Skitterbots - summons two invincible Minions that Chill and Shock nearby enemies, boosting your damage and survivability |
 |
Enlighten Support - reduces Mana Reservation cost of linked Auras |
[UTILITY] Curse/Tempest Shield
(socketed in your "trigger" Wand) |
|
Despair - in most cases, Despair is the best Curse to use, but Sniper's Mark would also work here if you have enough Dexterity |
 |
Tempest Shield - boosts your chance to Block slightly, which is a good addition to this build's defenses |
|
Arcane Surge Support - since triggered Spells now cost Mana, you can use that for your benefit and have such Spells grant you a nearly permanent Arcane Surge buff. Just keep this Support Gem at level 9 so that it's triggered every time your Wand casts linked Spells |
|
On Odealo dozens of sellers compete for your attention. Buying PoE Currency here guarantees the best prices, prompt delivery and the best quality of service.
|
5. Gear Setup
Below you will find all the recommended and required gear for this build. This build is a great League Starter so it can be used with a set of random Rares, but getting two Kikazaru Rings, Self-Flagellation, and Soul Mantle allows you to insanely boost your DPS at a very reasonable cost. These are the three most heavily recommended Uniques that we suggest using when transitioning into red Maps and end-game.
Our recommended items will:
- Cap your resistances
- Give you enough DPS/Life to start mapping successfully
|
Stat priorities on items:
- Life
- Elemental Resistances
- Maximum Mana
- Chaos Spell Damage
- Critical Strike Multiplier
- Critical Strike Chance
- Mana Regeneration Rate
|
 (Helmet) Rare Helmet - a Rare Helmet with Life/Mana and Resistances is the best option. Later on, you can invest into influenced modifiers like Added Chaos Damage to Spells, Crit. Multiplier, or Chaos Resistance reduction for nearby enemies (Helmet) Rare Helmet - a Rare Helmet with Life/Mana and Resistances is the best option. Later on, you can invest into influenced modifiers like Added Chaos Damage to Spells, Crit. Multiplier, or Chaos Resistance reduction for nearby enemies |
Min. requirements:
70 Maximum Life
60 Maximum Mana
60% Total Elemental Resistances
Optional affixes:
Global Critical Strike Multiplier
Added Chaos Damage to Spells
Nearby enemies have -#% Chaos Resistance |
Helmet enchantments:
#% Increased Forbidden Rite Damage
Withering Step inflicts 3 additional Withered Debuffs |
 (Weapon) Rare Wands - aim for extra Mana and Spell Damage/Spell Crit. bonuses. You are also looking to get it to trigger linked Spells (Weapon) Rare Wands - aim for extra Mana and Spell Damage/Spell Crit. bonuses. You are also looking to get it to trigger linked Spells |
|
Min. requirements:
60% Increased Spell Damage
150 Maximum Mana
Trigger a Socketed Spell when you Use a Skill, with a 8 second Cooldown and 150% more Cost
Optional affixes:
Increased Cast Speed
Global Critical Strike Multiplier
Spell Critical Strike Chance
+1 to Level of all Chaos Spell Skill Gems
|
 (Shield) Rare Shield - just aim for high defensive stats, extra Mana, and some Spell Damage. You can also get the mod here that allows you to summon an extra Totem (Shield) Rare Shield - just aim for high defensive stats, extra Mana, and some Spell Damage. You can also get the mod here that allows you to summon an extra Totem |
Min. requirements:
70 Maximum Life
50 Maximum Mana
+1 to maximum number of Summoned Totems
Optional affixes:
Increased Spell Damage
Spell Critical Strike Chance
+1 to Level of all Chaos Spell Skill Gems
Elemental Resistances |
 (Body Armour) Soul Mantle - the BiS Body Armour. Gives you more Spell Damage, Totem Life, Maximum Number of Totems, Energy Shield, and most importantly - Level 20 Spell Totem Support Gem. You are also going to use two Kikazaru's Rings to negate the downside (Body Armour) Soul Mantle - the BiS Body Armour. Gives you more Spell Damage, Totem Life, Maximum Number of Totems, Energy Shield, and most importantly - Level 20 Spell Totem Support Gem. You are also going to use two Kikazaru's Rings to negate the downside |
Socketed Gems are Supported by Level 20 Spell Totem
(20-25)% increased Spell Damage
(100-120)% increased Energy Shield
50% increased Totem Life
+1 to maximum number of Summoned Totems
Inflicts a random Hex on you when your Totems die, with 80% more Effect |
 (Body Armour) Rare Body Armour - initially, you can simply use any Body Armour with Life and Maximum Mana bonuses (Body Armour) Rare Body Armour - initially, you can simply use any Body Armour with Life and Maximum Mana bonuses |
Min. requirements:
90 Maximum Life
60 Maximum Mana
Optional affixes:
Elemental Resistances
Attributes
Chance to avoid getting Stunned/Ailments |
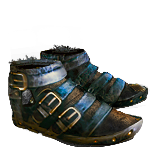
 (Boots) Torchoak Step - the best pair of boots for this build. They increase the maximum Life of your Totems, increasing the base damage of Forbidden Rite (Boots) Torchoak Step - the best pair of boots for this build. They increase the maximum Life of your Totems, increasing the base damage of Forbidden Rite |
(80-120)% increased Armour
(30-50)% increased Totem Life
25% increased Movement Speed
(30-50)% increased Totem Placement speed
Totems Reflect 25% of their maximum Life as Fire Damage to nearby Enemies when Hit |
Boot enchantment:
16% increased Attack and Cast Speed if you've Killed Recently
70% increased Mana Regeneration Rate if you've cast a Spell Recently |
 (Gloves) Rare Gloves - Gloves and Boots should provide the most Maximum Life and Elemental Resistances in this build, focus on these stats (Gloves) Rare Gloves - Gloves and Boots should provide the most Maximum Life and Elemental Resistances in this build, focus on these stats |
Min. requirements:
70 maximum Life
60 maximum Mana
60% Total Elemental Resistances
Optional affixes:
Spell Damage
increased Critical Strike Chance against Shocked Enemies |
 (Belt) Rare Belt - again, Life/Mana/Resistances is the core. Try getting a Stygian Vise for the extra Abyssal Jewel (Belt) Rare Belt - again, Life/Mana/Resistances is the core. Try getting a Stygian Vise for the extra Abyssal Jewel |
Min. requirements:
70 maximum Life
60 maximum Mana
60% Total Elemental Resistances
Optional affixes:
Spell Damage
increased Critical Strike Chance against Shocked Enemies |
 (Amulet) Rare Amulet - should provide high Mana bonuses and extra Life. Other than that you can look for some DPS-oriented affixes like Crit Chance and Multiplier (Amulet) Rare Amulet - should provide high Mana bonuses and extra Life. Other than that you can look for some DPS-oriented affixes like Crit Chance and Multiplier |
Min. requirements:
70 maximum Life
60 maximum Mana
10% maximum Mana
Optional affixes:
Mana Regeneration Rate
Attributes
Critical Strike Multiplier |
Recommended Anointments:
Ironwood |
 (Ring) Kikazaru - if you are using Soul Mantle, you will need two Kikazaru Rings, preferably with Caster Catalysts to further reduce the effectiveness of Curses on you. Otherwise, just use random Rares with Life/Mana/Resistances (Ring) Kikazaru - if you are using Soul Mantle, you will need two Kikazaru Rings, preferably with Caster Catalysts to further reduce the effectiveness of Curses on you. Otherwise, just use random Rares with Life/Mana/Resistances |
+(20-30)% to Lightning Resistance
+(10-15) to all Attributes
(20-40)% increased Mana Regeneration Rate
40% reduced Effect of Curses on you
Regenerate 1 Life per second per Level |
 (Jewel) Rare Jewels - look for extra Life, Crit. Multiplier and plenty of damage mods that are available on those like Crit. Chance, Cast Speed, Chaos Spell damage etc. (Jewel) Rare Jewels - look for extra Life, Crit. Multiplier and plenty of damage mods that are available on those like Crit. Chance, Cast Speed, Chaos Spell damage etc. |
Recommended affixes:
Maximum Life
Global Critical Strike Multiplier
Spell/Chaos Damage
Optional affixes:
Cast Speed
Global Critical Strike Chance |
 (Jewel) Abyss Jewels - look for similar stats as in standard Jewels. You can also grab added Chaos Damage to Spells in here (Jewel) Abyss Jewels - look for similar stats as in standard Jewels. You can also grab added Chaos Damage to Spells in here |
Recommended affixes:
Maximum Life
Global Critical Strike Multiplier
Added Chaos Damage to Spells
Optional affixes:
Elemental Resistances
Increased damage if you've killed recently |
 (Jewel) Self-Flagellation - a mandatory Jewel if you are using Soul Mantle and Kikazaru Rings. It grants tons of extra damage for a very little cost (Jewel) Self-Flagellation - a mandatory Jewel if you are using Soul Mantle and Kikazaru Rings. It grants tons of extra damage for a very little cost |
(10-20)% increased Damage per Curse on you
An additional Curse can be applied to you |
 (Jewel) Large Cluster Jewel - it's highly recommended to use one Large Cluster Jewel with bonuses to Chaos Damage. The most important Passive is Touch of Cruelty that Hinders enemies and increases Chaos Damage taken by them (Jewel) Large Cluster Jewel - it's highly recommended to use one Large Cluster Jewel with bonuses to Chaos Damage. The most important Passive is Touch of Cruelty that Hinders enemies and increases Chaos Damage taken by them |
Recommended affixes:
1 Added Passive Skill is Touch of Cruelty
1 Added Passive Skill is Unholy Grace
1 Added Passive Skill is Wicked Pall |
 (Jewel) Medium Cluster Jewel - you should use two Medium Cluster Jewels that will increase your Totem's maximum Life. Also, you can grab one Sleepless Sentries Passive to gain Onslaught buff (Jewel) Medium Cluster Jewel - you should use two Medium Cluster Jewels that will increase your Totem's maximum Life. Also, you can grab one Sleepless Sentries Passive to gain Onslaught buff |
Recommended affixes:
1 Added Passive Skill is Ancestral Might
1 Added Passive Skill is Ancestral Preservation (preferably on both Jewels)
1 Added Passive Skill is Sleepless Sentries |
 (Flask) Bottled Faith - one of the best Utility Flasks in the game. It increases your Damage and Critical Strike Chance against enemies on Consecrated Ground (Flask) Bottled Faith - one of the best Utility Flasks in the game. It increases your Damage and Critical Strike Chance against enemies on Consecrated Ground |
Creates Consecrated Ground on Use
(20-40)% increased Duration
Consecrated Ground created by this Flask has Tripled Radius
(100-150)% increased Critical Strike Chance against Enemies on Consecrated Ground during Effect
Consecrated Ground created during Effect applies (7-10)% increased Damage taken to Enemies |
|
Other suggested Flasks:
- Seething Divine Life Flask of Staunching (immunity to Bleed)
- Enduring Eternal Mana Flask of Dousing (Ignite removal)
- Ample Diamond Flask of Heat (Freeze immunity)
- Experimenter's Quicksilver Flask of Adrenaline (increased mobility)
|
     |
|
Odealo is one of the biggest Path of Exile marketplaces. It allows regular players to buy, sell, and trade PoE Currency with the use of real cash.
|
If you have any other build requests please leave that in the comments below. We are always open to suggestions and constructive feedback.
Pictures used in this article are the intellectual property of Grinding Gear Games.