Tarkov Beginner's Guide - How to start playing EFT
Most comprehensive Beginner's Guide for Escape from TarkovEscape from Tarkov
Ultimate Beginner's Guide
Settings, Controls, Stash, Hideout, Traders, Bartering, Health System, Meds, Ammo, Weapon Modding, Gear, and more
Introduction
Escape from Tarkov is not a beginner-friendly game, it is not a friendly game at all, in fact. After watching some videos and reading a few articles, you might expect a rough start, but you most likely don't realize HOW rough. This is why we have decided to compile all the information, that is important from the beginner's perspective, and share it with you. This will be a long read, but there is A LOT to learn and comprehend...
| Settings | |
|
Graphics Finding a good balance between the looks and the performance is essential if you want Tarkov to run at high FPS values and still look good. Here is a short explanation of all graphics settings available in the game, together with some recommendations that should help you find an optimal configuration. Note: If you want to know more about these settings and about how they affect performance, check out our comprehensive EfT Graphics Settings guide, HERE. |
|
| Resolution |
Resolution is the number of distinct pixels, that can be displayed on a monitor, in each dimension. Our Recommendation: This should be always set to your monitor's native value. |
| Aspect Ratio |
The Aspect Ratio is a proportion of the displayed image's width to its height. Our Recommendation: This should be always set to your monitor's native value. |
| Screen Mode |
There are three Screen Modes available in Tarkov; Fullscreen, Windowed, and Windowed Borderless. The latter option is "the best of both worlds" as it offers almost as much freedom as Windowed mode while also taking up full screen which allows you to focus on the game. Our Recommendation: Windowed Borderless, unless you have severe performance issues with the game. |
| VSync |
VSync synchronizes the frame rate of a game with your monitor's refresh rate to prevent screen tearing, but it may cause input lag or, in more extreme cases, cap your FPS at a very low value. Our Recommendation: Turn it off, it causes more problems than it solves. |
| Overall Graphics Quality |
This gives you a bunch of graphics presets that allow you to easily match the game's graphics settings to your PC's capabilities. Our Recommendation: No real need to fiddle with this, as you will adjust every single setting manually anyway. If you want to adjust Graphics quickly, then match this with your PC's strength. |
| Texture Quality |
This changes the resolution of the game's textures. The difference is seen mainly when you are very close to an object (like a brick wall, for example); Low Texture Quality can make the game look bad in confined spaces. Our Recommendation: Put this on High, unless you want to squeeze that few extra FPS at the cost of greatly decreasing the graphical fidelity of the game. |
| Shadows Quality |
Lowering this setting will make shadows look less sharp and fuzzy. The smaller and more complicated the shadow, the more difference will this setting make when changed from Low to High. Our Recommendation: Put this on Low for the best performance, unless your graphics card can handle it. |
| Object LOD Quality |
This determines how the complexity, resolution, and quality of 3D models change with their distance to the player. Object LOD Quality improves rendering efficiency by decreasing the strain that the game's graphics put on the GPU - take advantage of this. Our Recommendation: Put this on 2, which is the lowest possible - it will give you up to 20 extra frames. |
| Overall Visibility |
This determines the distance at which objects, players, and terrain features start to render on your screen. Increasing your Overall Visibility will force your PC to render objects (and Players) that are really far away. This is not as good as it sounds as maps aren't flat and you can't see through terrain and buildings. Our Recommendation: Set this to 400 and increase to 1000 for very open maps if your PC can handle it. Even when you're sniping, you most likely won't engage people that are further away than 400 meters. |
| Shadows Visibility |
This determines at what distance shadows cast by objects, players, and terrain features start to disappear. Increasing this boosts the game's immersion, but the performance cost is pretty high. Our Recommendation: Set this to 40 (minimum value) to increase your framerate by a bit. Most of the time, you don't focus on objects that are more than 40 meters from you, so you will not notice the lack of shadows. |
| Antialiasing |
This setting determines how well the jagged edges (caused bt the fact that pixels are square in shape) on rendered objects are smoothed out. Our Recommendation: Put this on FXAA as it actually increases your framerate when compared to having this turned on (Tarkov's graphics for you... this effect is most likely caused by the number of sharp edges on the grass). |
| Resampling |
This setting changes the resolution of 3D textures depending on their distance to the actor. Supersampling increases the number of pixels and Downsampling reduces it. Resampling has the highest performance impact of all Tarkov's graphics settings. Our Recommendation: Put this to "1x off"; even the strongest graphics cards will struggle with 4x supersampling (expect to lose over 50 FPS... really). |
| HBAO |
This is is a rendering and shading technology used in ambient lighting calculations. It determines how rendered objects are exposed to ambient lighting (HBAO stands for Horizon-Based Ambient Occlusion). This, basically, makes dark areas look even darker. Our Recommendation: Turn this off, as it may substantially decrease your framerate in dark, enclosed areas (and it will make spotting enemies in such areas harder). |
| SSR |
This is q post-processing technology that utilizes screen space data to calculate reflections. Thanks to SSR, you can see object reflections in puddles of water and other reflective objects (SSR calculates reflections in a way that stimulates the real-life image). Our Recommendation: Turn this off to increase performance, unless you notice the lack of reflections and it disturbs you. |
| Anisotropic Filtering |
This setting enhances the image quality of textures, on 3D-rendered objects, that are slanted with respect to the player's view (so, not directly in front of the player) where the projection of the texture appears to be non-orthogonal. Without this, textures viewed at different angles might lose their proportions (distant objects, viewed at oblique angles, will appear visibly skewed, blurry, and somewhat flat). Anisotropic Filtering has a great impact on Tarkov's looks, but it does not impact the performance that much. Our Recommendation: Turn this on, without it, the game looks bad. |
| Sharpness |
Increasing Sharpness makes all objects stand out more against each other while reducing it results in images becoming more blurry (Sharpness increases the contrast of all objects' edges). Some players state that high Sharpness makes spotting enemies easier. Our Recommendation: It has close to no impact on performance, so it's up to you. We recommend something around 1.7 Sharpness as higher values might cause your eyes to tire. |
| Lobby FPS Limit |
Rather self-explanatory. This does not have any direct impact on the game's in-Raid FPS, but decreasing it might allow your PC to cool down a bit more between raids and help you indirectly (it will heat up in Raid very fast anyway; if you have overheating problems, think about getting a better PC case or an additional fan). Our Recommendation: Set this to 60; it makes the game feel a bit smoother when you fiddle with your stash. |
| Game FPS Limit |
A bit less trivial than the "Lobby FPS Limit"; You can rise this up to 120, but it does not guarantee that the game will run at that value; the actual amount of FPS depends on other settings and your PC's specs. Our Recommendation: Set this to 120, unless you run the game on a Low-End PC and worry that it might overheat on a rare occasion when it reaches high FPS. |
| Z-Blur |
This feature will blur images on your screen while you sprint or quickly turn to increase immersion (rapid movements make focusing your eyes on objects difficult and Z-Blur tries to simulate that). This can make spotting enemies while turning or sprinting much more difficult and thus is rather detrimental. Our Recommendation: Turn this off as it does not make any real difference and may put you on a disadvantage in the extreme cases. |
| Chromatic Aberrations |
In optics, Chromatic Aberration is defined as a failure of a lens to focus all colors at the same point. This setting simulates this effect by making objects, at the corners of your screen, look out of focus. In photography, Chromatic Aberrations are, in most cases, seen as unwanted artifacts that greatly reduce image quality and are often removed in image post-processing. In Tarkov, this makes your character's vision a bit more "realistic" (human eyes have a field of vision of about 120°, but they can focus on just 30° and the rest appears blurry). Our Recommendation: Turn this off as it might put you at a disadvantage. |
| Noise |
This setting simulates the Film Grain, which is a result of the presence of small metallic silver particles or dye clouds (which break up from silver halide which is a chemical used commonly in photographic film and paper) and manifests as random optical textures (grain effect). Our Recommendation: Turn this off, unless you want that classic cinematic feel during gameplay. |
| Grass Shadows |
Self-explanatory; this adds shadows to the grass. This is not very noticeable, most of the time; unless you go prone in high grass. Our Recommendation: Turn this off to increase your FPS by a bit. You will not notice the difference unless you go prone in high grass (in which case Grass Shadows will make spotting enemies more difficult). |
|
Movement, Stances, and Chosen Controls/Key Binds Some controls options, present in Escape from Tarkov, are rarely seen in other games. The game puts emphasis on realistic gameplay and a classic HUD is replaced by other mechanics because of that. This might cause some confusion for new players (how do I check how much ammo I have left?!). Learning all the hotkeys and remembering what they do is essential if you want to get better at the game. Tip: Remember to rebind your in-game controls so that they feel more familiar right from the start. This will speed up the learning process; there's quite a lot to learn when it comes to controlling your Character in Tarkov. Note: We have decided to feature only the more unusual controls here; this is why, for example, movement-related ones are missing (they are pretty standard, and featuring them would just make the list harder to read as a whole). Movement If you are used to the movement model from arcade First Person Shooters, like Counter Strike, you might be surprised by the complexity of Tarkov's system. In EfT, every possible move-related action is designed to simulate real-life, and things like encumbrance and lack of comfort caused by wearing heavy armor are taken into account. If you want to cosplay as a walking tank, don't expect to move anywhere near as fast, or as smooth, as someone using a light loadout. While most of FPS games constrict your movement options to sprinting, running, walking, and "sneaking" (with all of these movement options having pre-designated moving speeds), Tarkov lets you freely adjust your speed by scrolling your Mousewheel. Movement-related actions, your character can take, can be broken down into 5 categories:
Stances Tarkov offers three main Stances - Prone, Crouching, and Standing - each with its own advantages and disadvantages. Knowing how to utilize them to their full potential is a vital part of the game and combining them with the before-mentioned movement options is necessary if you want to survive in a Raid:
Note: On top of the three pre-set stances, you are also able to smoothly adjust your posture with Mouse Scrool+ +C/Mouse Scroll- + C. This allows you to pick over obstacles of different heights and find a balance between the noise you make and the speed you move at. |
|
| Chosen Controls/Key Binds | |
| Switch Scopes | By default: "RMB + LCtrl". If you have mounted 2 or more sets of Optics on your weapon or the Optic you use has backup sights, this key combination will allow you to cycle between them. |
| Change Scope Magnification | By default: "RMB + LAlt". Some long-range scopes have adjustable zoom, this allows you to use that feature. |
| Check Time |
By default: "O" (Press). Shows you how much time is left before the Raid ends. Important: If you fail to extract from the Raid before the time ends, you will lose all items you've acquired during that Raid. |
| Check Time and Exits |
By default: "O" (Double Tap). On top of showing you low much time you have left before the Raid ends, this also shows you which extraction points are currently active. Important: It is a good idea to check this immediately after spawning (and maybe finding some cover first), as it will allow you to plan your advance into the Raid better. |
| Toggle Tactical Device | By default: "T" (Press). If you have a tactical flashlight or a laser mounted, this will turn them on. |
| Switch Tactical Device Mode | By default: "T + LCtrl" (Press). If you have a tactical device that has multiple modes, like X400 Tactical Flashlight which is a Flashlight+Laser combo), this command allows you to switch between the modes. |
| Interact | By default: "F". Pick things up, open doors, and other things like that - this will be the key you use the most. |
| Throw Grenade | By default: "G". Quickthrow Grenade; Nades are selected from left to right, from your Tactical Rig and Pockets. Grandes placed in your backpack can't be used without moving them first. |
| Quick Reload Weapon | By default: "R" (Double Tap). This is faster than the regular reload, but your character drops the ejected magazine on the ground (which is how the time is saved - don't forget to pick it up afterward). |
| Next/Previous Magazine | By default: "Mouse Scrool+ +R/Mouse Scroll- + R" (Hold R + Scroll). By default, magazines are chosen from left to right; this allows you to cycle between them. |
| Check Ammo | By default: "T + LAlt" (Press). This is how you check how much ammunition you have left in your gun. You will not get the exact number, but rather an estimation ("Full", "About Half", "Empty", and so on). |
| Fire Mode | By default: "B" (Press). Many weapons have multiple firing modes, this allows you to switch between them. |
| Check Fire Mode | By default: "B + LAlt" (Press). If you don't remember which firing mode you have selected, this allows you to check it without switching modes. |
| Check Chamber | By default: "T + LShift" (Press). Self-explanatory - us this to make sure that you have a round chambered, so you are not surprised by a "click" when you expect the weapon to fire a shot. |
| Increase/Decrease Movement Speed | By default: "Mouse Scrool+ /Mouse Scroll-" This allows you to smoothly adjust your character's movement speed. |
| Next/Previous Walk Pose |
By default: "Mouse Scrool+ +C/Mouse Scroll- + C". In Tarkov, you can smoothly change your moving posture - this is how you toggle between them. Note: The faster you move (so, the more straightened you are), the more noise your steps make but also the faster you move. |
| Lean Right/Lean Left | By default: "E/Q". Leaning allows you to pick corners without exposing your character's whole body to possible enemies. |
| Smooth Lean Right/ Smooth Lean Left | By default: "LAlt+D/LAlt+A" With this, you can adjust your "leaning angle" and pick just a bit or make a full lean. To reset your stance, use default Lean hotkeys (E/Q by default). |
| Overhead Blind Fire | By default: "W + LAlt". This allows you to blind-fire from behind a low cover. |
| Right Side Blind Fire | By default: "S + LAlt". This allows you to blind-fire around a right-side corner. |
| Examine Weapon | By default: "L". Your character will take a closer look at the weapon he's holding; it might allow you to spot if something's missing (this is handy for checking weapons found on Scavs etc.). |
| Fold Stock | By default: "L + LAlt". Folding stock on a weapon that has this feature makes it take up less space in your backpack. However, shooting a weapon when it's stock is folded is a bad idea (you might find a weapon with a folded stock in-Raid; this is also how you unfold it). |
| Mumble | By default: "Y" (Press). Makes your character mumble; any nearby Scavs will respond to you with a voice line. |
| Inventory | By default: "Tab". Self-explanatory. Remember to find some cover before fiddling with your inventory during a Raid. |
| Scope Elevation Up/Down | By default: "PgUp/PgDown" (Press). This allows you to adjust your optics for long-range firing (gravity, loss of velocity over distance, and some other things affect your bullets, so it's a good idea to apply some corrections if your scope has this option). |
| Discard | By default: "Del". If you want to quickly drop something, this is how you do it. |
| Hold Breath | By default: "LAlt". Holding Breath improves your aim (it reduces weapon sway), but doing it for too long will tire your character. |
|
Gear, Stash, and the Hideout Firstly, your Character can carry a limited amount of stuff and your Stash is of a limited size. However, there are ways around that - tactical gear, like Vests and Backpacks, allows you to carry more items, while specialized containers allow you to store more goods in your stash. |
|
Gear In Tarkov, there is no such thing as a pre-set loadout - in a Raid, you will have only the things you have brought to that Raid with you. Your Character has multiple "slots" that can be fitted with gear, these are:
|
|
Stash Stash is where you will be holding your loot, equipment, money, provisions, and all other things you decide to bring from a Raid. A Standard Edition of EfT provides you with a "small" 10x28 grid-size stash that can be expanded by upgrading the Stash module in your hideout (these upgrades are among the most expensive, however). Standard Edition also starts you off you with some low-tier gear, meds, and provisions. Small stash is one of the most limiting factors of Escape from Tarkov, especially in the end game when players have a lot of loot and resources. Complying to the below-described hints will help you alleviate the problem:
|
 Gear and Stash in-game window you'll see after you log-in to EfT for the first time. |
|
Hideout Hideout is your personal hidey-hole and a safe house in the war-torn city of Tarkov. This is where you store all your loot, heal your wounds, practice combat skills, and craft some of the essential items. The Hideout is comprised of multiple modules (some of them have multiple levels), all of which have different effects/bonuses:
|
|
Currency, Flea Market, Traders, and Bartering Escape from Tarkov features a player-driven dynamic economy that is affected not only by in-game actions but also by the real-life market changes! For example, the price of in-game Physical Bitcoin reflects the value of real-life Bitcoin. Moreover, there are several currencies available in the game and their exchange prices fluctuate constantly. To make things even more interesting, you can trade not only with money but also with multiple items found in Raid - Each Trader has a set of Barter Trades that let you exchange miscellaneous items for much more useful ones. All of this makes the game's economic system unique and engaging, especially for an online FPS. |
|
Currency The main currency of Tarkov is the Rouble (₽) which is accepted by 7 out of 8 Traders; the 8th - Peacekeeper - only accepts Dollars ($). The third currency you'll find in Tarkov is Euro (€), which is mainly used for buying stuff from the Mechanic. You can earn all three currencies in multiple ways:
To more or less reflect the state of the real-life foreign exchange market, Currency ratios in Tarkov are changed over time. This means that you can actually lose or gain money by keeping your savings in a certain currency. |
|
Flea Market Flea Market is an auction house of sorts that features all AI Trader and Player-made exchange offers - the system allows both money and items as circulating mediums, which means that you can ask for a certain thing in return for your goods, instead of money. The Flea Market had a few iterations to this day and multiple restrictions and rules were imposed on if for balance and fair play reasons; these include:
*"Found in Raid" status is given to all items you found during a Raid if you successfully extract from that Raid, but with some restrictions - You can't extract before the 10-minute mark in the Raid passes and you have to earn at least 600 experience (if you get a "Run Through" status after you extract, your found items will not count as "Found in Raid"). **"Merchant Reputation" is gained or lost based on your performance on the Flea Market - each successfully completed deal, and every 50K Roubles gained, increase your Reputation, while expired and removed deals decrease your Reputation. |
|
Traders and Bartering Traders are the foundation of Tarkov's economy, but not only that - they are also Questgivers, and some of them are Handymen, and Medics. Each Trader has his own field of expertise and an area of interest - they buy and sell specific goods and their Quests revolve around certain aspects of life (and death) in Tarkov. As you progress through their Tasks and gain PMC levels, you will gradually unlock Traders' inventories which will give you access to more and more powerful weapons, equipment, and consumables. Not everything can be bought for hard currency - some deals offered by Traders require you to procure certain goods that are especially desired by them. These Barter Trades often give you earlier access to the more powerful items and gear but are also harder to make. If you want to know more about Tarkov Traders and Bartering, you can check out our comprehensive guide on the subject, HERE. |
|
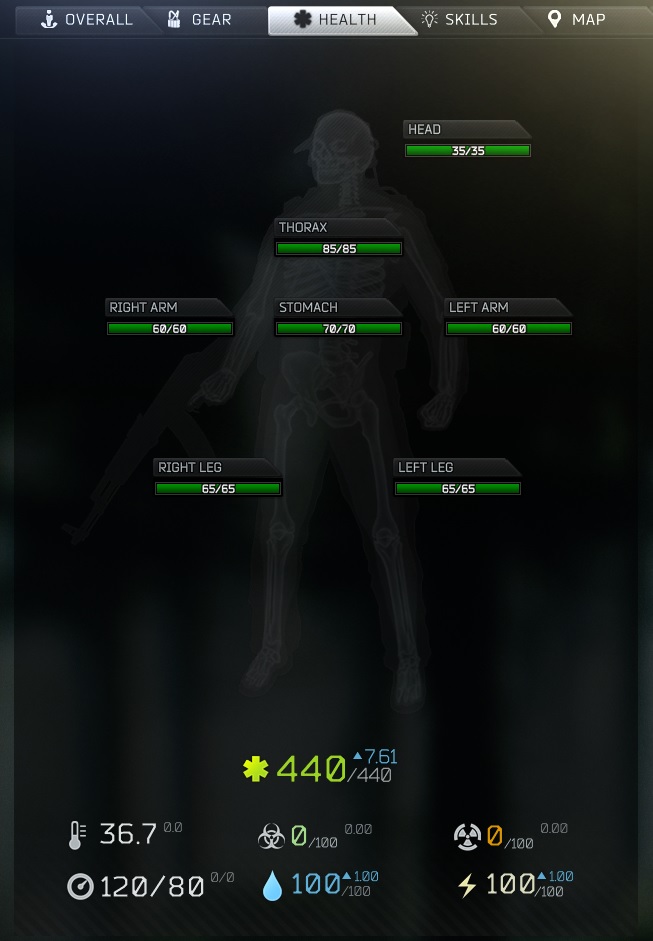
Health, Hydration, Energy, and Status Effects Escape from Tarkov features a full Body-Health-System aimed at simulating real-life body conditions (including pain, fractures, and bleeding), damage effects (injuries to different body parts will have different consequences), satiety, and overall physical condition. The overall condition of your character is described with three main parameters:
|
|
|
Status Effects Status Effects simulate various injuries, body conditions, and the effects of using drugs. These can be divided into Body Part-Specific and General effects, and also into Temporary and Permanent (these include destroyed body parts) where Permanent Status Effects require special surgical kits to remove. |
|
| Body-Part-Specific Status Effects | |
| Head |
|
| Thorax |
|
| Stomach |
|
| Right Arm |
|
| Left Arm |
|
| Legs |
|
| General Status Effects | |
 Berserk |
|
 Bloodloss |
|
 Contusion |
|
 Critical Overweight |
|
 Overweight |
|
 Dehydration |
|
Hard Dehydration |
|
 Disorientation |
|
 Fatigue |
|
Hard Fatigue |
|
 Fatigue (Overweight) |
|
Flash |
|
 Fracture |
|
 Fresh Wound |
|
 On Painkillers |
|
 Pain |
|
 Stim Buff |
|
 Stim Debuff |
|
 Stun |
|
 Tremor |
|
 Tunnel Vision |
|
|
Meds, Stimulants, and Provisions After seeing the complexity of Tarkov's health system, the sheer number of medicaments and other consumables available in the game should not surprise you too much. These range from simple provisions, like Army Crackers, to powerful stimulants with multiple beneficial and negative effects.
|
|
| Meds | |
 Analgin Painkillers |
|
 Augmentin Antibiotic Pills |
|
 Ibuprofen Painkillers |
|
 Morphine Injector |
|
 AI-2 Medkit |
|
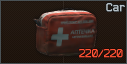 Car First Aid Kit |
|
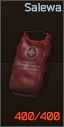 Salewa First Aid Kit |
|
 IFAK Personal Tactical First Aid Kit |
|
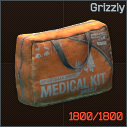 Grizzly First Aid Kit |
|
 CMS Kit |
|
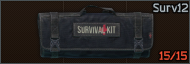 Surv12 Field Surgical Kit |
|
 Aseptic Bandage |
|
 Army Bandage |
|
 Immobilizing Splint |
Note: Applying the Splint to your leg will render you immobile for the duration. Applying it to an arm does not prevent you from moving, however. |
 Immobilizing Splint (alu) |
Note: Applying the Splint to your leg will render you immobile for the duration. Applying it to an arm does not prevent you from moving, however. |
 Vaseline |
|
 Golden Star Balm |
|
| Stimulants | |
 3-(b-TG) |
|
 Adrenaline Injector |
|
 AHF1-M |
|
 Cocktail "Obdolbos" |
|
 Combat Stimulant Injector SJ1 TGLabs |
|
 Combat Stimulant Injector SJ6 TGLabs |
|
 Hemostatic Drug Zagustin |
|
 L1 (Norepinephrine) |
|
 M.U.L.E. Stimulator |
|
 Meldonin |
|
 P22 |
|
 Propital |
|
 Regenerative Stimulant Injector eTG-change |
|
|
Provisions Note - Many of the barter trades listed below require multiple different items - listed Provisions can be just a part of the deal and you may require quite a few of them. |
|
|
|
|
Armor, Weapons, and Ammunition All weapon and armor ballistics are modeled as realistically as possible in Tarkov. Bullets drop off over distance because they are affected by gravity and air friction. They can penetrate objects or ricochet right off them (this depends on the impacted material), they might even fragment (which will cause extra damage if the fragmentation happens after the bullet penetrates the player's armor). As a bullet travels through the air, it gradually loses its velocity and, because of that, its armor penetration capabilities. If a bullet is stopped by armor, you will only take minor blunt damage, but if it manages to penetrate, you will be in a world of hurt. |
|
Armor There are 6 Armor Classes in the game, starting from Class 1 (the weakest) and leading up to Class 6 (the strongest). While Class 1 Armor will only stop basic buckshot, Class 6 is able to withstand everything except specialized Armor-Piercing ammunition. All Armors have their durability*; if a bullet is stopped by the armor, it looses some of it (the exact amount depends on the bullet's damage and armor damage % values). After the durability is reduced low enough, the armor stops to function and you receive full damage from all subsequent hits. What happens after the Armor is struck by a bullet is determined by its Armor Class and the bullet's penetration power. Overall, a bullet that has at least 45 penetration power will penetrate Class 6 Armor without too much of a problem (depending on the bullet type - 2 to 5 hits; this is a very rough estimate, of course). *Damaged Armors can be repaired with the help of Traders, but each repair reduces the maximum durability of the repaired armor. Moreover, depending on the material they're made of, some armors lose more max durability after repair (ceramic armors are more fragile and harder to repair overall). Note: As a general rule, you can assume that Class 3 Armor is enough to protect you against most Scavs, but you will need at least Class 5 Armor to have a chance against ammunition used by most players (this leaves Class 4 Armor in a rather peculiar spot). If you want to learn more about Tarkov's ballistics and check Damage and Armor Penetration values of every ammunition type available in the game, check out our Tarkov Ammo Chart, HERE. |
|
Weapons There are over 80 Weapons available in Escape from Tarkov, and this number rises with every patch. While some of them are less powerful than others, any weapon is a lethal tool when loaded with appropriate ammunition and held by a skilled PMC. Every weapon has a set of characteristics, which include:
Recoil and Ergonomics values of almost every weapon can be fine-tuned by replacing parts. In Tarkov, all weapons are modular and there are hundreds of weapon parts and attachments available. Some of the parts are extremely expensive, however, and it is not uncommon to have parts that outvalue the weapon itself. If you're interested, we have made a separate guide on the budget weapons and modding, it will help you make your starting weapons more reliable without spending a fortune. You can check it out HERE. |
|
Ammunition Choosing appropriate ammunition is the most important thing when it comes to combat effectiveness in EfT. Even the most advanced and highly-modded weapon will not be effective if loaded with terrible ammunition. When you are new to the game, or there was a wipe and you only have access to Level 1 Traders, your options are rather limited. Here is a shortlist of the most reliable ammunition types available right from the start (if there aren't any available for a given caliber, we'll skip it):
If you are interested in a detailed breakdown of the ammo available in the game, we encourage you to check out our comprehensive guide on ammunition, it includes our top 3 choices of ammo for each caliber - available HERE. |
|
Your first Raid Let us face it, you will most likely not survive your first couple of Raids. Escape from Tarkov is brutal for new players; you will be thrown straight into the blender together with experienced veterans who will have every advantage on you... luckily, there are a few things you can do to prepare yourself (to some extent) and speed up the learning process. |
|
Tips and Tricks
|
|
END NOTE The learning curve in Tarkov is steep, to say the least. We hope that this guide will help you learn the game and allow you to avoid at least some of the confusion associated with Tarkov's brutal gameplay. We hope that you have found this guide useful and informative. We will be happy to receive constructive criticism that will help us improve our future work so leave your suggestions in the comments section below. |
Pictures used in this article are the intellectual property of the Battlestate Games.
