
Hypixel SkyBlock Beginner's Guide
In-depth Guide on how to start your adventure in Hypixel Skyblock and earn your first moneyHypixel SkyBlock
Beginner's Progression Guide
Introduction
Starting your adventure in Hypixel SkyBlock can be quite tricky if you don't know what to expect. Even seasoned Minecraft players struggle to get enough traction to progress through the game in an efficient way. This is why we have decided to create a Beginner's guide that will help new players find their way in this amazing game mode.
Without further ado, we present you our Beginner's Guide to Hypixel SkyBlock.
Hypixel SkyBlock Glossary
Hypixel SkyBlock adds a lot of new mechanics and thus can be a bit confusing if you are a brand-new player. With this little glossary, you will quickly learn about Hypixel SkyBlock's basics. This information will not replace the first-hand experience, by any means, but knowing what to expect will help you avoid many newbie mistakes.
|
|
|
|
|
|
|
|
|
|
|
|
|
|
|
|
|
|
|
|
|
|
Early Game Progression Step by Step
When you're playing for the first time, chances are you will not develop your character in an efficient way - you simply lack the experience to do it. You learn while you play and that's great, but learning from your mistakes is a slow process. To speed things up a bit and help you start the game off on the right foot, we have prepared a simple step by step guide to the early game progression in Hypixel SkyBlock.
|
|
|
|
|
|
| If you would like us to expand this section, please let us know in the comments! |
Beginner/Early Game Gear
Below, we present some examples of Armor, Weapons, and Accessories that are worth getting in the early game. Equipping yourself with these should make your initial in-game journey considerably easier and much more enjoyable.
Armor
 Leaflet Armor |
Stats and Special Effects
*C - Chest, L - Legs, H - Helmet, B - Boots |
|
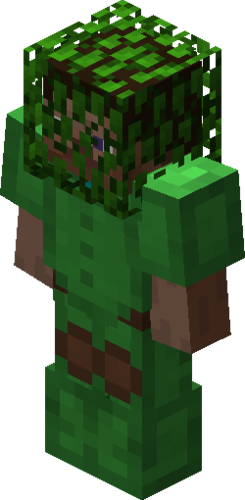
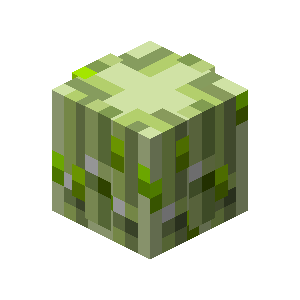
One of the quickest and easiest to make Armor Sets in the game (All you need for the full Set is 24 Oak Leaves - collected by using Shears on Oak Leaves). The recipe for this Armor is unlocked by reaching Oak Wood III Collection which requires you to collect just 250 pieces. It does not provide any defense, but the Health boost and the conditional Health Regen can come in handy when you get yourself into trouble. This Set is often skipped in favor of something a bit more sturdy, but it's still worth your consideration as there's nothing easier to obtain at the start. |
|
 Farm Suit |
Stats and Special Effects
|
|
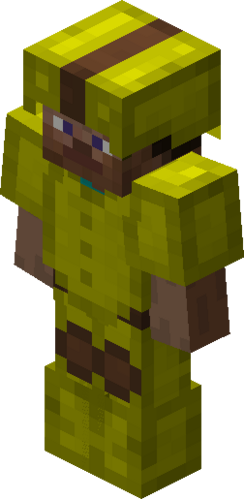
This Armor Set is extremely easy to unlock as it only requires you to gather 250 Wheat (Wheat III Collection). You will need 216 pieces of Wheat to craft all 4 parts - you can quickly collect it on the Hub Island or at The Barn. If you have some money and have unlocked the Bazaar already, purchasing the Wheat will cost you ~540 Coins*. Farm Suit has the Defense of a Diamond Armor and grants two farming-related bonuses on top which makes it a great choice for the early game, especially if you want to do some Farming early. *Just remember that you will have to Collect 250 pieces of Wheat anyway, as purchasing it does not count towards the Collection progress. |
|
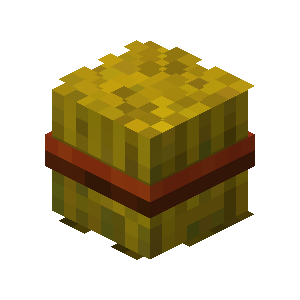
 Pumpkin Armor |
Stats and Special Effects
|
|
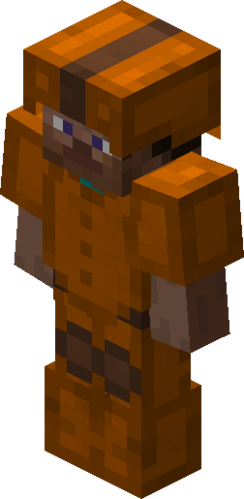
If you are looking for a very cheap Combat Set, that is easily craftable in the early game, this is it. The Combat-related bonuses it provides might be minor but a better set costs 10000x times more (not even a joke; 24 Pumpkins required for crafting this Set cost ~85 Coins and materials needed for crafting the Monster Hunter Armor cost over 820k Coins). Pumpkin Armor is unlocked by reaching the Pumpkin II Collection (100 Pumpkins collected - you can find them in the far right corner of The Barn) and requires just 24 Pumpkins to make which makes it as easy to obtain as the Leaflet Armor. |
|
 Lapis Armor |
Stats and Special Effects
|
|
Lapis Armor is the first non-craftable armor on this list - it drops from Lapis Zombies (Level 1, 100 Health, 20 Damage) that inhabit the Lapis Quarry - the second floor of the Deep Caverns which can be accessed from the Gold Mine area. Without any Luck Enchantments, it has a rather low drop rate of 0.5% which makes farming the Lapis Armor a waste of time; we recommend you just head to the Auction House and purchase it there*. You should get this Set even if you have access to something better as the +200% Mining Experience bonus is just too good to pass up on while grinding mining exp. Thanks to the +60 Health Set bonus, it also has a surprisingly high Effective Health, especially for its price tag. *A Full Set will cost you around 10k Coins (for a freshly-dropped version without any Enchantments or Reforges). Please note that the price fluctuates a lot; you can find pieces for vendor prices if you're lucky, if not - it might cost you closer to 30k in total. |
|
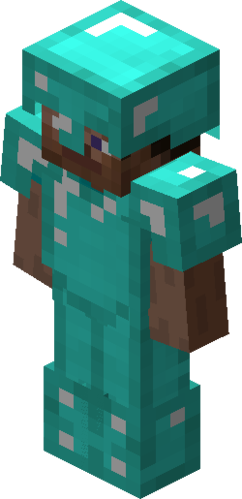 Hardened Diamond Armor |
Stats and Special Effects
|
|
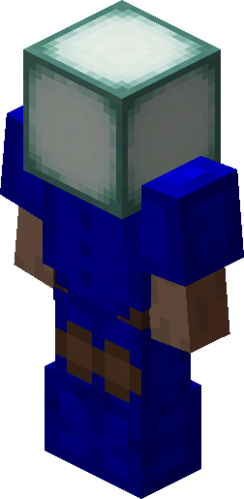
This is SkyBlock's variation on the "vanilla Minecraft Armors". All this Set does is increase your Defense, but it does it quite well - 330 total Defense is very high. While its Effective Health is not the highest, you will not get anything better at this price range (it will cost you around 30k Coins to make - the cost of 3840 Diamonds). If you decide to craft it, prepare for some grinding - It is unlocked by reaching Diamond VII Collection (10000 Diamonds gathered); The easiest way of unlocking the recipe is stacking Diamond Minions on your Private Island and waiting until they dig up enough Diamonds. Because of its popularity, you can also find it on the Auction House, however, purchasing it will generally cost more than crafting it yourself*. *Because of it being popular and locked behind a rather lengthy grind, especially for a new player. |
|
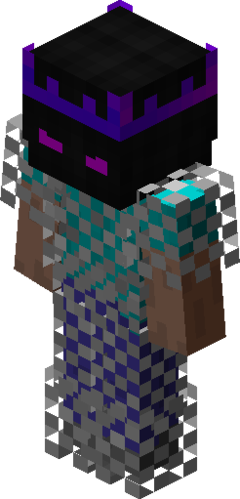 Ender Armor |
Stats and Special Effects
|
|
This Armor is a rare drop from Endermen (except Zealots) in the End Island. If you are a new player (and you probably are as you're reading this guide), forget about grinding it yourself - the Auction House is your best friend, purchase it there. The price of this Set is a few levels above the ones mentioned before, especially if you decide to purchase an enchanted one; It costs around ~100k Coins per unupgraded piece*. Good stats for the price make Ender Armor one of the most popular Sets among the new players. The best thing about this Set is the fact that all its Stats are doubled when you enter the End Island. This means that Reforging it and adding a few Enchants will make you quite powerful while in the zone, without too much of an investment (relatively speaking). *While it can sound like a lot, it really isn't - you will be able to make enough Coins very quickly if you follow the tips from the "How to Make Money in the Early Game" section of this guide. |
|
Weapons
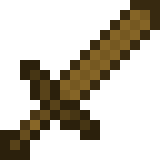
 Rogue Sword |
Stats and Special Effects
|
|
This will, most likely, be your first Sword in Hypixel SkyBlock as you can get it for free from the NPC Jamie (coordinates -35/70/-36). Its Damage is nothing to boast about, but the on-use effect is very handy for the early game. With this Sword, you will be able to move around much quicker than you normally would be able to*. As far as free stuff goes, Rogue Sword is great. *Rogue Sword's Speed ability is stackable, but all subsequent uses give only +10 speed instead of the initial +20. If you have enough mana, you can become a speed demon by using this Sword. Important Note: Rogue Sword is a one-time-deal - you get it from Jerry once and you can't obtain it again; it CANNOT be Bought from NPCs, Looted, or Crafted. Don't sell it or you might be forced to get it from another player or to create another profile just to get it back. |
|
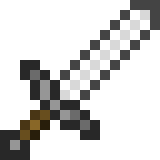
 Undead Sword |
Stats and Special Effects
|
|
Undead Sword is a very cheap (it costs just 100 Coins at the Weaponsmith, coordinates -9, 68, -140, Village) and an extremely handy early game weapon. While its damage is unremarkable, the fact that it gets doubled when fighting Undead makes it ideal for fighting Zombies and other undead in Deep Caverns (which is a very popular early game grinding area). Thanks to its effect, it also benefits a lot from Reforges and Enchantments. An Undead Sword can be upgraded into a Revenant Falchion by combining it with a Crystallized Heart and an Undead Catalyst. Note: Don't skip on this one; spending 100 Coins for it is one of the best investments you can make early in the game (and 100 Coins is a laughable amount, even for a brand-new player). |
|
 Hunter Knife |
Stats and Special Effects
|
|
Hunter Knife is not the best combat weapon you will get in the early game, but it definitely is one of the most useful. It gives you a considerable Speed increase of +40 and can be used to travel very quickly, especially when combined with the Rogue Sword's active ability. Reducing travel times will make the game more enjoyable and the progression quicker; get this Sword and keep it until you get enough speed-boosting items to make it obsolete. Unlike most other Weapons, it is not craftable or purchasable. Instead, it is awarded to players for finishing the Woods Race* in less than 1 minute. To achieve it, you will need some Speed-boosting items - a Rogue Sword is enough (but it's quite hard without anything else), but we recommend you to get at least a Level 4 Speed Potion which will enable you to complete it in under 1 minute without breaking a sweat. *Woods Race takes place in the Spruce Woods, inside of the Park Island. To take part in the race, you must talk to the NPC Gustave (coordinates -385, 89, 55) who will give you the corresponding Quest. |
|
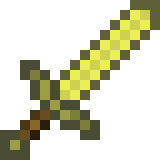
 Tactician's Sword |
Stats and Special Effects
|
|
This sword is very cheap for what it does, but its main strength is also its main weakness. Mainly, it gains Damage for every Combat Collection Level you have, above VI (so, every Combat Collection of levels VII and up counts). This means that it becomes stronger as you progress through the Collections but... other, much better, options become available to you as you gain experience (and Coins), making it somewhat obsolete. Still, it is worth using in the early game for its 20% Critical Chance if nothing else. You can also apply a Wood Singularity to it. Doing this will add +100 Strength to its stats, but it's not worth it - Wood Singularity costs ~2.2kk Coins which is 62 times more than Tactician's Sword itself. Tactician's Sword can be bought from the Master Tactician Funk (coordinates: -462, 110, -15) who resides at Savanna Woodland. It costs only 35k Coins. Note: If you like the Critical Buff and want to invest in this Weapon, we advise you to look for an already upgraded one on the Auction House - it will be a lot cheaper that way; the prices of maxed-out pieces fluctuate around 1kk Coins mark. |
|
 Raider Axe |
Stats and Special Effects
|
|
Raider Axe becomes available as a vendor purchase once you complete Quests offered by the Melancholic Viking NPC (coordinates: -359, 91, 76, Spruce Woods). Once you complete them, the same NPC will offer you a few items for purchase, Raider Axe being one of them. It costs 130k Coins. This is a powerful (for its price) and quite interesting Weapon, as it becomes stronger the longer you use it (and by "use" we mean "use for its intended purpose"...). Once maxed out*, Raider Axe has quite impressive stats, but maxing it out will take some time (doing it yourself is not a bad idea, in the early game at least, because you gain 20 Coins for each Kill which adds up surprisingly quickly. It is also considerably cheaper than purchasing one on the AH). *To max out the Raider Axe's stats, you will have to make 17500 Kills with it (at this point, you would also gain a total of 350k Coins from its Special Effect) and have 50000 Wood (of any type) in your Collections. Note: Despite its name, this is a Sword which means that all Sword-specific Enchantments can be applied to it. |
|
 Pigman Sword |
Stats and Special Effects
|
|
Pigman Sword was once one of the best weapons available in the game. Now, it is a medium grade sword that still gets the job done but falls behind the newer competition. While the power-creep made it somewhat obsolete for the end game, it also had a rather welcome effect of making it considerably cheaper to buy from other players. Its Special Ability, Burning Souls, remains rather useful. However, since the nerf, it has fallen out of favor (it had no cooldown previously which had made it immensely powerful) - which is, ironically, a good thing for a new player as it lowers the average Auction House price even further. It is unlocked by reaching the Raw Porkchop Collection IX and requires 48 Enchanted Grilled Pork (1228800 Raw Porkchop)* and a Stick to craft. If you want to make the most out of it, you should also invest in the Pigman Pet which buffs the Pigman Sword's statistics by quite a bit (up to 25 additional Strength and 40 additional Damage). *The current Bazaar price of the raw materials is ~6kk Coins. If you throw another ~2kk on top of that, you will be able to buy a Reforged and Enchanted version from the Auction House. |
|
Accessories
Note: There are A LOT of accessories in Hypixel SkyBlock. The ones mentioned here are extremely easy to get and very useful for a new player, but they are just the tip of the iceberg; you should seek to eventually obtain and upgrade pretty much every accessory available in the game.
 Farming Talisman |
Stats and Special Effects
|
|
This is the easiest-to-get Accessory in the game. It is unlocked upon reaching Wheat Collection IV* and it only requires 5 Hay Bales (45 Wheat) and 4 Seeds to craft. The speed bonus from this talisman is very handy to have when you are a brand-new player as speed boosts are hard to come by at the start. It will help you to outrun other beginners and get to freshly-spawned stuff, in the Barn and the Farm, quicker. *You will have to harvest just 500 pieces of Wheat to reach it. |
|
|
|
Stats and Special Effects
|
|
Speed Talisman is unlocked at Sugar Cane Collection II* and requires 108 pieces of Sugar Cane to craft. While the buff that it provides seems irrelevant, every little helps. You should definitely get this one as soon as you can. Once you reach Sugar Cane Collection V**, you unlock the upgrade - Speed Ring, you should craft it immediately as it triples the Talisman's effect. It requires 96 Enchanted Sugar (15468 Sugar Cane) to make; it will cost you ~31k Coins if you decide to purchase the required materials on the Bazaar. *You will have to harvest just 250 pieces of Sugar Cane to reach it. **You will have to harvest 2000 pieces of Sugar Cane to reach it. Note: Sugar Cane can be found in the Mushroom Desert, near the pool of water in the southern part of the area. You will need Farming Level V to enter. |
|
|
|
Stats and Special Effects
|
|
Zombie Talisman Talisman can be bought from the Adventurer NPC (coordinates: -41, 70, -64, Village) for just 500 Coins. It pairs well with the Undead Sword as both of them make you better at fighting Zombies. Once you reach Zombie Slayer II, you should upgrade it to the Zombie Ring which is twice as powerful. The upgrade requires 64 pieces of Revenant Flesh which can be bought for ~95 Coins (for all 64 of them; they cost ~1.5 Coins each). Both of these Accessories are very powerful in the early game, and worth getting quickly, as you will mainly fight Zombies at the start. |
|
|
|
Stats and Special Effects
|
|
Getting around quickly saves time and time is one of the most precious things you have. With these Accessories, you will reduce your travel times inside the Village and the Mines (and you will spend quite a lot of time running from one place to another there). Both of these Talismans can be purchased from the Adventurer NPC in the Village (coordinates: -41, 70, -64). They cost only 2500 Coins each, which makes them very affordable - you should purchase both as soon as you earn enough money. |
|
 Vaccine Talisman |
Stats and Special Effects
|
|
This Talisman is unlocked at the Potato Collection III* and can be crafted out of 9 Poisonous Potatoes that drop from Zombies (you can easily farm these in the Graveyard area - the Undead Sword will come in handy for this). The drop rate is rather low, so it might take up to ~15 minutes to drop all 9. *You have to harvest a total of 500 Potatoes to unlock it. The best place to farm Potatoes, in the early game, is the Barn. |
|
 Scavenger Talisman |
Stats and Special Effects
|
|
The effect of this Accessory is quite similar to the Raider Axe's, but it works in a bit different way. Mainly, every Monster will drop Coins as long as this Talisman remains in your Accessory Bag, however, the number of Coins dropped is not constant but based on the Monster's level - Monsters will drop 0.5 Coins/level. Scavenger Talisman can be purchased from the Adventurer NPC (coordinates: -41, 70, -64, Village) for 10000 Coins; Defeating 20k levels worth of Monsters will pay its price back. Note: Scavenger Talisman's effect stacks with the Scavenger Enchantment, meaning that you can get up to 1.4 Coins/level to drop from Monsters. |
|
 Magnetic Talisman |
Stats and Special Effects
|
|
The Magnetic Talisman is very handy to have as it makes collecting loot much more convenient. It is unlocked after reaching Emerald Collection III* and can be crafted out of 128 Emeralds and 32 pieces of Redstone (purchasing all required materials on the Bazaar will cost you around 700 Coins). Because of its usefulness and very cheap price, it is one of the most commonly used Accessories in the game. It is worth noting that it was introduced on June 11th, 2019, and nerfed just 9 days later (from 5x to 3x range increase) as it could be used for stealing loot from other players. *You have to harvest a total of 250 Emeralds to unlock it. The best place to farm Emeralds is Slimehill - the fourth floor of the Deep Caverns. |
|
 Talisman of Coins |
Stats and Special Effects
|
|
This is a fun accessory that can be unlocked by reaching the Emerald Collection II* and can be crafted out of 20 Emeralds and 5 Gold Ingots. The amount of spawned Coins is quite minor (1-5) and they can be picked up by anyone, but it's free money, essentially (after the Talisman repays itself). Truth be told, most players don't bother with actually using this one... at least it is cheap and it repays itself quickly, so it's worth getting early while every single Coin counts. *You have to harvest a total of 100 Emeralds to unlock it. |
|

How to make Money in the Early Game
Hypixel SkyBlock presents a lot of opportunities when it comes to filling up your pockets with money. We have summarized the most popular and the most efficient Coinmaking methods in a separate guide, you can check it out here:
Hypixel SkyBlock Coins Farming and Earning Guide
Here is a brief overview of things you can do to make Coins and avoid losing them:
|
|
|
|
|
END NOTE Fun should always be the most important - trying to play "perfectly" and always seeking to optimize everything will quickly kill your interest in the game. Don't let that happen, play for fun! We hope that you have found this guide useful and informative. If you liked it and want us to add more guides such as this one, please let us know! Also, we will be happy to receive constructive criticism that will help us improve our future work so leave your suggestions in the comments section below. |
Pictures used in this article are the intellectual property of Hypixel.