ArcheAge: Unchained
Darkrunner Melee DPS Build and Guide

Overview
Archeage Unchained offers dozens of possible Melee Builds, but when it comes to "the best" ones, just a few come to mind. One of these few, regarded as the most competitive, is Darkrunner. This melee class offers unparalleled mobility provided by skills like Charge, Freerunner, Drop Back, Behind Enemy Lines, and Chaos Ancestral Shadowsmite. Thanks to these, a Darkrunner can surprisingly easily chase down ranged classes or perform a calculated retreat if needed. His defenses, while not exceptional, are often enough to keep him alive long enough to deliver devastating combos. What makes Darkrunner great is His ability to Trip the target and unleash hell on him while he lays defenseless on the ground. If performed correctly, and not interrupted/broken by the enemy, Darkrunner's Combos can simply obliterate any opposition that finds themselves in his melee range.
If you are looking for an offensively-focused Melee DPS Class that combines traits of a frontline warrior with the mindset of a sneaky assassin, Darkrunner is a great choice for you. Below, we present you our take on this class's build, together with some Gear/Stats recommendation and a breakdown of the most useful Combos.
If this playstyle doesn't suit you, you can also check our other Archeage Unchained builds.
 Pros Pros |
 Cons Cons |
| Great Mobility |
Below Average Defenses |
| High Burst Damage |
Requires good Situational Awareness |
| Solid Crowd Control |
Can die almost instantly if caught off guard |
|
 
Odealo supports player-to-player trading for Archeage Gold and Items. With multiple sellers competing for your attention, you are to expect the best prices, prompt delivery, and high quality of service.
|
Skill Build
Darkrunner, the combination of Battlerage, Shadowplay, and Auramancy Skill Trees, is widely regarded as the strongest melee "Class" in ArcheAge Unchained (together with Executioner, some might say). Below, we present you our take on Darkrunner Skill Build; feel free to change a few things to your liking, as the game offers a lot of room for customization - the below-featured build should serve as a decent benchmark.
Note: The featured build is PvE-focused. For PvP, you might want to pick up things like Bonebreaker instead of the fourth Auramancy Skill (which is taken for the 3rd Auramancy passive, which works wonders when multiple mobs are attacking you).
|
The "Darkrunner" Class Melee DPS Build
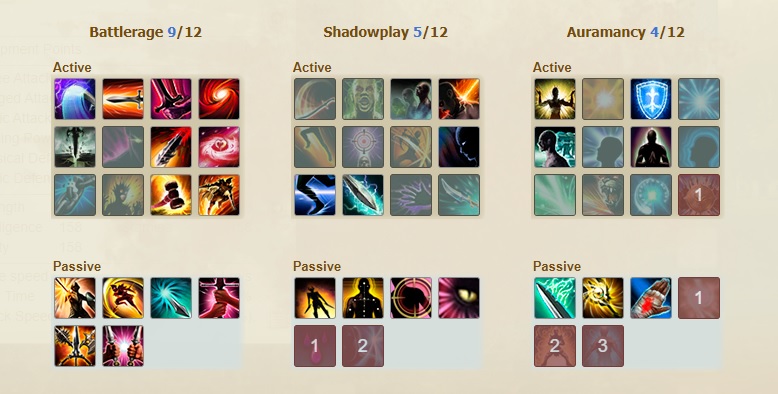
Battlerage Tree:
- Triple Slash - An attack that strikes your enemy with three separate hits; each 3rd attack deals bonus damage; We recommend "Quake" Ancestral skill for this one, as it makes the ability much more dynamic.
- Charge - Very strong opener that roots the target in place for 5 seconds (root duration is halved in PvP), it has a 12-second base Cooldown and can't be used while you are snared.
- Battle Focus - A strong self-buff that increases your Parry Rate by 30% and Melee Critical Damage by 20%, it can be used off-global cooldown; this can be used both offensively and defensively.
- Whirlwind Slash - Strong AoE Melee attack that deals 3 separate hits. The power of this ability comes from its 3 charges (it comes on its 12-second cooldown only after you use it 3 times).
- Sunder Earth - A frontal-cone attack that deals high damage to all enemies in a line in front of you; We recommend "Mist" Ancestral skill for this one, as it increases DPS. For group play, you might also consider leaving this in its base state (it will provide a 30% damage reduction to allies then).
- Precision Strike - Powerful melee nuke ability with high Crit Chance on a rather long cooldown. It has a further increased Critical Rate and Accuracy when Backstabbing; Picking "Water" Ancestral skill for this will make it even more devastating in PvP and turn this into an even more reliable finisher (but for PvE it is not needed).
- Tiger Strike - A Rushing attack that allows you to hit up to 5 enemies consecutively. Your Primary Target also gets Overpowered for 8s, which reduces his Continuous Health Regen by 33%. This skill cannot be used while Snared, but also cannot be Parried, Blocked, or Evaded, which makes it very strong in all situations; We recommend the "Life" Ancestral Skill for this, as it will grant you up to 5s of immunity to disabling effects, which is great for both PvE and PvP. It has a rather long Cooldown of 18 seconds.
- Hammer Toss - Throws a (very) heavy Hammer at the current Enemy's location. This deals respectable Damage, Stuns the Primary Target for 2.5s and knocks back all secondary Targets Hit (within 3m radius around the Primary Target). This has a very long (42 seconds) Cooldown and can be avoided by skilled players in PvP, but it is still very strong - the closer you are to enemies in PvP, the more effective this gets as it is harder to avoid (when using it at max range, you have to time it with the enemy spell-casts (that hold them in place for some time) or use it on rooted targets). In PvE, it is pretty much always effective as mobs tend to just stand around.
- Behind Enemy Lines - Skill that enables you to leap to the target location, dealing a very solid amount of Damage. the leap also inflicts "Shaken" debuff on all affected targets, reducing their Movement Speed by 27%, Skill Damage by 8%, and Attack Speed by 75 for 3 seconds. This ability has 21-seconds Cooldown and can't be used while snared; it has a 6-20 meters range (so it can't be used while in melee range). This is a great distance closer that increases your chances versus enemies that try to kite you in PvP.
Picking up 9 Skills (picking up 7 is enough to unlock all the passives, technically, so you can easily switch some Skills around) in the Battlerage Tree will also grant you the following passives:
- Deflect and Retaliate - Equipping dual weapons allows you to parry Ranged Attacks and each successful parry resets the cooldown on all your Battlerage attack skills (this effect has a 12-second internal cooldown). This makes dealing with Archers a little bit less painful if you opt for a dual-wielding setup.
- Reckless Charge - Your Physical Damage taken is reduced by 15% for 4 seconds after you use Behind Enemy Lines, Tiger Strike, or Charge. A straight-forward passive that increases your survivability; for a maximum effect, you can spread out your uses of the 3 abilities that trigger it.
- Puncture - Your Melee Critical Strikes reduce the target's Physical Defense by 3000 for 12 seconds. This offers a solid DPS boost against the more resilient targets.
- Attack Speed Training - Each successful Battlerage attack gives you a Delirium stack (+30 Attack Speed and +5% Melee Critical Damage for 9 seconds), for a maximum of 5 stacks. Keeping these stacks up it rather easy... Whirlwind Slash alone can grant you 3 stacks in a very short time.
- Weapons Mastery - A straight up 10% Melee Damage increase to all your Battle Rage skills.
- Deadly Duelist - This has two separate effects; it grants you +6% increase in Melee Critical Hit and allows you to Parry Ranged Attacks with both Dual Wield and Two-Handed Weapons.
Shadowplay Tree:
- Drop Back - At its base, this Skill allows you to leap back 10 meters to escape danger or disengage from an enemy. We recommend taking the "Death" Ancestral version of this Skill, as it will allow you to leap forward instead! Leaping forward greatly increases the versatility of this skill (it can be used offensively without the need to quickly turn your character 180 degrees first, which is nice). Performing a leap also allows you to cast Sunder Earth instantly for 2.5 seconds. It can't be used while snared and has a 12-second Cooldown.
- Pin Down - A strong Melee Attack that also causes the target to Bleed for over 20 seconds. This has a rather long Cooldown of 16.8 seconds. If the Target is already bleeding, this will inflict a higher rang of the effect and deal even more Damage over Time.
- Stealth - Makes you invisible to enemies for up to 45 seconds. While Stealthed, you gain 1 Bloodthirst stack every second. Performing any action other than moving will break the effect. Stealth's Cooldown starts to tick only after the effect fades. This is definitely one of the most "fun" abilities in the game; it allows you to sneak around undetected and ambush your prey or just escape your pursuers by breaking combat and vanishing out of sight. There are counters to Stealth, but no one will use them if they don't suspect you to be there - this ability allows for devastating openers during gank attempts in PvP, just make sure that your target does not see you before you use it.
- Freerunner - Increases your Attack Speed for 6.4 and your Movement Speed by 40% for 30 seconds. This is a simple Spring-like ability with am offensive buff attached to it; use it to chase down fleeing enemies or to escape danger (if the situation demands it). Freerunner has a rather short Cooldown, for its 30s duration, of just 72 seconds. Ancestral versions of this ability are quite interesting choices for mass/zerg vs zerg PvP but are not worth it in solo play at all - choose one of them only if you think you can make it work.
- Shadowsmite - Very powerful surprise attack that deals an additional 400% of your Melee Attack Damage with a Backstab. We strongly recommend that you take the "Chaos" Ancestral version of this skill as it will Teleport you behind your target (within 6m radius of you), which will almost guarantee a successful Backstab (at the cost of losing the poison synergy). This is one of your most devastating abilities, but it has a long (24-second) cooldown.
Picking up 5 Skills in the Shadowplay Tree will also grant you the following passives:
- Shadow Training - Gives you a +40 Attack Speed increase - some bonus DPS is always good.
- Become Void - Provides you with a +5% bonus to your Evasion Rate, which makes you a bit harder to hit in melee - a nice passive to have in both PvP and PvE.
- Ruthless Assault - After you inflict a Critical Heal or a Critical Strike, your Attack Speed is increased by 120 for 8 seconds. This effect has a 12-second internal cooldown. This is a solid DPS increase, but you have little control over it.
- Bloodthirst Intensified - This allows you to accumulate 2 stacks of Bloodthirst at a time (instead of the standard 1), which synergizes with your Stealth (you'll gain max stacks in 5s instead of 10, which will allow you to engage quicker without losing some of your Damage Potential). Each Bloodthirst stack grants you a +3% increase to all your Healing and Skill Damage (up to 10 stacks for a 30% maximum increase). 2 Stacks of Bloodthirst are consumed each time you damage an enemy; the whole effect lasts for up to 25 seconds.
Auramancy Tree:
- Thwart - Gives you 1 stack of Warding Light that Absorbs up to 5000 Damage from the next attack (of any type) that strikes you. This effect can stack up to 3 times. Using this also inflicts enemies, within a 6 meters radius, with the "Shaken" debuff for 3 seconds. Shaken enemies have 45% reduced Movement Speed, 20% Decreased Skill Damage and a -25 modifier to their Attack Speed. Thwart has a 15-second Cooldown and can be used while you are incapacitated, which makes it a great defensive tool in both PvP and PvE.
- Conversion Shield - Protects you with a shield that converts 25% of your Received Magic Damage into Health. The shield lasts for 8 seconds and can be activated while you are incapacitated; it has a 30 seconds cooldown. This increases your survivability against your worst enemy - casters, and will often save your life, especially when combined with Thwart.
- Teleportation - Blinks you 15 meters forward. This ability can be used during a Global Cooldown and does not trigger a Global Cooldown, but can't be used while you are snared. It has a 35 seconds CD. This ability gives you a great mobility boost that can be used both defensively and offensively and works especially great when combined with Drop Back (combing these two allows you to relocate by 25 meters almost instantly).
- Meditate - Restores 3% of your Maximum Mana per second for 5 seconds. When channeling ends, it also decreases all Auramancy Skill Cooldowns by 15%. You can't perform any action during the channeling, otherwise, you'll break the effect. This ability somewhat solves your mana-sustain problems but it will be tricky to use in PvP situations. It has 45 seconds cooldown.
Picking up 4 Skills in the Auramancy Tree will also grant you the following passives:
- Absorb Damage - A buff that converts 15% of your Received Damage into Health for 9 seconds. This has a 20-second Cooldown. A nice survivability-increase and you get it basically for free.
- Inner Peace - Reduces the duration of all Sleep and Fear effects inflicted on you by 20%. This comes in handy, especially in PvP where a single second can be a difference between life and death.
- Unassailable - The main reason why we've picked up 4 Skills in the Auramancy Tree. This passive gives you a 1% chance to become invincible for 2 seconds after you receive any damage; the effect has a 20s internal cooldown. This is life-saving and can make you randomly survive a nuke; it also makes you better at solo PvE. 1% seems very low, but you will be surprised how often this effect triggers (if a mob hits you 10 times during combat, this will effectively have a ~10% chance to trigger during each fight). This passive really shines when you fight versus multiple enemies at once.
|
Combos / Basic Rotations
Here are some of the Combos you can use as Darkrunner to maximize your Damage output and make the most out of your Skills.
Tip: In PvP, always be ready to disengage from combat with one of your mobility skills if an enemy manages to break your Combo. Blindly following a DPS Sequence is a sure way to defeat.
Recommended Gear / Stats
Perfect stats often depend on your current gear score, which means that there is no such thing as "universally best stats", except Strength which is your primary that should always be present on your equipment. This is why we will provide a "basic" and "alternative" Synthesis Effect composition for the gear pieces.
- Basic - As the name suggests, these are stats that should be treated as "standard" ones that can be modified to one's liking/situation.
- Alternative - These stat suggestions are PvP-focused and follow the thought that Melee Classes can burst you down quicker than ranged ones and that escaping alive from melee range is more important than surviving ranged onslaught for a few more seconds (and then dying anyway).
Note1: Different Weapons offer different advantages; Damage Type depends on the Weapon (Daggers - Piercing, Swords - Slashing, Katanas - Slashing, Axes - Crushing, Clubs - Crushing, Scepters - Crushing, Shortspears - Piercing, Greatswords - Piercing, Nodachi - Slashing, Greataxes - Crushing, Greatclubs - Crushing, Staves - Crushing, Longspears - Piercing). These Damage Types differ in their effectiveness against certain types of armor. Moreover, different Weapon Types have different Damage Spreads and Attack Speeds. Most players suggest using a Greataxe because it's more effective against Plate Armor.
Note2: We recommend Leather Armor for the balanced protection and reduced Trip duration.
| |
| Head |
- Primary: Strength
- Secondary: Health + Resilience (Basic) / Received Melee Damage + Resilience (Alternative)
- Gems: Melee Attack Increase
|
| Chest |
- Primary: Strength
- Secondary: Health + Resilience (Basic) / Received Melee Damage + Resilience (Alternative)
- Gems: Resilience Increase
|
| Waist |
- Primary: Strength
- Secondary: Backstab Melee Damage + Toughness
- Gems: Triple Slash Damage Increase
|
| Wrists |
- Primary: Strength
- Secondary: Backstab Melee Damage + Toughness
- Gems: Melee Attack Increase
|
| Hands |
- Primary: Strength
- Secondary: Health + Resilience (Basic) / Received Melee Damage + Resilience (Alternative)
- Gems: Melee Attack Increase
|
| Cloak |
|
| Legs |
- Primary: Strength
- Secondary: Health + Resilience (Basic) / Received Melee Damage + Resilience (Alternative)
- Gems: Toughness Increase
|
| Feet |
- Primary: Strength
- Secondary: Health + Resilience (Basic) / Received Melee Damage + Resilience (Alternative)
- Gems: Move Speed Increase
|
| Costume |
- Focus (to counter Evasion) + Melee Critical Damage + Defense Penetration + Melee Attack
|
| Underwear |
- Melee Damage Reduction + Resilience + Toughness + Focus
- Gems: Melee Attack Increase
|
| Neck |
Archeum Evernight Necklace (Decrease Received Damage + Stamina + Toughness + Focus) or other with similar bonuses |
| Earring 1 |
- Primary: Strength
- Secondary: Received Damage
|
| Earring 2 |
- Primary: Strength
- Secondary: Received Damage
|
| Ring 1 |
- Primary: Strength
- Secondary: Defense Penetration
|
| Ring 2 |
Dream Ring (for increased Stamina) |
| Melee Weapon (2H) |
- Primary: Strength
- Secondary: Melee Critical Rate + Melee Critical Damage / Defense Penetration
- Gems: Melee Critical Damage Increase
Note: For Dual Wielding, you want the same Stats and Gems on both of your Weapons.
|
Ranged
Weapon |
- Primary: Strength
- Secondary: Melee Critical Rate + Melee Critical Damage / Defense Penetration
- Gems: Melee Critical Damage Increase
|
| Instrument |
- Primary: Strength
- Secondary: Melee Damage + Parry Rate / Move Speed
- Gems: Melee Attack Increase
|
|
Odealo is a player-to-player marketplace for Archeage Gold, Items, and Power Leveling.
|
Other Random Things
- In PvP, Darkrunners are predators that wait for an ideal moment to pounce; their greatest strength comes from their ability to jump on an isolated, weakened, or defenseless prey. To master this Class, you have to act just like that; exploit weaknesses of your enemy and never pick up a fight you can't win... As a well-known Ganker proverb says, "fair fights are for losers".
- If an enemy manages to break your combo, disengage immediately. The more time you spend derping around in the heat of things, the less likely you are to survive. Get some distance, wait for your Cooldowns, and then re-engage on your conditions.
- To maximize your grinding efficiency in PvE, rotate your two basic combos, as they are on separate Cooldowns.
|
END NOTE
This Guide should help you master your Darkrunner and become a force to be reckoned with in both PvP and PvE environments. We hope that you have found it useful and informative, and maybe learned something new about your favorite game. If we have missed a piece of information that is important to you, please let us know!
Please do note that this is an early version of our guide, and we will be happy to receive constructive criticism, that will help us improve it, so leave your suggestions in the comments section below.
|
Pictures used in this article are the intellectual property of XL Games.
 ⇒
⇒  ⇒
⇒ 
 ⇒
⇒  ⇒
⇒  ⇒
⇒ 
 ⇒
⇒  ⇒
⇒  ⇒
⇒ 
