Last Epoch
Crafting Guide
Introduction
Crafting is a fundamental part of Gear Progression in Last Epoch and a large portion of the game's looting system is designed to support it. As a result, getting familiar with the Forge is fundamental for increasing the power level of your Last Epoch characters and progressing further in the end game. In this guide, we will go over the basics of Last Epoch's Crafting, explain how certain Crafting Items work, tell you what some of the terms used in crafting mean and give you some tips and tricks that will help you craft an optimal gear for your characters.
Important Note: Legendary Crafting is not in the scope of this guide. If you want to know more about Legendary Crafting, please refer to our Last Epoch Legendary Crafting and Temporal Sanctum Guide.
Last Epoch Crafting Basics
Last Epoch's Crafting System allows you to improve, modify, and even transform most Equipment pieces by adding, removing, or changing their Affix Shards. Crafting results can be affected by applying special Glyphs and Runes in the crafting process. The Crafting Window can be accessed by clicking the "F" hotkey.
|
Important Terms
Before we go over the Crafting Window, we should explain some of the important terms used in Last Epoch Crafting:
- Affixes - Modifiers that are often present on Equipment. Affixes can be added to most equipment (except Unique, Set, and Legendary) through the Crafting Interface. Affixes can modify one or more stats, add special effects, or even increase the level of some of your Skills. Each Affix can occur in 5 different Tiers*, where Tier 1 is the weakest and Tier 5 is the strongest. Each Affix Tier has a value range on the Stats it provides. Affixes are divided into two Subcategories:
- Prefixes - These Modifiers mostly consist of bonuses to Damage Stats, Attributes, Minions, Potions, and Defenses. Items have 2 Prefix Slots.
- Suffixes - These Modifiers mostly consist of bonuses to Status Effects (both Buffs and Ailments), Mana, Health, and Resistances. Items have 2 Suffix Slots.
- Stat Range - Affixes often don't have concrete values. Instead, each Affix Tier has a pre-determined range of values and a roll is made when the Affix is crafted to an item or upgraded. High-Rolls can be carried through Affix Tiers with the use of special Modifier Items.
- Sealed Affixes - Affixes sealed into Items with the use of a Glyph of Despair. Sealed Affixes cannot be further modified or removed in conventional ways, but do not occupy the regular Prefix/Suffix Slots (so Sealing an Affix frees up one of the Affix Slots on an Item).
- Affix Shards - These Shards represent Affixes in their Physical Form. Shards can be added to Equipment in the Crafting Process to modify the Equipment's Stats and Effects. Affix Shards are acquired by Shattering equipment with the use of
 Runes of Shattering, or by extraction via Runes of Shattering, or by extraction via  Runes of Removal. Runes of Removal.
- Implicit Modifiers (Implicits) - These are Modifiers that are inherent to specific Equipment. Implicit Modifiers are always present and are always the same for the same Item Bases, however, they might differ in Values. Implicits cannot be changed/removed, but their values can be re-rolled with the use of
 Runes of Refinement. Runes of Refinement.
- Glyphs - Crafting Support Items that can be used in the Support Slot of the Crafting Interface to affect the results or Circumstances of Crafting. They can grant various benefits (like a chance to preserve Forging Potential), preserve certain aspects of an item, and more. Used Glyphs are consumed, regardless of the crafting result.
- Glyphs drop from random Enemies and Containers and are sometimes awarded from Echoes in the Monolith of Fate.
- Runes - Crafting Support Items that can drastically change how the Crafting process works. Just like Glyphs, Runes can be placed in the Support Item Slot of the Crafting Window. When applied, they can Destroy an item and give you some Affix Shards in return, Re-roll all Affix Values on an item, turn an Item into a Unique or Set piece, or even create a Copy of an item, and more.
- Glyphs drop from random Enemies and Containers and are sometimes awarded from Echoes in the Monolith of Fate. Some of the Basic ones can also be purchased from Vendors.
- Forging Potential - A property of all Exalted, Rare, Magic, and Normal Equipment pieces, that is used at the Forge to perform crafting actions. Forging Potential serves as a limiter, as when an Item runs out of its Crafting Potential, it can no longer be Crafted (it can still be used, however). Higher Rarity Items will generally drop with more Forging Potential which makes them more desirable as Crafting Bases.
- Each time you use an Item in the Crafting process, some of its Forging Potential is reduced by a random amount inside a specified range (the range is indicated in the Crafting Interface).
- Loss of Forging Potential can be prevented with
 Glyph of Hope and certain Crafting processes do not cost any Forging Potential (adding random Affixes with the Glyph of Hope and certain Crafting processes do not cost any Forging Potential (adding random Affixes with the  Rune of Discovery, for example). Rune of Discovery, for example).
- You can use an item in Crafting for as long as it has any Forging Potential remaining, even if it's lower than the maximum amount of Forging Potential that may be deduced from it in the process.
- Critical Success - When this occurs, a random Affix of your Item will get upgraded an additional time, the Crafting Materials used won't be consumed, and Forging Potential will not be deduced. Every Crafting has a small chance of being a "Critical Success".
- Level Requirement - Adding Affixes to Items may add certain Level Requirements to them. You won't be able to craft items that would have a resulting level requirement higher than your current Character Level.
*With the exception of Naturally-occurring Affixes on the Exalted Items. These can roll T6 and even T7.
|
|
The Crafting Window
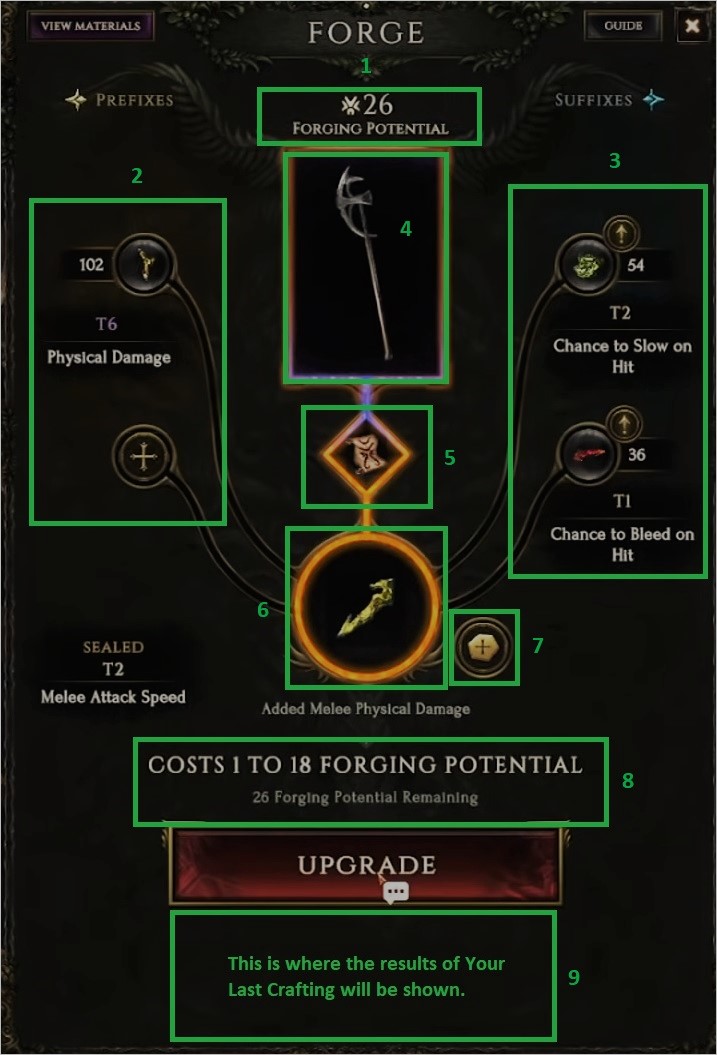
The Crafting Interface
- The Remaining Forging Potential of the selected Item.
- Prefix Slots. Empty ones are indicated with the "+" Icon. Tiers of the already existing Prefixes are indicated below their Icons.
- Suffix Slots. Empty ones are indicated with the "+" Icon. Tiers of the already existing Suffixes are indicated below their Icons.
- Crafted Item Slot. This is where you put the item you want to modify.
- Glyph Slot. This is where you can apply various Glyphs to affect the results of your Crafting.
- Affix Shard Slot. This is where you put the Affix Shard you want to add to your item.
- Rune Slot. This is where you add Runes to heavily affect the outcome of your Crafting.
- An indicator that shows the Remaining Forging Potential of the selected Item and the Range of the possible Forging Potential that will be consumed during Crafting.
- A Window that shows you the results of your previous Crafting Attempt.
|
|
What the Crafting System can be used for
- You can add up to 4 Affixes (2 Prefixes and 2 Suffixes) to an Item Base. This is done by selecting Affix Shards from the list and simply clicking "Craft".
- You can Upgrade the Affixes of a selected Item to higher Tiers. This is done similarly to adding a new Affix to the item.
- You can randomly change an Affix to a Different one that can appear on that Item Type.
- You can Remove one Affix from the selected Item at RANDOM.
- You can Seal an Affix to the Item, preventing it from being further modified but also enabling you to add a new Affix in its place.
- You can Shatter an Item to get a random selection of its Affixes as Shards.
- You can re-roll the values of all Affixes on an item within their tiers.
- You can reroll all Implicit Modifiers on an Item.
- You can add random Tier 1 Affixes to all empty Affix Slots on an item.
- You can Transform an item into a Unique or Set item of the same type.
- You can create a Copy of an Item.
Note: Actions from points 3 to 11 are performed with the aid of Runes and Glyphs. Check out the next section of this Guide for a detailed breakdown of how they exactly work.
|
Last Epoch Runes and Glyphs Explained
Runes and Glyphs provide Last Epoch's crafting system with a never before seen depth of possibilities. With them, you can affect the outcome of your crafting, stack the odds in your favor, obtain crafting materials, re-roll item modifiers, or even transform or duplicate Last Epoch Items! The number of Runes and Glyphs you currently own can be viewed in the Crafting Materials Panel in your inventory or in the Crafting Window itself.
Below, you will find a complete list of Last Epoch Runes and Glyphs together with in-depth explanations of what they do and how to take full advantage of them:
Glyph of Hope |
This commonly used Glyph grants your craft a 25% chance not to consume any Forging Potential of an Item, generally increasing the total number of crafts you can make with a single Item. With this Glyph, you can basically get a "free" craft 25% of the time, which is great if you want to make as good items as possible!
- Glyph of Hope is consumed even if the bonus was not successfully applied to the used item.
- It cannot be used on Set and Unique Equipment.
- Glyph of Hope is a relatively common drop from monsters so you should have no problems obtaining it in large enough quantities.
If you're not using other Glyphs, you should always use this one as it will improve your overall crafting results.
|

Glyph of Order |
Normally when an Affix is upgraded to the next Tier, its value is re-rolled within its range*. This can be a good thing if the roll from the previous Tier was bad, but if the roll was high, re-roll might turn out to be painful. This is where the Glyph of Order comes in, as it allows you to preserve the Roll of the upgraded Affix within its range.
- Glyph of Order has no effect on T5 Affixes as it only works when Affixes are upgraded and t% is max.
- It is best used to carry over High Affix Rolls from lower Tiers all the way up to Tier 5.
- It cannot be used on Set and Unique Equipment.
- Keep in mind that Glyphs of Order can't be used simultaneously with Glyphs of Hope, so you won't get a chance to preserve Forging Potential while using them.
*As you know, Affixes have stat value ranges within the Tiers (3 to 5 Strength or 7% to 11% increased Block Chance for example).
Some Stat Roll ranges are very wide in Last Epoch, so these Glyphs can come in very handy when you're optimizing your crafted equipment. They are more of an end-game thing, so don't waste them for crafting your basic equipment.
|

Glyph of Chaos |
This Glyph can be used to modify the outcome of a Craft when upgrading an Affix. Mainly, it randomly changes the Upgraded Affix to a Different one that can appear on that Item Type.
- Glyph of Chaos can be used during Affix upgrading.
- It can only be used together with an Affix Shard. Used Affix Shard will determine which Affix will be re-rolled. This means that you can use Glyph of Chaos strategically and predict the results to some extent.
- The new Affix will always be from the same category as the old one (Prefixes turn into new Prefixes and Suffixes turn into new Suffixes).
- The new Affix is chosen at random, depending on the Item Type. It will also be 1 Tier higher than the Affix that's being replaced.
- The latter also means that you can't use Glyphs of Chaos to re-roll Tier 5 Affixes as they can't go up to T6.
- Affixes that already exist on the Item cannot be duplicated with this Glyph.
- It cannot be used on Set and Unique Equipment.
- It is a good idea to keep a stock of Affix Shards that seem useless to you as you might need them re-roll their corresponding Affixes, with a Glyph of Chaos, on the Items you're using.
This Glyph is a powerful tool that can be used to refine your Items a bit. For example, if you have an Item with 3 great bonuses for your build and 1 useless one, you can use it to re-roll the latter for a chance of obtaining an Affix that is actually useful to you. Because the new Affix is rolled from the pre-existing table, you can predict the results to some extent and determine if it's worth it. Depending on the Tier of Affix you want to re-roll, you'll get a different number of chances (because of how Glyph of Chaos works, T4 Affixes can be re-rolled once, T3 twice, etc.).
|

Glyph of Despair |
This powerful Glyph gives you a chance to Seal an Affix instead of upgrading it. A Successfully Sealed Affix is moved to the dedicated slot in the item details panel and its properties are frozen (so, you cannot modify that affix in any way anymore). You can have a maximum of one Sealed Affix on an item.
- When you Successfully Seal an Affix, the Affix Slot it was occupying will be freed thus enabling you to add another Affix in that slot.
- Thanks to this, you can exceed the usual max number of Affixes on an item by 1, for a total of 5.
- Sealing a Prefix will allow you to add another Prefix to an Item (same with Suffixes). So you can have 1 extra Offensive or Defensive modifier on your item!
- Sealing an Affix consumes some of the item's Forging Potential. Remember this, because if an item doesn't have enough Forging Potential left after Sealing, you might not be able to add another Affix in the Sealed one's place.
- Sealing is not Guaranteed; Lower Tier Affixes have a higher chance of successfully being Sealed. Moreover, the more Affixes an item has, the higher chance to Seal one of them.
- The chance of Sealing an Affix is also higher for Exalted Items.
- The maximum Tier of an Affix that can be sealed is Tier 4.
- This is because of the fact that you can't use Shards on T5 Affixes which also prevents you from sealing them.
- The only way of removing a Sealed Affix is by applying a
 Rune of Ascendance. Moreover, the Sealed Affix cannot be modified in any way. Rune of Ascendance. Moreover, the Sealed Affix cannot be modified in any way.
- It cannot be used on Set and Unique Equipment.
|
Rune of Shattering |
These handy runes are used to create a random number of Affix Shards from Items. The extraction process destroys the used Item and generated Affix Shards are based on Affixes that were present on it.
- Rune of Shattering has a rather high Drop Rate and can be purchased from vendors without any limitations.
- Using Rune of Shattering on an Item will always yield at least one Affix Shard.
- It can be used to extract Shards from Sealed Affixes, but it's not reliable because of its random nature.
- It cannot be used to extract Affixes from Legendary, Unique, or Set Equipment.
- Extracted Shards will be sent to your Forge automatically.
If you're looking for a cheap way to obtain Affix Shards from Items, this is it. Thanks to this rune, you can easily stock up on a plethora of Affix Shards. If you're interested in extracting a specific Shard (a rarely occurring Affix or one that you require for your build, for example), however, you'll be better off using the Rune of Removal instead.
|
Rune of Removal |
Rune of Removal removes a random Affix from an Item, granting you a number of Affix Shards corresponding to it. This Rune is much more reliable when it comes to extracting specific Affix Shards from Items and thus is much more valuable and handy to have than the very random Rune of Shattering.
- The Extracted Affix is Random but the Item is not Destroyed in the extraction process.
- Can only be used on Items that have at least 1 Forging Potential remaining and using it on an item will remove some Forging Potential from it.
- If the Item runs out of Forging Potential before you're able to extract your desired Affix, you'll still have to use Rune of Shattering.
- The number of extracted Shards is equal to the number of Tiers of the extracted Affix.
- It cannot be used to extract Affixes from Legendary, Unique, or Set Equipment.
These Runes are more expensive and rarer than Rune of Shattering but they offer a much more reliable way of extracting Affixes from Equipment. Use them to maximize the probability of obtaining Rare and desirable Affix Shards from Items.
|
Rune of Refinement |
This handy Rune can be used to Reroll the values of all Affixes on an item within their tiers (so stat ranges still apply and cannot be exceeded).
- Keep in mind that Rune of Refinement will Reroll ALL unsealed Affixes present on the Item. This means that using it on an item that has rolled higher than Average on its Affixes might not be a good idea.
- It is best used on items with Below Average range values on Affixes, to bring the Average up.
- Using Rune of Refinement will consume some of the item's Forging Potential, so you can't just re-roll your Affixes indefinitely.
- Rune of Refinement can be used with Glyphs.
If you've just crafted yourself an item with Affixes that are ideal for your build, but you were unlucky with Tier Range rolls, this rune can help you fix that!
|

Rune of Shaping |
Some Implicit Modifiers on items can be very powerful, especially if they high-roll. Naturally, you want your crafting bases to be as strong as possible, which means that you should focus on items with high Implicit rolls, but sometimes you get an item with great affixes but a low Implicit roll. This is where the Rune of Shaping comes in. It lets you reroll all Implicit Modifiers on an Item, potentially turning an average crafting base into a very powerful one.
- Rune of Shaping can be used together with Glyphs.
- This Rune is especially worth using if the Implicit bonuses on your item are of high value to you, but they low-rolled.
- Some Implicit ranges are very high, remember to check if re-roll is worthwhile.
- Using Rune of Shaping will consume some of the Item's Forging Potential.
|
Rune of Discovery |
This fun Rune adds random Tier 1 Affixes to all empty Affix Slots on an item. It has an increased chance of rolling rarer Affixes, which gives it the potential for interesting high-rolls.
- Rune of Discovery does not consume any Forging Potential, but it can't be used on Items with no Forging Potential remaining.
- It can be used to fill the remaining slots on items that have very little Forging Potential remaining, for a chance of getting useful T1 Affixes.
- It can also be used strategically to finish off Items that offer multiple Affixes that are of use to you (more useful Affixes for a slot = a higher chance of getting something useful from this Rune).
- By using Rune of Discovery to add the last remaining Affix on an item that can have multiple useful ones still added, you basically gamble to preserve some of the item's Forging Potential.
- It's very beneficial at low levels as it allows you to get Affixed Items very cheaply (and sometimes the affixes might even be useful to you...).
- Runes of Discovery are quite common and you can easily find them even at low levels, so don't hesitate to use them.
|
Rune of Ascendance |
This crazy Rune changes an item into a Unique or Set item of the same type (Armors, Helmets, Gloves, etc.). Some Set pieces and Uniques are extremely powerful, so this Rune has a crazy high-roll potential. It's also very fun to use.
- Only World Drop Set/Unique Items can be created with the Rune of Ascendance.
- If you're looking for a specific Set or Unique gear piece, you should use these Runes on items of the same type you're looking for. Who knows, you might get lucky and spare yourself hours of grinding.
These Runes offer an alternative fun way of obtaining Uniques, which makes them our favorite. Using them is like buying unidentified Items, but you always win a Set or Unique item!
|

Rune of Creation |
This is the rarest and the most powerful of all the currently available Runes. It Duplicates an item, setting the Forging Potential of the base and the copy to 0 in the process (so it can be used only once on any Item and can never be used on created copies).
- Copy of an item created with Rune of Creation will always retain the properties of the crafted item.
- It can only copy items that have at least 1 Forging Potential remaining.
- Both the Original and the Copy turn uncraftable in the copying process.
- In Singleplayer, it's best used on Items you can use multiple copies of, like One-Handed Weapons or Rings.
- These Runes are crazy expensive in the multiplier, so think twice before using them there.
|
Last Epoch Affix Shards and Crafting Tips
Crafting offers you a world of opportunities to make your Last Epoch characters stronger and your builds more refined. While the whole system can feel a bit intimidating at first, it's intuitive enough to a point where you should be able to familiarize yourself with it pretty quickly. We have certainly grown to appreciate it and now can't imagine a modern aRPG without a similar system! Thousands of Crafting attempts have also allowed us to gather some experience and we want to share it with you, so here's some advice regarding the whole Crafting System and its components:
- Before you even start crafting, check which Stats are the most useful for your Build, and try to find Item Bases that already have some Affixes that are of use to you. Crafting items from scratch (by starting with an item that has no Affixes) is most often a waste of resources unless you want to gamble with a Rune of Discovery.
- Noteworthy Affixes that are great for pretty much any build are Affixes that increase Skill Levels (these can be added to Helmets, for example). They are, however, very rare so you should think twice before taking them higher than Tier 1. Even T1 Skill-Increasing Affix is very powerful, especially as Tiers 1 to 4 give +1 Skill level and the only difference is in the added secondary benefit. You get additional Levels starting at T5.
- The difference between Tier 4 and Tier 5 Affixes is often huge, so choose which of the you want to take all the way up to 5 carefully. Most of the time, you'll have enough Forging Potential to increase just 1 (maybe 2 if you're very lucky) to 5. Rolling Critical Successes will help with this...
- Runes of Shattering are your best friends. Always try to have a hefty amount of them on you to shatter your looted items on the fly. There are never enough Shards, and thus there are never enough Runes of Shattering! You never know what Affix Shards you might need for your future crafting.
- Don't waste your resources on crafting high-end Affixes on low-level bases. The real challenge begins in the end-game, it's the end game where you need the most powerful items, and so that's when you should start your real crafting endeavors. At lower levels, simply adding T1 affixes to a decent base or even using a Rune of Discovery is often good enough.
- Always calculate and think twice before you take a risk! The end results of Last Epoch Crafting might be quite random, but the end result is heavily affected by your choices. For example, maybe it's not worth it to take an Affix to T4 before attempting to seal it. Maybe using a Rune of Discovery to roll on the last Affix on a good base is a good idea to increase its overall crafting potential. Think in risk vs reward terms and your overall crafting results should improve.
- If you find a good Item Base, but you have no use for it currently, stash it for later!
|
|
END NOTE
If you've found this guide helpful and informative, don't hesitate to leave a comment below, it will motivate us to continue our work. If you have a question regarding a part of the guide, or if something is unclear, please let us know and we'll do our best to answer it! Also, please note that this is an early version of our guide, and we will be happy to receive constructive criticism, that will help us improve it, so leave your suggestions in the comments section below.
|
Pictures used in this article are the intellectual property of Eleventh Hour Games