Escape from Tarkov The Lab Map Beginner's Guide
Beginner's Guide to The Lab Map in EFTEscape from Tarkov
Beginner's Guide to The Lab
Introduction
The Lab is a top-secret underground laboratory facility built by the Terra Group underneath the city of Tarkov. It does not exist in any official records and its existence surfaced only after the Tarkov conflict escalated and personnel evacuation had to be carried out. Documents and data salvaged by PMC operatives suggest that the lab specialized in biological, biotechnological, physical, chemical, and high-tech areas. Moreover, the state of some of the work areas, their design, and equipment seems to suggest that many of the experiments that were carried out here were forbidden by law (biological agent tests on living subjects (humans), that were most likely carried out in the test room, for example). Lore-wise The Lab is definitely one of the darkest and the most disturbing places in Tarkov as it shows the true face of the Terra Group corporation. Each Raid in the Lab lasts for 45 minutes and features from 6 to 10 players and multiple Scav Raider spawns (some of which can be triggered by players; by activating certain extraction points, pressing buttons, etc.).
This is what you should expect from an average Lab Raid:
- Some of the best loot available in the game. Some areas inside of the Terralabs are filled to the brim with rare and valuable items; there is more than any player (or even a squad) can carry.
- Item insurance will not work here. Any items lost by players during a Raid will not be recovered. This feature adds to the "secret" status of the place - the trader's recovery teams are not able to locate the lab.
- Scav Raiders spawn all around the Lab after certain events are triggered. Beware as they are formidable (and a bit bugged; they will lock on to, and shoot, you through walls and cover) enemies, but once defeated they leave high-end loot, including fully-modded weapons, high tier armors, helmets, and rare ammunition. Raiders are one of the main reasons for The Lab's popularity among players - farming them is one of the best ways to make a lot of money in EfT.
- Player squads are very common in the Lab as going in alone is suicidal. Expect to fight well-equipped and well-organized enemies.
- Many extraction points have to be activated before use and activating them spawns Scav Raiders. Be prepared for that or you might die at the very end of your adventure.
- After an event is triggered inside The Lab (extraction activation, etc.) it will be announced through the lab's intercom system.
Points of Interest
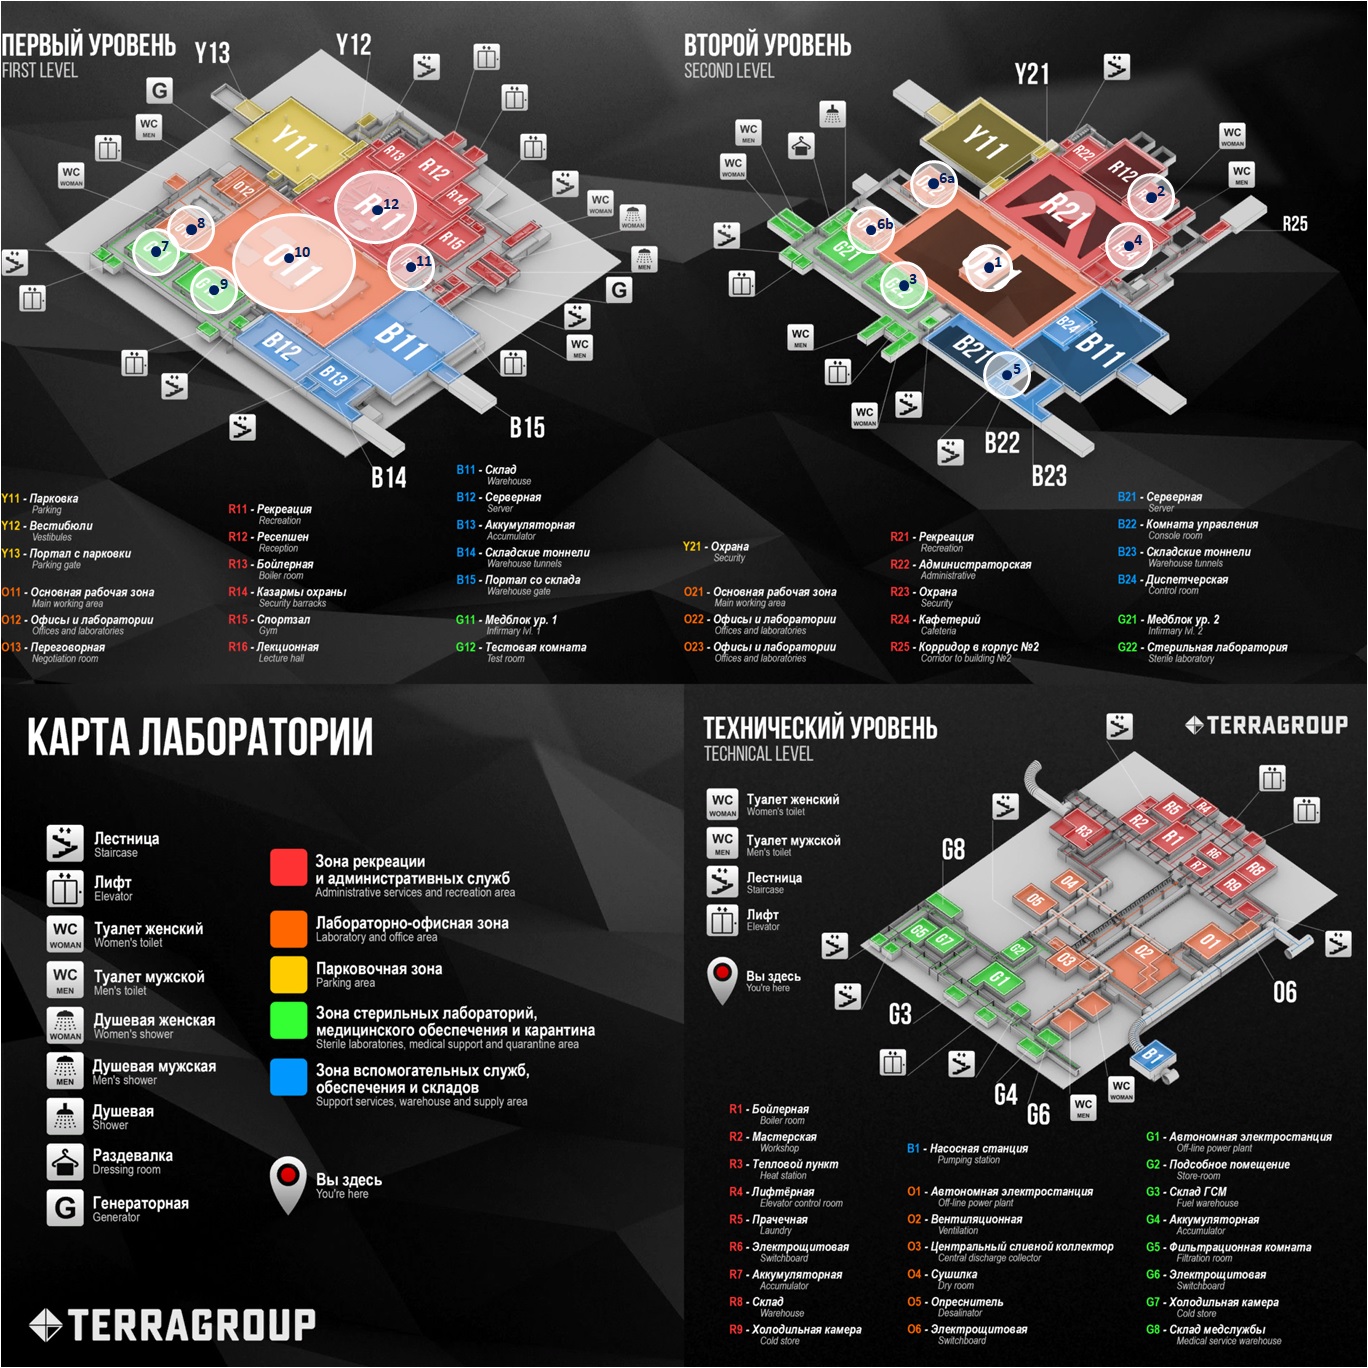
There are very many interesting (and sometimes very dangerous) places to explore inside Terra Group's underground laboratory complex located in Tarkov, from abandoned parking lots, through many laboratory areas, offices, and test rooms, to highly-secured arsenal rooms; here are some of the most interesting locations (possible loot included).
Note1: Left-clicking on the map will open the full-sized version in a new window.
Note2: We plan on expanding this section of the guide and making it much more detailed in the future (some points of interest that are bulked together might be separated, others will be added, etc.).
 |
|
1. Lab's Manager Office Placed in the center of the Terra Group's Laboratory, the Laab's Manager Office overlooks a large portion of the Lab's main working areas; this means that players who go there are rather exposed as they can be clearly seen from every one of the second level's main corridors. Manager's Office gets even more dangerous if Scav Raiders have spawned, as they will lock on to the player's head and obliterate him in mere seconds if he shows himself in one of the room's windows. The Lab. key. Manager office [Lk.MO] is needed to access this area (it spawns in the Lab, inside the O13 room, on the lit-up desk). |
|
Location - The room that hangs above the main working area (O11) accessible from the O21 (second level of the main working area). Lab's Manager Office is marked as number "1" on our Map. |
|
Possible Loot: A Weapon Box, a single PC Block, a Drawer, and multiple rare items spawns scattered around the office, an M4A1 Weapon spawn on one of the computer desks, and a lootable Safe. The Lab. Green Keycard [Green] spawns on the manager office's reception desk (the desk can be seen as you approach the area, the spawn is located near an opened book, close to the keyboard). |
|
2. Security Office, Arsenal Security Room, and Lab. Security Post The holy grail of all PMC's (if they have appropriate keys and keycards, of course). The Security Office and its locked areas contain some of the best loot available in the game. If you are after rare items, weapons, ammunition, weapon mods, or meds, there is no other place to find them. However, the keys needed to fully exploit this area are astronomically expensive (Lab. Red Keycard is one of the most expensive items in the game, and the rest of the keys needed here are not cheap either). To fully explore this area, you will need the following keys:
|
|
Location - Room R23 that overlooks the Lab's main reception area (R21) (when you exit the cafeteria (R24), go past the bathrooms (they should be on your right-hand side) and open the first door on the right. The Lab's Security Office, Arsenal Security Room, and Lab Security Post are marked as number "2" on our Map. |
|
Possible Loot:
|
|
3. Sterile Lab Block (Lab's second level) Laboratory equipped for sterile work. Biotechnological, microbiological, and cell line experiments were carried out here. Because of its previous purpose, the room is filled with laminar chambers (work stations designed for sterile work), microscopes, pipettes, centrifugal separators, incubators, and other lab devices. If you are looking for medical supplies and/or injectors, this is one of the better places you can visit on this map. |
|
Location - On the lab's second level, above the main working area, opposite of the Lab's Manager Office. The Sterile Lab Block is marked as number "3" on our Map. |
|
Possible Loot: Multiple medical loot spawn points on tables and shelves, Portable defibrillator spawns on tables, Adrenaline Injectors and Combat Stimulant Injectors SJ1 TGLabs spawn on shelves and tables, some Weapon Mod spawns on shelves. |
|
4. Cafeteria The place where the Lab's workers and visitors would come to have their lunch and an afternoon coffee. It is designed like a regular lunch bar with bain-marie food warmers and tables. The Cafeteria overlooks the Lab's Reception area. |
|
Location - Room R24 on the Lab's second floor, adjacent to the lab's main kitchen. Cafeteria overlooks the main reception area (R21). The Cafeteria is marked as number "4" on our Map. |
|
Possible Loot: Lab. Yellow Keycard [Yellow] spawns on a center table near the window that overlooks R21 (Reception), some possible provision spawns scattered around the room. |
|
5. Small Kitchen / Server Office A small room with some computer desks and Kitchen/Leasure area. Most likely, it was used by the Lab's technical/IT workers. There is a staircase that leads to the Lab's Warehouse (B11) in the back of the room (which means that this is a good place to hide and heal up, as it offers a quick escape route). It is also possible to go straight into the Server Room (B12) from the corridor that leads to this place. |
|
Location - Above the Server Room (B21) on the Lab's second level, the area is accessible from the southern corridor of the Main Working Area (O21) - go through the catwalk above the server room. The Small Kitchen / Server Office is marked as number "5" on our Map. |
|
Possible Loot:
|
|
6. The second level's Office/Laboratory areas This is where a large portion of the data collected from the experiments carried out in the Lab was being studied and processed. These rooms are filled with multiple computer work stations, document shelves, and other office-related stuff (both of the rooms look very similar and can be confused with each other is the player doesn't know his way around the lab yet). Some of the shelves in the rooms might still hold items that once belonged to the lab's workers.
|
|
Location - The Lab's second level, by the infirmary (Office O23; 6b on our map) and near the Garage's security area (Office O22; 6a on our map). These areas can be easily accessed from the second level's main corridor (western part). The second level's Office/Laboratory areas are marked as numbers "6a and 6b" on our Map. |
|
Possible Loot: In both Offices: multiple PC Blocks under the desks, lootable Jackets, a Safe, loose loot on the Shelves (including rare items). In the O22 Office: possible Lab. Black Keycard [Black] spawn on a computer desk, possible Lab. Key. Manager Office [Lk.MO] spawn next to the powered laptop. |
|
7. The Infirmary level 1 / The Quarantine Area A Hermetically sealed Quarantine Area, that was probably used as a sickroom in which contagious biological agents (viruses, bacteria, and prions) were tested on living subjects (alternatively, this might just be a regular infirmary in which sick lab workers were isolated and treated, but conspiracy theories are way more interesting, especially when the Terra Group is concerned). The Lab. Blue keycard [Blue] is needed to enter the Quarantine Area (it spawns in Shoreline's Health Resort; Office 112, Office 104, and inside of an ambulance that is parked in front of the Resort). Note: This is one of the best places, in the game, to stock up on medical supplies. |
|
Location - The Lab's first level, near the Negotiation Room (O13), accessed through a corridor that looks like taken from an epidemic movie. The Infirmary level 1 / The Quarantine Area is marked as number "8" on our Map. |
|
Possible Loot: Multiple loose medical supplies (on beds and on the shelves), a Medbag. |
|
8. The Negotiation Room At first glance, this room looks just like all other Lab's office areas, but it also holds a leisure area with poufs and a pool table that makes it easy to recognize. Besides the leisure area, the room's layout is rather similar to rooms O23 and O22 on the second level (computer desks, shelves, and other office-related stuff). Some of the shelves in this room might still hold items that once belonged to the lab's workers or people who were invited for negotiations. |
|
Location - The Lab's first level, near the 1st level's Infirmary/Quarantine Zone (G11), adjacent to the main working area (O11). The Negotiation Room is marked as number "8" on our Map. |
|
Possible Loot: Multiple PC Blocks, a Weapon Spawn on the pool table, loose loot on the Shelves (including rare items), and the Lab key. Manager Office [Lk.MO] spawn on the table next to the room's main entrance (on the left-hand side). |
|
9. The Test Room / Experiment Area One of the creepiest areas inside the Terra Group's laboratory. This room is filled with various lab equipment and shelves located against the walls, but the thing that makes it disturbing is in its center... the middle of the room is occupied by a glassed-off cell that holds a single hospital bed. Judging by the bloody handprint on the cell door's window, the person that was held inside didn't like it... While the purpose of the Quarantine Area can be debated, this room was definitely used for experiments that involved deadly and highly contagious biological agents. The Lab. Black keycard [Black] is needed to access this area (it spawns in the sterile lab block (G22) on the lab's second level). |
|
Location - Lab's first level, near the 1st level's Infirmary/Quarantine Zone (G11); further along the corridor, locked door on the left, behind the corner. The Test Room / Experiment Area is marked as number "9" on our Map. |
|
Possible Loot: Some loose medical items can spawn on shelves that stand against the room's walls, and one Medcase can be found in one of the room's corners. Note: Loot-wise, this room is very disappointing, but it is a cool area to explore nevertheless. |
|
10. Lab's Main Working Area / Open Area As the name suggests, this is where most of the experiments were carried out by the lab's workers. The area is filled with laboratory work stations, scientific equipment, computers, high-tech devices, chemicals, document shelves, and other lab-related stuff. Despite being called the "Open Area" there is quite a lot cover here (just don't count on ply wood separators, between work stations, to stop a well-aimed bullet). If you are looking for loot, this is where you will find a lot of it, more than you can carry in fact. This area also contains the enclosed Weapon Testing Area that requires the Lab. key. Testing area (weap.) for access (the key spawns in room R15 on a stool, and on the kitchen counter in the room above Server (number 5 on our list)). Inside the testing area, there are multiple weapon racks and practice targets. |
|
Location - The big open room in the middle of the Lab's first level, behind the Reception (R11). Lab's Main Working Area / Open Area is marked as number "10" on our Map. |
|
Possible Loot:
|
|
11. The Lecture Room / Auditorium A regular, university-esk, lecture hall. During the good-old-days of the facility, science Conferences, aimed at presenting the newest experiment results and breakthroughs made in the lab, were regularly held here. Now, it lays empty and all that remains are some abandoned laptops, audio-video equipment, notebooks, and other stuff left here after the last ever lecture. |
|
Location - The Lab's first level, accessible through the Reception room (R11). The Lecture Room / Auditorium is marked as number "11" on our Map. |
|
Possible Loot: Loose Weapon spawn in the back of the room (on one of the desks in the last row), UHF RFID Reader and spawn on the lecturer's table (by the screen), and some possible loose loot spawns on the audience tables. |
|
12. Lab's Reception Area The Lab's main waiting room/reception. This is where the lab's visitors would wait for their tours/lectures/audiences/job interviews. It was designed to make waiting pleasant and there are still live plants growing in flower tubs between benches. Unlike the main working area, Reception does not offer too much cover, so you shouldn't hang around here for too long (especially considering that there are Scav Raider spawns around). Lab's main parts on both the first and second floors can be easily accessed through the Reception area. |
|
Location - The Lab's first level, adjacent to the main working area. Lab's Reception Area is marked as number "12" on our Map. |
|
Possible Loot: Tetris, computer parts, and VPX Flash Storage Module spawn by the entrance to the Lecture Room (R16), loose loot on tables and benches. |
Spawns and Extractions
| Detailed Extraction/Spawn map of The Lab coming soon! |
|
Spawns Coming Soon! |
|
Extractions Coming Soon! |
Raid Strategy
| Coming soon! |
|
END NOTE Escape of Tarkov is a tough game with a steep learning curve. This is why we have decided to aim this guide at new players who tend to struggle with their first Raids and help them learn about different maps that the game has to offer. We hope that you have found this guide useful and informative. If we have missed an important piece of information, please let us know! Also, we will be happy to receive constructive criticism that will help us improve our future work so leave your suggestions in the comments section below. |
Pictures used in this article are the intellectual property of the Battlestate Games.
