 Buy/Sell
 Log in

Consecrated Path of Endurance Earthbreaker Totem Juggernaut
A Melee Totem build for a Juggernaut that uses Consecrated Path of Endurance on the Dawnstrider Boots.Consecrated Path of Endurance
Earthbreaker Totem Juggernaut Build
Updated for Patch 3.29
The Best Crafty Guides by Odealo
| Guide notes | |||
| August 26, 2026 -Build created |
|||
| Build overview | |||
| Tags: [TOTEM] [ELEMENTAL] [LIFE] [MELEE] | |||
|
Budget: Defenses: |
|
Boss DPS: AoE: |
|


Dawnstrider Boots are the only way to have a Melee Totem; you can socket any Slam Skill Gem in them for it to be automatically linked with built-in Earthbreaker Support, which lowers Attack Speed but grants more Damage. The Ancestral Bond Keystone and Multiple Totems Support increase the Totem limit to four. We could summon two more with a Shaper's Shield and Hierophant's Pursuit of Faith, but instead of that, we decided to equip a two-handed Weapon on a Juggernaut. Juggernaut is a durable ascendancy specializing in Endurance Charges, and to benefit from them offensively, the Slam Skill of our choice is Consecrated Path of Endurance. This version of Consecrated Path deals more Area Damage and has more Area of effect per Endurance Charge spent on the Attack. The Slam has a 2-second Cooldown otherwise. Note that Totems can and will get their own Endurance Charges, up to three of them, but that's irrelevant because Consecrated Path of Endurance is special, and it calculates damage and AoE based on the player's Charges, not the Totems'. It also makes Totems able to teleport, making it the most mobile Totem build out there.
We've used Wilma's Requital Helmet for a huge Attack Speed boost, Replica Farrul's Fur for a steady supply of Frenzy and Endurance Charges, Rakiata's Dance for the weapon, and, most importantly, Pearl of Tsoatha Rings. Introduced in 3.29, these Rings add Support Gems to Skills socketed in Helmet, Gloves, or Boots. We want the Boots variant with something useful on them, like Close Combat or Hypothermia. This one item elevates the build from a low tier to one that's actually good, with over 20mil DPS. The best part is, you can equip two of these Rings for up to 4 additional Support Gems, making it a potential 8-link.
Defensively, the build relies on Endurance Charges (8 or more), 5% of Damage taken from Totems, and Armour to withstand the damage. Recovery is hard to come by, but the basic Regeneration will suffice. Offensively, it deals all three types of Elemental Damage in roughly equal parts, with some Physical and Chaos on top. Unfortunately, we cannot use Trinity Support with Totems. It's also difficult to get any meaningful Crit Chance, so allocating Precise Technique is what we did; it's very easy to enable with Juggernaut's Undeniable passive.
1. Gameplay
Place Totems and let them loose. They will last 20 seconds each and are somewhat durable. In the meantime, your character will use damage-less Attacks: Smite to add Lightning Damage for a duration and Leap Slam to move around. They're linked with Rage and Hallow, so keep using them on bosses to increase your DPS. For a Curse, you can choose Warlord's Mark or Punishment. You can also use Warcries, but their effect is not as substantial. Blood Rage and Immortal Cry are linked with Automation. Your passive skills are Aspect of the Cat, Haste, Purity of Elements, Precision, Herald of Ice, and Blood and Sand.
|
|


2. Build's PROS & CONS
| PROS |
|
| CONS |
|
3. Leveling tips
You cannot level up with Dawnstrider because it's an item available at level 62. Instead, start with Sunder. Allocate Undeniable first and then Precise Technique immediately after. The items that you will want early on include Replica Karui Ward, Replica Hinekora's Sight, Empire's Grasp, Kaom's Sign, Prismweave, and a variety of Unique Axes. For Skills, keep Static Strike and Blood Rage on, and focus more on the base Physical damage of Sunder. Add some Fire Damage with Herald of Ash and Infernal Cry, but do include Seismic Cry and Intimidating Cry. On the Skill Tree, allocate Graceful Assault for Onslaught, something for Rage on Hit, and multiple 2-hand and Axe passives for damage. Durability stems from the aforementioned items and capped Elemental Resistance. Later on, start allocating Maximum Endurance Charges and improve your mana management with Reservation and Cost Efficiency. You can swap to the Consecrated Path of Endurance after the second lab where you allocate Unflinching. It's when you should Convert all that Physical Damage to Elemental with a Fire Mastery, or with Avatar of Fire if you don't sport any Added Cold or Lightning Damage. You'll still use the Slam yourself; the Totems become available at the end of the campaign. Alongside Dawnstrider, start wearing Wilma's Requital and enable Haste. After equipping Rakiata's Dance, make sure to abandon a Curse that lowers Fire or Elemental Resistance, and any source of Fire Exposure. Throughout this whole process, remember to have your Accuracy higher than Maximum Life.
Bandits:
An additional Passive Skill Point seems like the best option.
4. Final Skill Tree, Ascendancy Points, and Pantheon
Final Skill Tree:
106 Points Final Skill Tree (doesn't include Cluster or Unique Jewels)
121 Points Path of Building (PoB) link
Ascendancy points:
Preferably in that order:
- Undeniable
- Unflinching
- Unyielding
- Unrelenting
Pantheon:
Major God: Soul of the Brine King: You cannot be Stunned if you've been Stunned or Blocked a Stunning Hit in the past 2 seconds; 100% chance to Avoid being Frozen; 50% reduced Effect of Chill on you
Minor God: Soul of Gruthkul: 1% additional Physical Damage Reduction for each Hit you've taken Recently up to a maximum of 5%
5. Final Gems links
| [DPS] Consecrated Path of Endurance setup socketed in Dawnstrider |
|
 |
Consecrated Path of Endurance - A Slam Attack that teleports the Totem to a Target. It uses Endurance Charges for more damage and AoE. We have listed more Support Gems in the gear section (Pearl of Tsoatha). |
 |
Earthbreaker Support - Linked Slam Attack is now used via Totem proxy. |
 |
Multiple Totems Support - Lets you summon two more Totems, one more at a time. |
 |
Endurance Charge on Melee Stun Support - Generates Endurance Charges on Melee Stun and grants more Damage per Endurance Charge. |
 |
Pulverise Support - Much more Area Damage and AoE, but lower Attack Speed. |
| [UTILITY] Reservation setup | |
 |
Haste - Increased Attack and Cast Speed. It is twice as effective with Wilma's Requital. |
 |
Purity of Elements - Additional Resistances. They most likely won't be needed for the character, but the Aura improves damage with Rakiata's Dance and Runegraft of Treachery. |
 |
Precision - Accuracy that may be needed for Precise Technique to work. |
 |
Blood and Sand - Lets you choose between more concentrated or more spread-out damage. We recommend the Blood Stance since AoE is good enough already. |
 |
Herald of Ice - Adds Cold Damage to Attack and Triggers Cold explosions on kill. |
 |
Enlighten Support - Linked Skills Reserve less Mana. |
| [UTILITY] Attack setup | |
 |
Leap Slam - The movement ability to move around the map faster. |
 |
Smite - After landing a Hit, it grants an Aura for Added Lightning Damage. The Vaal variant grants even more. |
 |
Rage Support - Generates 3 Rage on Hit. Rage grants more damage for the character, but it will transfer to Totems. Totems don't have their own Rage. |
 |
Hallow Support - Applies Hallowing Flame on Hit. It's a debuff, consumed on Hit, that causes the target to receive extra Fire Damage sourced from Physical Damage. |
 |
Faster Attacks Support - Increased Attack Speed for Leap Slam and Smite. |
 |
Lifetap Support - Linked Skills cost Life instead of Mana. |
| [UTILITY] Automation setup | |
 |
Automation - Linked Spells are Triggered whenever they're off cooldown. |
 |
Immortal Call - Consumes Endurance Charges, which you have a lot of, to create a protective barrier that reduces damage taken. |
 |
Blood Rage - Increases Attack Speed but drains Life over time; easily sustained. |
|
Lifetap Support - Linking it with Blood Rage will increase its cost, so you may want to avoid it. |
| [UTILITY] other Gems | |
 |
Infernal Cry - Use to get a Buff that grants Extra Fire Damage from Physical Damage. The Combust component is not very impactful. |
 |
Intimidating Cry - Intimidates nearby enemies so they take increased damage. It's not needed if you have another source of Intimidation. |
 |
Punishment - It's the best offensive Curse. Enemies take much increased damage when on Low Life. You can replace it with Warlord's Mark for various other bonuses. |
|
Lifetap Support |
| [UTILITY] Aspect of the Cat | |
 |
Aspect of the Cat - Cat's Agility increases Attack and Cast Speed; Cat's Stealth increases Stealth and grants a 15% chance to Avoid Damage. It has to be crafted on a Rare Item. |
|
|
5. Gear Setup
We've used many Uniques; Resistances are easily capped with them alone. You may even get away with using only Unique gear pieces, but it's better to have at least a Rare Glove or Body Armour, mostly to fix missing Attributes and put the Aspect of the Cat on it. Another important thing is to have more Accuracy than Maximum Life to enable Precise Technique; specializing in Critical Strikes is inefficient here. Rage, Intimidation, and Frenzy Charge generation come from Items, the Skill Tree, and Skills. Reservation Efficiency is gained from the Runegraft of Treachery, but you may need an additional 2% on a Jewel depending on your Totems' Mana Cost. On Rare Items' Suffixes, focus on Intelligence and Dexterity with Chaos Resistance. On Prefixes: Maximum Life. Don't forget to Corrupt cheap Uniques for a new, hopefully good, Implicit.
|
Stat priorities on items:
|
 (Helmet) Wilma's Requital - Wilma's Requital causes Cast Speed to affect the attack rate of Totems, doubling the effect of Haste, Onslaught, Cat's Agility, and Frenzy Charges. It has Accuracy, also useful. (Helmet) Wilma's Requital - Wilma's Requital causes Cast Speed to affect the attack rate of Totems, doubling the effect of Haste, Onslaught, Cat's Agility, and Frenzy Charges. It has Accuracy, also useful. |
|
| +(300-500) to Accuracy Rating (200-250)% increased Energy Shield Increases and Reductions to Cast Speed apply to Attack Speed (20-30)% increased Elemental Damage with Attack Skills Ancestral Bond |
|
 (Body Armour) Replica Farrul's Fur - It would be extraordinarily difficult to gain Frenzy Charges if not for this Body Armour. (Body Armour) Replica Farrul's Fur - It would be extraordinarily difficult to gain Frenzy Charges if not for this Body Armour. |
|
| (100-150)% increased Armour and Evasion +(80-100) to maximum Life +2.00 seconds to Cat's Agility Duration Aspect of the Cat has no Reservation Gain up to your maximum number of Frenzy and Endurance Charges when you gain Cat's Agility You have Onslaught while you have Cat's Agility |
|
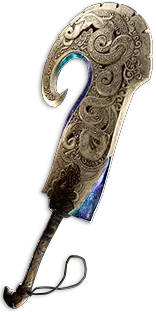 (Weapon) Rakiata's Dance - This Sword has high base Cold and Lightning Damage, and it inverts enemies' Resistances, so Elemental Weakness and Exposure are redundant. It's by far the best choice out of all Unique weapons, but Voidforge or a good Rare can also work. (Weapon) Rakiata's Dance - This Sword has high base Cold and Lightning Damage, and it inverts enemies' Resistances, so Elemental Weakness and Exposure are redundant. It's by far the best choice out of all Unique weapons, but Voidforge or a good Rare can also work. |
|
| 60% increased Global Accuracy Rating Adds (150-200) to (300-350) Cold Damage Adds 1 to (550-600) Lightning Damage (15-20)% increased Attack Speed Treats Enemy Monster Elemental Resistance values as inverted |
|
 (Gloves) Rare Gloves - On Rare Gloves, get Dexterity, Maximum Life, craft Aspect of the Cat, and look for Added Elemental Damage to boost your DPS. Resistances are not needed unless you want to match them for The Wise Oak. For the Eldritch mods: Intimidate on Hit or Added Damage and Accuracy Rating. (Gloves) Rare Gloves - On Rare Gloves, get Dexterity, Maximum Life, craft Aspect of the Cat, and look for Added Elemental Damage to boost your DPS. Resistances are not needed unless you want to match them for The Wise Oak. For the Eldritch mods: Intimidate on Hit or Added Damage and Accuracy Rating. |
|
| Min. requirements: +50 to Dexterity +80 to Maximum Life Adds Damage to Attacks Grants Level 30 Aspect of the Cat Skill (crafted Suffix) Optional affixes: increased Attack Speed Accuracy Rating Life Regeneration Intelligence (crafted) |
|
 (Gloves) Admiral's Arrogance - Improves damage via Gem Levels with a bit of Attack Speed, and trivializes Rage management. You may Corrupt them for +1 Max Frenzy Charge. (Gloves) Admiral's Arrogance - Improves damage via Gem Levels with a bit of Attack Speed, and trivializes Rage management. You may Corrupt them for +1 Max Frenzy Charge. |
|
| (6-12)% increased Attack Speed (100-140)% increased Armour (10-20)% chance that if you would gain Rage on Hit, you instead gain up to your maximum Rage +(1-3) to Level of all Melee Skill Gems |
|
 (Boots) Dawnstrider - A core element of the build. It turns any socketed Slam into a Totem Attack. Try Corrupting them for +1 Max Endurance Charge. (Boots) Dawnstrider - A core element of the build. It turns any socketed Slam into a Totem Attack. Try Corrupting them for +1 Max Endurance Charge. |
|
| Socketed Slam Gems are Supported by Level 25 Earthbreaker +(80-100) to maximum Life 30% increased Movement Speed (3-5)% of Damage from Hits is taken from your nearest Totem's Life before you Ancestral Bond |
|
 (Belt) The Magnate - Chance to deal Double and Triple Damage if you have 400 Strength, which you most likely do. It's the best Belt damage-wise other than Mageblood or Headhunter. (Belt) The Magnate - Chance to deal Double and Triple Damage if you have 400 Strength, which you most likely do. It's the best Belt damage-wise other than Mageblood or Headhunter. |
|
| (20-30)% increased Stun Duration on Enemies +(40-50) to Strength +(20-25)% to all Elemental Resistances 50% increased Flask Charges gained 10% chance to deal Double Damage while you have at least 200 Strength 5% chance to deal Triple Damage while you have at least 400 Strength |
|
 (Amulet) Natural Hierarchy - This build has Physical (Converted to Fire), Cold, and Lightning Damage, so a Natural Hierarchy with increased Elemental Quality is one of the best Amulets, even if you cannot anoint it. (Amulet) Natural Hierarchy - This build has Physical (Converted to Fire), Cold, and Lightning Damage, so a Natural Hierarchy with increased Elemental Quality is one of the best Amulets, even if you cannot anoint it. |
|
| 100% of Cold and Lightning Damage from Hits taken as Fire Damage Gain (10-15)% of Physical Damage as Extra Lightning Damage Gain (15-20)% of Lightning Damage as Extra Cold Damage Gain (20-25)% of Cold Damage as Extra Fire Damage Gain (25-30)% of Fire Damage as Extra Chaos Damage |
|
 (Amulet) Yoke of Suffering - Yoke of Suffering can be slightly better than Natural Hierarchy, but only with a good Roll on increased Damage Taken and an anointment. (Amulet) Yoke of Suffering - Yoke of Suffering can be slightly better than Natural Hierarchy, but only with a good Roll on increased Damage Taken and an anointment. |
|
| +(10-16) to all Attributes +(10-20)% to Fire Resistance +(10-20)% to Cold Resistance +(20-40)% to Lightning Resistance 30% reduced Duration of Ailments on Enemies (5-10)% chance to Shock Enemies take (5-10)% increased Damage for each type of Ailment you have inflicted on them Your Elemental Damage can Shock |
|
 (Amulet) Ashes of the Stars - Level and Quality of all Skills increase damage directly, and have beneficial effects on Purity of Elements, Blood Rage, Immortal Call, and Warlord's Mark. (Amulet) Ashes of the Stars - Level and Quality of all Skills increase damage directly, and have beneficial effects on Purity of Elements, Blood Rage, Immortal Call, and Warlord's Mark. |
|
| +(10-16) to all Attributes (5-10)% increased Experience Gain of Gems +1 to Level of all Skill Gems +(20-30)% to Quality of all Skill Gems |
|
| Recommended Anointments: Disciple of the Unyielding Frenetic Fervour |
|
 (Ring) Pearl of Tsoatha - It improves DPS by adding additional Support Gems for the Boot slot, and it has a big impact since Dawnstrider only has 4 sockets. Look for Elemental Damage with Attacks, Close Combat, Endurance Charge on Melee Stun, Hypothermia, Inspiration, Innervate, Immolate, Pulverise, Ruthless, or Volatility. (Ring) Pearl of Tsoatha - It improves DPS by adding additional Support Gems for the Boot slot, and it has a big impact since Dawnstrider only has 4 sockets. Look for Elemental Damage with Attacks, Close Combat, Endurance Charge on Melee Stun, Hypothermia, Inspiration, Innervate, Immolate, Pulverise, Ruthless, or Volatility. |
|
| +(8-10)% to all Elemental Resistances +(27-34)% to all Elemental Resistances (30-60)% increased Elemental Damage Skills <granted by your Passive Tree/Socketed in your Helmet/Gloves/Boots> are Supported by Level 20 <random Support Gem> Skills <granted by your Passive Tree/Socketed in your Helmet/Gloves/Boots> are Supported by Level 20 <random Support Gem> |
|
 (Ring) The Taming - The Taming increases your damage a lot since you inflict all three Elemental Ailment types. Two Pearls of Tsoatha are still better. (Ring) The Taming - The Taming increases your damage a lot since you inflict all three Elemental Ailment types. Two Pearls of Tsoatha are still better. |
|
| +(8-10)% to all Elemental Resistances (30-40)% increased Elemental Damage with Hits and Ailments for each type of Elemental Ailment on Enemy +(20-30)% to all Elemental Resistances 10% chance to Freeze, Shock and Ignite |
|
 (Jewel) Brutal Restraint - We're using it mainly for Dexterity, which you can struggle with, or maybe even Accuracy, which Dexterity provides. It also has many great notable upgrades. If you do have enough Dex without it, try Lethal Pride instead. (Jewel) Brutal Restraint - We're using it mainly for Dexterity, which you can struggle with, or maybe even Accuracy, which Dexterity provides. It also has many great notable upgrades. If you do have enough Dex without it, try Lethal Pride instead. |
|
| Denoted service of (500-8000) dekhara in the akhara of <Asenath • Balbala • Nasima> Passives in radius are Conquered by the Maraketh Historic |
|
 (Jewel) Watcher's Eye - Your Watcher's Eye Auras are Haste, Purity of Elements, and Precision. Look for Chaos Resistance with Purity of Elements, and increased Attack Speed or Attack Damage with Precision. (Jewel) Watcher's Eye - Your Watcher's Eye Auras are Haste, Purity of Elements, and Precision. Look for Chaos Resistance with Purity of Elements, and increased Attack Speed or Attack Damage with Precision. |
|
| (4-6)% increased maximum Energy Shield (4-6)% increased maximum Life (4-6)% increased maximum Mana <Two or Three random aura modifiers> |
|
 (Jewel) Rare Jewels - Murderous Abyss Jewels can get you lots of very desirable flat added damage. Regular Jewels are also good with their mods for increased Maximum Life, Mana Cost Efficiency, and Mana Reservation Efficiency, which will be needed in very small quantities; so is Intelligence. (Jewel) Rare Jewels - Murderous Abyss Jewels can get you lots of very desirable flat added damage. Regular Jewels are also good with their mods for increased Maximum Life, Mana Cost Efficiency, and Mana Reservation Efficiency, which will be needed in very small quantities; so is Intelligence. |
|
| Recommended affixes: Added Damage to Sword Attacks Adds Damage to Attacks Maximum Life Attributes Resistances increased Mana Cost Efficiency increased Mana Reservation Efficiency |
|
 (Jewel) Large Cluster Jewel - One Large Two-Hand, Attack, Sword/Axe, or Elemental Cluster Jewel will be needed. They all have a lot of great notables to choose from, but Martial Prowess, Brutal Infamy, and Sadist are the best ones. (Jewel) Large Cluster Jewel - One Large Two-Hand, Attack, Sword/Axe, or Elemental Cluster Jewel will be needed. They all have a lot of great notables to choose from, but Martial Prowess, Brutal Infamy, and Sadist are the best ones. |
|
| Recommended affixes: 1 Added Passive Skill is Calamitous 1 Added Passive Skill is Heavy Hitter 1 Added Passive Skill is Martial Prowess 1 Added Passive Skill is Prismatic Heart 1 Added Passive Skill is Sadist 1 Added Passive Skill is Widespread Destruction 1 Added Passive Skill is Brutal Infamy 1 Added Passive Skill is Titanic Swings |
|
 (Jewel) Medium Cluster Jewel - One Totem Medium Cluster Jewel with Sleepless Sentries for Onslaught and Ancestral Inspiration for Arcane Surge is mandatory. The other Cluster Jewel is much less important, but you can get some damage and AoE out of it. They should also provide Intelligence or Chaos Resistance. (Jewel) Medium Cluster Jewel - One Totem Medium Cluster Jewel with Sleepless Sentries for Onslaught and Ancestral Inspiration for Arcane Surge is mandatory. The other Cluster Jewel is much less important, but you can get some damage and AoE out of it. They should also provide Intelligence or Chaos Resistance. |
|
| Recommended affixes: 1 Added Passive Skill is Sleepless Sentries 1 Added Passive Skill is Ancestral Inspiration 1 Added Passive Skill is Titanic Swings 1 Added Passive Skill is Towering Threat |
|
 (Flask) The Wise Oak - You can easily balance your Uncapped Resistance with two Suffixes on Rare Jewels or Gloves to be rewarded with reduced Elemental damage taken and Elemental Penetration during its effect. It's not a very strong effect, so don't force it. (Flask) The Wise Oak - You can easily balance your Uncapped Resistance with two Suffixes on Rare Jewels or Gloves to be rewarded with reduced Elemental damage taken and Elemental Penetration during its effect. It's not a very strong effect, so don't force it. |
|
| +35% to all Elemental Resistances During Effect, 6% reduced Damage taken of each Element for which your Uncapped Elemental Resistance is lowest During Effect, Damage Penetrates (5-8)% Resistance of each Element for which your Uncapped Elemental Resistance is highest |
|
|
Other suggested Flasks and Tinctures:
|
|
     |
|
|
If you have any other build requests, please leave that in the comments below.
Pictures used in this article are the intellectual property of Grinding Gear Games.
