0.00
Learn more about Credits (Click on the icon to view details)

Articles

Frozen Orb Sorceress PD2 Build

Frozen Orb Sorceress PD2 Build

The best setup for the Cold Sorceress that uses Frozen Orb to deal an insane amount of Damage in an extremely satisfying manner.

Frozen Orb Sorceress Build

Last Update: May 8, 2026

Introduction

The Frozen Orb is easily the most iconic Skill of the Diablo 2 series. It is a Cold Spell that fires an orb in a straight line that releases multiple Ice Bolts on its way, and even more of them at the end of its path. If the Orb explodes very close to your opponent, you can expect almost 20 hits from a single cast. In more realistic scenarios, it drops down to 5-10 hits, which is still a lot, and makes this Skill one of the strongest in the Sorceress arsenal. Additionally, in Project Diablo 2, the Cooldown of this skill has been removed. 

As a Sorceress, you will have access to the best mobility Skill in the game, the Teleport. You will also have the Shiver Armour to greatly improve your Defense, and Warmth to improve your natural Mana Regeneration. There are not enough points to max out your Energy Shield and Damage synergies, which is why we recommend skipping that approach for the sake of usual Vitality and maximum Life.

You can allocate saved points into Teleport to reduce the Debuff it applies after usage, which is very useful for your Clear Speed. Proper positioning is very important to maximise the Damage of your Frozen Orb, so you will use the Teleport very often during the most difficult fights. 

Recommended Breakpoints

Since you are not limited by Cooldown, you will need FCR to improve your Damage. The final Breakpoint can be achieved at 200% FCR, but in most cases, it is impossible to reach without heavy sacrifices on your defense.  

  • Faster Cast Rate (FCR): 78% (low budget) → 117% (high investments)
  • Faster Hit Recovery (FHR): 42% (good enough for most content)

You can also get a bit of Faster Block Rate, but it is not very important, as your Block Chance is rather low. 

Stat Allocation

  • Strength: Enough to meet gear attribute requirements 
  • Dexterity: Enough to meet gear attribute requirements
  • Vitality: Put everything
  • Energy: Nothing

Some players may choose the Energy Shield playstyle instead. In such a case, you would invest all into Energy instead. 

Pros

  • Great AoE Coverage
  • Very safe thanks to Freeze
  • High Damage against Bosses
  • Great mobility

Cons

  • Cold Immunity is hardest to break
  • Items may be expensive due to popularity


You can also visit this page to check our other Project Diablo 2 Builds

Skill Trees


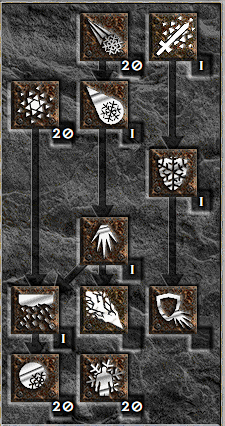
In the Cold Tree, you will obviously want to level up Frozen Orb and its synergies: Frost Nova and Ice Bolt. The Cold Mastery is also very important, although keep in mind that the Cold Pierce does not help against Cold Immune opponents; you need to break their Immunity with other methods first. In some cases, even the Lower Resist Curse and Conviction Auras together are not enough, and you have to abandon the fight. Lastly, you should pick the Shiver Armor to boost your defense. 

In the Lightning Tree, you will need the Teleport. At first, you can leave it at level 1, but any leftover Points should be spent here. You can also opt for the Energy Shield, but it is not very effective without spending 20 Points, as it greatly impacts the amount of Mana-transferred Damage. 

In the Fire Tree, you should pick up the Warmth. You can spend additional points here if you struggle with Mana sustain and don't want to use Potions too much.

Gear

The Tal-Rasha Set is an ideal starting point for most Sorcerer Builds out there. It is quite effective and very cheap, allowing you to hunt for valuable Corruptions.

The Cold archetype has many tailor-made Uniques you can use. The Death's Fathom or Oculus are both very good choices. You should pair them with the Medusa's Gaze Shield. The universal Mang Song's Lesson is the best for pure DPS, as it often allows you to reach the final FCR, but it can be very expensive to acquire. Another ideal Cold-themed Unique is Nightwing's Veil Helmet. It grants all Skills, lowers enemy Cold Resistance, improves your Cold Damage, and even lowers the Freeze duration on you. The Belt slot is also very straightforward: you will want to use the Snowclash, which improves all your cold Spells by 2 levels and lowers the Freeze on you, leading to total immunity. 

If you lack offense, you should try to get the Ormus' Robes, or Skin of the Vipermagi if you are limited by budget. The Steel Carapace will be a much better choice if you struggle with survivability. The Atma’s Wail offers a very good mix of offense and defense. The Glove slot is dedicated to FCR - you can acquire it via Occultist, Magefist, Trang-Oul's Claws, or even a Rare pair of Gloves. It is a good target for corruption as well. The Silkweave Boots greatly help with Mana sustain, but you can also opt for the War Travelers to get more Magic Find, or even Rare Boots to fill your Resistances, especially against Poison. The Sandstorm Treks are also very useful in this regard and provide valuable FHR, too. 

The Jewellery is very static across most Casters. The Mara’s Kaleidoscope can be beaten by an extremely well-rolled Rare, often as a result of Desecration, but it is insanely expensive. Your Rings should help you achieve the next FCR. If that is not possible, you should pick additional Skill levels instead, such as Wisp Projector, Stone of Jordan, or Bul-Kathos. You can also get a bit of Life and Mana on each Kill here to improve your sustain. 


Charms

Large Charms that improve your cold Damage by 3% are never worth it, since the Grand Charms with Cold Skill bonuses also boost the Cold Mastery, which grants you extra Cold Pierce. Ideally, they should also provide maximum Life or FHR. 

The Small Charms should provide Life and Resistances, although Magic Find and FHR are also decent options. 

As always, you will also need all 3 Unique Charms: Gheed's FortuneHellfire Torch, and Annihilus. They provide very valuable bonuses that can't be sourced otherwise. 


Tal Rasha's Horadric Crest
Death Mask
Defense: 99-131
Required Strength: 55
Required Level: 66
[6-10]% Mana Stolen per Hit
[6-10]% Life Stolen per Hit
+45 Defense
+[50-65] to Life
+[25-35] to Mana
All Resistances +[10-20]
Tal Rasha's Guardianship
Lacquered Plate
Defense: 973-1064
Required Strength: 84
Required Level: 71
+400 Defense
Cold Resist +40%
Lightning Resist +40%
Fire Resist +40%
Magic Damage Taken Reduced by [12-18]
[70-90]% Better Chance of Getting Magic Items
Requirements -60%
+10% Faster Cast Rate (2 Items)
Tal Rasha's Fine-Spun Cloth
Mesh Belt
Defense: 35-40
Base Potion Rows: 4
Required Strength: 47
Required Level: 53
+20 to Dexterity
+[20-40] to Mana
37% Damage Taken Gained as Mana when Hit
[10-20]% Better Chance of Getting Magic Items
Requirements -20%
+60 Defense (2 Items)
+10% Faster Cast Rate (3 Items)
Tal Rasha's Lidless Eye
Swirling Crystal
One-Hand Damage: 18 to 42
Required Level: 65
+30% Faster Cast Rate
+[2-3] to Fire Mastery (Sorceress Only)
+[2-3] to Lightning Mastery (Sorceress Only)
+[2-3] to Cold Mastery (Sorceress Only)
+10 to Energy
+57 to Life
+77 to Mana
+1 to Sorceress Skills (2 Items)
-15% to Enemy Fire Resistance (3 Items)
-15% to Enemy Lightning Resistance (4 Items)
+15% to Cold Skill Damage (Complete Set)
Tal Rasha's Adjudication
Amulet
Required Level: 67
+2 to Sorceress Skills
Adds 3-32 Lightning Damage
+[40-60] to Life
+[32-52] to Mana
Lightning Resist +33%
+10% Faster Cast Rate (4 Items)
Tal Rasha's Wrappings
Complete Set Bonus:
Replenish Life +10 (2 Items)
50% Better Chance of Getting Magic Items (3 Items)
+25% Faster Hit Recovery (4 Items)
+3 to Sorceress Skills (Complete Set)
+150 Defense (Complete Set)
+50 Defense vs. Missile (Complete Set)
+150 to Life (Complete Set)
All Resistances +50 (Complete Set)
Display Aura (Complete Set)
Mang Song's Lesson
Archon Staff
Two-Hand Damage: 104 to 124
Required Strength: 34
Required Level: 82
    12% Chance to Cast Level 20 Lower Resist on Casting
+5 to All Skills
+75% Faster Cast Rate
-[12-20]% to Enemy Fire Resistance
-[12-20]% to Enemy Lightning Resistance
-[12-20]% to Enemy Cold Resistance
Regenerate Mana [20-30]%
+50% Damage to Undead
Death's Fathom
Dimensional Shard
One-Hand Damage: 30 to 53
Required Level: 73
+3 to All Skills
+20% Faster Cast Rate
+[20-30]% to Cold Skill Damage
Lightning Resist +[25-35]%
Fire Resist +[25-35]%
+[3-6] Life after each Kill
The Oculus
Swirling Crystal
One-Hand Damage: 18 to 42
Required Level: 42
2% Chance to Cast Level 1 Teleport when Struck
+[2-3] to All Skills
+30% Faster Cast Rate
+20% Enhanced Defense
+20 to Vitality
+20 to Energy
All Resistances +[15-25]
+5 to Mana after each Kill
[25-50]% Better Chance of Getting Magic Items
Medusa's Gaze
Aegis
Defense: 605-677
Block: 66-76%
Required Strength: 165
Required Level: 76
10% Chance to Cast Level 14 Lower Resist when Struck
+2 to Cold Skills
+[30-40]% Faster Cast Rate
[5-9]% Life Stolen per Hit
Slows Target by 20%
+[150-180]% Enhanced Defense
Cold Resist +[40-80]%
Requirements -25%
Nightwing's Veil
Spired Helm
Defense: 304-352
Required Strength: 96
Required Level: 67
+2 to All Skills
-[5-10]% to Enemy Cold Resistance
+[5-10]% to Cold Skill Damage
+[90-120]% Enhanced Defense
+[10-20] to Dexterity
+[5-9] Cold Absorb
Half Freeze Duration
Requirements -50%
Ormus' Robes
Dusk Shroud
Defense: 370-502
Required Strength: 77
Required Level: 75
[8/12]% Chance to Cast Level [22-26] [Random Sorceress Skill] on Casting
+30% Faster Cast Rate
+[10-15]% to Fire Skill Damage
+[10-15]% to Lightning Skill Damage
+[10-15]% to Cold Skill Damage
+2 to [Random Sorceress Skill] (Sorceress Only)
+[100-200] Defense
Regenerate Mana [20-30]%
Steel Carapace
Shadow Plate
Defense: 2230-2439
Required Strength: 220
Required Level: 66
4% Chance to Cast Level 26 Iron Maiden when Struck
+[1-2] to All Skills
+40% Faster Hit Recovery
+[250-280]% Enhanced Defense
Removed
Cold Resist +[40-60]%
Physical Damage Taken Reduced by [19-24]
Attacker Takes Damage of [1400-1600]
Repairs 1 Durability in 10 Seconds
Atma's Wail
Embossed Plate
Defense: 673-991
Required Strength: 125
Required Level: 41
+1 to All Skills
+20% Faster Cast Rate
+30% Faster Hit Recovery
+[120-160]% Enhanced Defense
+[2-198] Defense (+2 per Character Level)
+15 to Dexterity
Replenish Life +[20-30]
Increase Maximum Mana [20-30]%
25% Better Chance of Getting Magic Items
+50 Durability
Skin of the Vipermagi
Serpentskin Armor
Defense: 270
Required Strength: 43
Required Level: 29
+1 to All Skills
+30% Faster Cast Rate
+120% Enhanced Defense
All Resistances +[20-30]
Magic Damage Taken Reduced by [5-8]
Occultist
Crusader Gauntlets
Defense: 124-138
Required Strength: 151
Required Level: 70
+20% Faster Cast Rate
[25-35]% Reduced Curse Duration
Hit Blinds Target
[80-100]% Enhanced Defense
Increase Maximum Mana [25-35]%
Snowclash
Battle Belt
Defense: 98-116
Base Potion Rows: 4
Required Strength: 88
Required Level: 42
5% Chance to Cast Level [7-20] Blizzard when Struck
+[1-2] to Cold Skills
Adds 39-63 Cold Damage
+[130-170]% Enhanced Defense
+[5-8]% to Maximum Cold Resist
Cold Resist +[30-45]%
Half Freeze Duration
Arachnid Mesh
Spiderweb Sash
Base Defense: 55-62
Base Durability: 12
Base Potion Rows: 4
Defense: 119-138
Required Strength: 50
Required Level: 80
+1 to All Skills
+[10-20]% Faster Cast Rate
Slows Target by 20%
+[90-120]% Enhanced Defense
Increase Maximum Mana [5-10]%
Level 3 Venom (31 Charges)
The Stone of Jordan
Ring
Minimum Item Level: 39
Occurrence Rate: 1/60
Required Level: 29
+1 to All Skills
Adds 1-120 Lightning Damage
+[20-40] to Mana
Increase Maximum Mana [15-20]%
Wisp Projector
Ring
Minimum Item Level: 84
Occurrence Rate: 1/60
Required Level: 76
+1 to All Skills
Lightning Absorb +[4-6]%
[10-15]% Better Chance of Getting Magic Items
Level 7 Spirit of Barbs (11 Charges)
Level 2 Heart of Wolverine (13 Charges)
Bul-Kathos' Wedding Band
Ring
Minimum Item Level: 66
Occurrence Rate: 1/60
Required Level: 58
+1 to All Skills
[4-6]% Life Stolen per Hit
+[0-49] to Life (+0.5 per Character Level)
+50 Maximum Stamina
Silkweave
Mesh Boots
Defense: 112-130
Required Level: 80
+30% Faster Run/Walk
+[150-190]% Enhanced Defense
+200 Defense vs. Missile
Increase Maximum Mana [10-20]%
+5 to Mana after each Kill
Mara's Kaleidoscope
Amulet
Minimum Item Level: 80
Occurrence Rate: 5/75
Required Level: 67
+2 to All Skills
+[5-8] to All Attributes
All Resistances +[20-30]
Harlequin Crest
Shako
Base Defense: 98-141
Base Durability: 12
Defense: 98-141
Required Strength: 50
Required Level: 62
+2 to All Skills
+2 to All Attributes
+[1-99] to Life (+1 per Character Level)
+[1-99] to Mana (+1 per Character Level)
Physical Damage Taken Reduced by [4-6]%
[25-50]% Better Chance of Getting Magic Items
Rainbow Facet (Cold)
Jewel
Required Level: 49
100% Chance to Cast Level 43 Frost Nova when you Level-Up
100% Chance to Cast Level 37 Blizzard when you Die
Adds 24-38 Cold Damage
+[3-5]% to Cold Skill Damage
-[3-5]% to Enemy Cold Resistance
War Traveler
Battle Boots
Defense: 120-139
Durability: 48
Base Kick Damage: 42 to 84, Avg 63
Required Strength: 95
Required Level: 42
+25% Faster Run/Walk)
Adds 15-25 Damage
+[150-190]% Enhanced Defense
+10 to Strength
+10 to Vitality
40% Slower Stamina Drain
Attacker Takes Damage of [5-10]
[30-50]% Better Chance of Getting Magic Items
+30 Durability

Mercenary

The best option is to pick the Act 2 Mercenary with Defiance Aura to boost your survival, and equip him with the Infinity Runeword to massively improve your Damage. At first, you can use the Insight to improve your Mana sustain. The Reaper's Toll is also a valid option that allows your Mercenary to deal serious damage on his own. The rest of this Setup should be focused on defense to make sure your investments were worth it during the tough encounters. 

  • Vampire Gaze or Andariel's Visage or Ferocity (Helmet)
  • String of Ears or Nosferatu’s Coil (belt)
  • Shaftstop or Innocence (Armour)
  • Lava Gout's or Dracul Grasp (gloves)
  • Rare Boots with Life, Movement Speed, and Resistance

Final Thoughts

The Frozen Orb is a very popular Skill of choice for many reasons, including great Damage, speed, and enjoyment from playing. It is an ideal pick for most players who want to farm any content within the game. 

We will continue updating this guide with future Project Diablo 2 changes and expand our PD2 content with more builds and strategies.

If you have suggestions or would like to see other builds covered, feel free to share your feedback—it helps us improve and deliver better guides.

Images used in this article are the intellectual property of Blizzard Entertainment or its corresponding owners.