Mind Blast Assassin PD2 Build
An amazing end-game Map farming setup offering unique quasi-minion playstyleMind Blast Assassin Build
Last Update: April 21, 2026
Introduction
Mind Blast Assassin is one of the strongest caster-based builds in Project Diablo 2, offering a unique hybrid playstyle that blends traditional spellcasting with minion-like mechanics through Shadow Warriors. It stands out as a top-tier endgame setup, combining excellent clear speed, strong crowd control, and exceptional survivability. Instead of relying purely on direct damage, this build amplifies its power through Shadows that replicate your abilities, effectively multiplying your overall damage output.
The core gameplay revolves around casting Mind Blast while your Shadow clones mirror your actions, using your left and right mouse button abilities to deal additional damage. Psychic Hammer is the secondary ability that helps you deal with Physical immunity. This creates a highly dynamic and scalable playstyle, where your effectiveness increases significantly with each active Shadow. At higher levels of investment, having multiple Shadows active allows them to independently clear weaker enemies, while also providing a strong frontline that absorbs incoming damage.
Unlike traditional caster builds, this setup offers an extra defensive layer through its minions. Properly geared Shadows are extremely durable—practically immortal in endgame scenarios—which makes the build feel very safe even in dense maps. They not only tank damage but also contribute meaningful DPS, allowing you to maintain constant pressure while staying at a safe distance.
This results in a smooth and efficient farming experience, where you chain packs together with Mind Blast while your Shadows handle both damage and aggro. It’s a highly effective setup for players looking for a powerful caster with built-in safety and scaling, making it one of the best Assassin builds currently available in PD2.
Recommended Breakpoints (Quick Overview)
To ensure optimal casting speed and responsiveness, aim for the following breakpoints:
- Faster Cast Rate (FCR): 102% (minimum) → 174% (high-end optimization with corruptions)
- Faster Hit Recovery (FHR): 48% (sufficient for smooth gameplay)
FCR is the most important stat for this build, as it directly affects your Mind Blast casting speed and overall clear efficiency. While 102% is required for smooth gameplay, reaching 174% offers a noticeable improvement but requires heavy investment. FHR helps prevent lockups when taking hits, especially in high-density maps.
Stat Allocation (Baseline Setup)
- Strength: ~120 (for gear requirements like Whispering Mirage)
- Dexterity: ~90 (for Shadow Dancer and weapon requirements)
- Vitality: Dump remaining points here
- Energy: Base
This setup focuses on maximizing survivability through Life while meeting gear requirements. Unlike mana-based builds, Mind Blast Assassin relies on positioning, Shadows, and crowd control for defense, making Vitality the most efficient stat investment for endgame content.
Pros
- Very high DPS with strong crowd control
- Unique hybrid minion-caster playstyle
- Very high survivability
- Insane scaling with additional investments
- Good Bossing capabilities
Cons
- Slower early progression
- Lacking clear speed and AoE without all 3 Shadow clones
You can also visit this page to check our other Project Diablo 2 Builds
Skill Trees
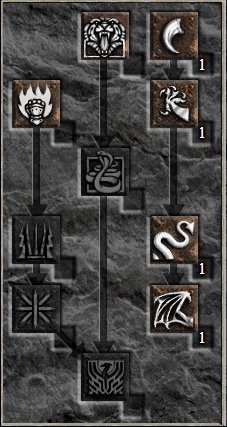
The Mind Blast Assassin is heavily focused on the Shadow Disciplines tree, which contains all of the core mechanics for this build. In most optimized variants, nearly all skill points are allocated here, making it a very straightforward but highly effective setup.
Your main damage comes from Mind Blast and Psychic Hammer, both of which should be fully maxed. These are your primary casting abilities, and thanks to Shadow clones, their effectiveness is multiplied significantly. Cloak of Shadows is also maxed, as it acts as a key synergy while providing additional utility and safety through crowd control.
A crucial part of the build is Shadow Warrior, which should also be maxed. These Shadows replicate your abilities, effectively acting as additional casters and dramatically increasing your overall damage output. With proper gear, they become extremely durable and form the backbone of both your offense and defense.
As you approach higher levels, additional points should be invested into Fade, which improves your survivability through damage reduction and resistances. Any remaining points can be placed into Weapon Block for extra defensive value.
For mobility, we recommend allocating 1 point into Dragon Flight, along with its prerequisites. This provides an additional movement option that can be used in combination with teleport effects from items like Enigma. In practice, you will alternate between Blink (Enigma) and Dragon Flight, allowing for smooth repositioning despite cooldown limitations.
Overall, the build is very streamlined in terms of skill allocation, focusing entirely on maximizing Shadow scaling and spell output while maintaining strong defensive layers.
Gear
This build relies heavily on Shadow clones, which is why dual-wielding Whispering Mirage claws is essentially mandatory. Their main value is not just raw stats, but the fact that they allow you to summon additional Shadows, which are a core part of the build’s damage and survivability. Since your clones replicate your active abilities, increasing their number has a massive impact on overall performance.
Once that foundation is established, your gearing priorities are quite straightforward. The most important stats are +Skills, Faster Cast Rate, and Life, with Resistances and defensive utility also playing an important role. +Skills improve both your own spell damage and the power of your Shadows, while FCR is crucial for reaching the key 102% breakpoint and, in more optimized setups, the 174% breakpoint. Life and other defensive stats help smooth out the build in tougher maps, especially since this is still a caster that can get punished when forced into dangerous positions.
Core items like Shadow Dancer, Enigma, and Arachnid Mesh fit naturally into this setup. Shadow Dancer is the best boot option thanks to its bonuses to Shadow Disciplines and defensive utility, Enigma provides unmatched mobility through Blink, and Arachnid Mesh is one of the most important sources of +Skills and Faster Cast Rate.
There is more flexibility when it comes to Rings, Helmets, Gloves, and Amulets. For Rings, you can use Constricting Loop if you need help reaching your FCR breakpoint, or opt for Stone of Jordan, Bul-Kathos’ Wedding Band, or Wisp Projector if you prefer additional skill levels and utility. Gloves should mainly provide FCR, which makes Trang-Oul’s Claws, Magefist, and Occultist the most natural choices.
For Amulets, the most common options are Mara’s Kaleidoscope, a well-rolled Crafted +2 Skills/FCR Amulet, or a Magic +3 Shadow Disciplines / FCR Amulet if you want to maximize your damage scaling. On the Helmet slot, you can go with Harlequin Crest (Shako) for a reliable and balanced option, or invest into a +2 Assassin / 20% FCR Diadem with additional useful modifiers, which is generally the stronger but much more expensive choice.
Overall, the build has a very clear core, but still leaves some room to adjust the remaining slots depending on whether you want easier breakpoint management, extra survivability, or maximum endgame damage.
Charms
For charms, the setup is very straightforward and follows standard caster optimization with a focus on Shadow scaling and survivability.
You should always use Hellfire Torch and Annihilus, as they provide +Skills, Attributes, and Resistances—all extremely valuable for this build.
For Grand Charms, prioritize +Shadow Disciplines Skillers, ideally with +Life modifiers. These significantly boost both your damage and the effectiveness of your Shadow clones, making them the best-in-slot option for maximizing overall performance.
For Small Charms, focus mainly on Life and Resistances to improve survivability in higher-tier maps. You can also include Faster Hit Recovery (FHR) if you need to reach the 48% breakpoint more comfortably.
If you are struggling to reach your desired FCR breakpoint, you can supplement it with Large Charms that roll FCR, which is a useful option when your gear setup is slightly lacking in cast speed.
Mercenary
You have two main Mercenary options for this build, with the Act 1 Vigor Mercenary being the top recommendation. The Vigor Aura greatly improves your mobility, allowing you to reposition faster and clear maps more efficiently.
For optimal performance, equip your Mercenary with the Wrath Runeword and/or Anvilguard to apply Amplify Damage, which significantly boosts your overall damage output.
The rest of the gear should focus on survivability and consistent damage. Popular choices include:
- Innocence Runeword (armor)
- String of Ears (belt)
- Andariel’s Visage or Vampire Gaze (helmet)
- Lava Gout (gloves)
- Nosferatu’s Coil (belt alternative)
An alternative option is the Act 2 Defiance Mercenary, which provides additional defensive value. This setup is typically paired with The Reaper’s Toll to apply Amplify Damage, offering a more defensive but still effective approach.
Overall, Act 1 Vigor remains the most efficient choice for speed and farming, while Act 2 Defiance offers a tankier alternative.
Final Thoughts
Mind Blast Assassin is one of the most efficient and powerful caster builds in Project Diablo 2, combining high clear speed with excellent safety thanks to its Shadow clones. This hybrid playstyle allows you to rapidly clear maps while your Shadows provide both damage and protection, making it a highly reliable farming setup.
We will continue updating this guide with future Project Diablo 2 changes and expand our PD2 content with more builds and strategies.
If you have suggestions or would like to see other builds covered, feel free to share your feedback—it helps us improve and deliver better guides.
Images used in this article are the intellectual property of Blizzard Entertainment or its corresponding owners.