
Arc Raiders Best Skill Tree and Passive Points Guide
Best Arc Raiders skill tree guide with optimal passive points, beginner paths, and the strongest upgrades for every build.Best Skill Tree and Passive Points in Arc Raiders
Updated: January 10, 2026
Introduction
The skill tree in Arc Raiders is one of the core systems that shapes how your character plays, survives, and progresses through increasingly dangerous encounters. Every passive point you invest strengthens a specific aspect of your gameplay—whether that’s mobility, combat efficiency, survivability, or utility. Because these bonuses apply permanently and affect every raid you enter, choosing the right passives can dramatically improve your overall performance.
Naturally, the optimal allocation will always depend on your personal goals and preferred playstyle. A player who focuses on aggressive PvP will prioritize different nodes than someone who plays cautiously and values stamina efficiency, durability, or early-game survivability. Still, despite the flexibility of the system, some passive points are simply stronger, more universally beneficial, or more impactful than others. In contrast, certain skills may look appealing at first glance but offer minimal value in real gameplay situations—you either rarely benefit from them, or their bonuses are too situational to justify the investment.
In this guide, we present what we consider to be the best overall passive tree setup in Arc Raiders, explaining why each chosen point stands out and how it contributes to a consistent, high-performing playstyle. We will also highlight alternative picks for players with different preferences or specific goals, helping you tailor the tree to your exact needs while avoiding common traps and low-impact upgrades.
Best 76-Point Passive Setup (Our Recommended Build)
In our opinion, the strongest all-around passive configuration at 76 points is a balanced mix of looting efficiency, mobility, and survivability, with looting receiving the highest priority. This setup is designed to maximize your value per raid while still giving you enough stamina, speed, and defensive tools to survive hostile encounters and extract safely. At the core of this build is Security Breach, the key looting node that dramatically increases the quality and quantity of containers you can open. Around it, we invest in passives that enhance movement, stamina reliability, and general durability—creating a setup that feels smooth, fast, and rewarding for both beginners and experienced players.
Below, we will break down each of the selected passives, explain why they outperform alternatives, and provide optional swaps depending on your playstyle or raid objectives.
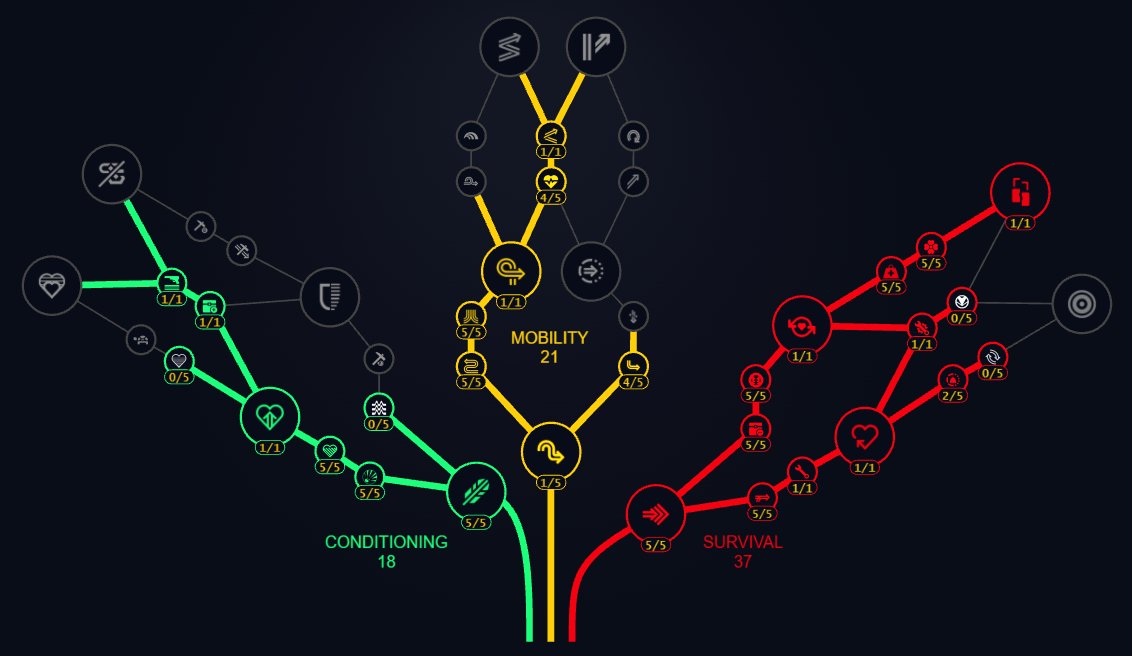
Best Passive Points Allocated — Explained
Core Passives (Most Impactful & Must-Haves) - These passives provide the highest impact on gameplay and should be prioritized first. They offer strong benefits for survivability, stamina management, and most importantly, a looting-oriented playstyle.
- Security Breach - The single most important passive for any looting-focused setup. Security Breach unlocks access to high-value containers that can completely change the outcome of a run, especially for players whose raid hasn’t been going well so far. For many players, this node is the biggest game-changer in the entire tree.
- Looter’s Instinct - One of the strongest quality-of-life skills in the game. Faster looting means less time spent standing vulnerable by a container and significantly reduces the chance of being ambushed. It’s universally considered a must-have for looting builds.
- Broad Shoulders - Increases your maximum carry weight, letting you extract far more loot before becoming encumbered. This passive scales extremely well with a loot-heavy playstyle and directly increases the value of every successful raid.
- Marathon Runner & Youthful Lungs - These two passives form the core of the Mobility branch. Together, they increase your stamina pool and improve stamina efficiency, allowing longer sprints, more evasive movement, and better survivability. Most players consider these essential picks early on.
Very Good Nodes (Strong, but Not Absolutely Essential) - These passives further enhance a looting-oriented setup and appear in most well-rounded builds, though they are not as mandatory as the core selections.
- Looter’s Luck - Adds a chance to find extra loot while scavenging. Although it’s partly RNG-based, the long-term value is noticeable, making it a solid pick once your core passives are in place.
- Silent Scavenger - Helps reduce noise while looting, which is especially valuable for players who prefer stealthy or cautious solo play. It reduces the risk of drawing attention during vulnerable moments.
- Loaded Arms - Reduces the encumbrance penalty when carrying heavier weapons or fully loaded backpacks. This is particularly useful if you extract with maximum capacity or prefer running heavier loadouts.
- Conditioning (one-point investment) - Even a single point in Conditioning can noticeably improve how your character handles weight and movement when fully loaded. It’s a great utility pick for extraction-focused players.
Optional but Useful Passives - These passives are not essential but provide valuable quality-of-life benefits in both solo and squad play. They are excellent additions once your main build is complete.
- Crawl Before You Walk - Improves mobility while downed and can genuinely save your life in tense situations. Both solo and squad players appreciate this passive for its practical value.
- Stubborn Mule - Improves stamina regeneration when encumbered, letting you carry more loot without feeling sluggish. A good comfort node for loot-heavy runs.
- Fight or Flight - Gives a burst of stamina in emergencies. Not mandatory, but a helpful escape tool for players who often disengage from combat.
- Blast Born - Helps increase awareness and stealth efficiency, making it easier to navigate dangerous areas undetected or avoid sudden threats.
- In-Round Crafting - Allows you to craft basic consumables like bandages during the raid. A very convenient passive for players who often run low-budget or improvisational builds.
Other Interesting Alternatives (Advanced or Playstyle-Dependent) - These passives offer strong benefits for experienced players or specialized builds.
- Effortless Roll & Heroic Leap - Both improve mobility and evasive options. Skilled players who rely on dodge rolls, movement tech, or rapid repositioning in PvP/PvE encounters can get substantial value from these.
- Proficient Pryer - Speeds up breaching locked doors and containers. It’s especially good for players who prioritize high-value unlockable containers and synergizes well with a fast-looting playstyle.
- Used to the Weight (and similar Conditioning nodes) - Not essential, but helpful when running heavy equipment or extracting with full backpacks, making your movement feel smoother under heavier loads.
Final Words
The optimal skill tree in Arc Raiders may shift as new patches, balance changes, and passive adjustments roll out, so we’ll continue updating this guide to ensure it reflects the most effective point allocations. We also plan to cover more specialized passive setups in the future, including PvP-focused builds, endgame routes, and playstyle-specific alternatives.
If you want to stay up to date with future Arc Raiders guides and updates, be sure to check our website regularly or follow our social channels. And remember—many in-game items and services can be safely traded on the Odealo marketplace through verified sellers. Explore current offers here: Arc Raiders Marketplace
Pictures used in this article are the intellectual property of Embark Studios or their corresponding owners.