Bear Form Shaman POE2 Build
The most optimized build for a Shaman to make the most out of the Bear form and its various Slam attacksBear form
Shaman Build
Updated for Path of Exile 2 Early Access
The Best Crafty Guides by Odealo
| Guide notes |
| December 24, 2025 - Created for Early Access. |
| Build Overview | |||
| Tags: [MELEE] [PHYSICAL] [ELEMENTAL] [LIFE] | |||
|
Budget: Defenses: |
|
Boss DPS: AoE: |
|
The Bear form comes with many advantages. It's a restriction, sourced from a Talisman that unlocks new abilities, many of which are designed to be synergistic with Rage, Slams, and Fire Damage. That's why it's popular among characters starting on the left side of the Skill Tree, where such nodes are plentiful. Here, we have leaned heavily into the Rage aspect of these abilities with Shaman's Furious Wellspring. It disables Rage loss and adds Rage Regeneration, which can be modified via the Mana Regeneration stat. Rage grants inherently more Damage, but it can be improved with notables like Bestial Rage, Vengeful Fury, and Ignore Pain. That's, more or less, 90% more Attack damage and 100% increased Physical Damage. We will employ it to deal Physical Attack Damage with a big portion of Fire Damage gained as Extra Damage. The default Bear Attack, Maul, will be a primary source of single-target damage, but with the Walking Calamity Buff and Infernal Cry linked to Ferocious Roar, it truly is the best choice. Maul also grants Rage on Hit, so balancing out the Rage cost imposed by Furious Wellspring is more than manageable.
Shaman also offers other great Ascendancy passives. Wisdom of the Maji unlocks new properties for Runes and Idols. That usually grants more of the basic stats, like Maximum Life. Reactive Growth lessens Elemental Damage taken. We could also improve it with Avatar of Evolution, but we opted for bonded Runes. The build is also conceptually uncomplicated. It's most optimized on Rare Items only, which also makes it a good starter or SSF choice. Defensively, it relies on Armour with Maximum Life. Life Regeneration and Adaptation will improve it, but the most efficient way to patch up recovery is with the DoD Amulet. Overall, it's reasonably tanky, but not as tanky as ES builds; it's hard to get beyond 3k of Maximum Life, and it has no Block Chance.
You can also check our other Path of Exile 2 builds right over here Odealo's Crafty Guides - Full List
1. Gameplay
Maul is the single-target skill; good for tough Rares and map bosses. In such fights, be sure to activate Walking Calamity and Infernal Cry. The latter should be activated as soon as it's off-cooldown to Empower Attacks. Pounce inflicts a Mark that plays a minor role. To slay packs of smaller enemies, use a combination of Rampage and Furious Slam. Rampage is a movement ability, while Furious Slam has a huge AoE. Your passive skills are Herald of Ash and Overwhelming Presence.
|
|
|
|

2. Build's PROS & CONS
| PROS |
|
| CONS |
|
3. Leveling tips
Level it up as this exact build. Some skills have high-level requirements, but Maul is a very versatile Attack that will carry you through the campaign. You will allocate the Furious Wellspring first, so start specializing in Rage right from the start. Remember to upgrade your Talisman often, and focus on Gem Level after you finish the campaign. You may need to get some additional Accuracy - Rings and Helmet will be great for that.
4. Final Skill Tree, Ascendancy Points, and Pantheon
Final Skill Tree:
 |
|
Click on the image to open the Passive Tree preview in a new window Or import the build into PoB: |
Ascendancy points:
Preferably in this order:
- Druidic Champion
- Furious Wellspring
- Reactive Growth
- Wisdom of the Maji
5. Final Gems links
| [DPS] Maul setup | |
 |
Maul - The basic Attack of a Bear. It generates Rage and deals good damage with no conditions to fulfill beforehand. |
 |
Fire Attunement |
 |
Blazing Critical |
 |
Close Combat |
 |
Rapid Attacks |
 |
Heft |
| [DPS] Furious Slam setup | |
 |
Furious Slam - Slam the ground and create shockwaves. It's better with Rage. It's one of your primary damaging abilities. |
 |
Combo Finisher |
 |
Close Combat |
 |
Rageforged |
 |
Fist of War |
 |
Aftershock |
| [MOBILITY] Rampage setup | |
 |
Rampage - A movement ability that's capable of dealing quite good DPS. Use it to dash through packs of enemies. |
 |
Burgeon |
 |
Momentum |
|
Aftershock |
 |
Stomping Ground |
 |
Efficiency |
| [DPS] Walking Calamity setup | |
 |
Walking Calamity - A 10-second Buff that triggers meteors dealing fully converted Fire Damage, grants Rage Regeneration, and Extra Fire Damage. It's very powerful, but requires Glory and Rage to use, so save it for bosses. |
 |
Prolonged Duration |
 |
Fire Penetration |
 |
Elemental Armament |
 |
Rigwald's Ferocity (set 2) |
 |
Concentrated Area |
| [UTILITY] Ferocious Roar setup | |
 |
Ferocious Roar - Bear-form exclusive Gem that upgrades the linked-to-it Warcry, so that it has more AoE, deals increased Damage, and the Attacks Empowered by it deal increased Damage as well. |
 |
Infernal Cry - Nearby enemies will combust on death, while the character gains Extra Fire Damage. Use it whenever you're surrounded, or when fighting bosses. |
 |
Tireless |
 |
Raging Cry |
 |
Magnified Area |
| [MOBILITY] Pounce setup | |
 |
Pounce - With Pounce, you can mark enemies with Predator's Mark, causing them to take increased Damage the more enemies (you and your Allies) are nearby. It's also a leap-slam-like ability that requires the Wolf form. Use it once against bosses. |
 |
Mark for Death |
 |
Crater |
 |
Mark of Siphoning |
 |
Holy Descent |
| [UTILITY] Overwhelming Presence setup | |
 |
Overwhelming Presence - Nearby enemies are easier to Stun and Ignite. |
 |
Vitality |
 |
Clarity |
| [UTILITY] Herald of Ash setup | |
 |
Herald of Ash - Ignites enemies near the ones you slay, improving your clear speed. |
|
Magnified Area |
 |
Fire Mastery |
|
|
6. Gear Setup
It's an Attack build that deals Physical Damage with Fire Damage that's Converted or gained as Extra. Most Damage comes from the Talisman, but the extra Gem level, which is found in a lot of places, will be equally important. All your Skills cost Rage, which can be limiting, so keep that in mind. When it comes to items, Rage generation is easily acquired on Jewels. Be sure you have enough Resistances and Accuracy. Herald of Ash and Overwhelming Presence require only 60 Spirit, so it won't be needed at all, unless you want to enhance these with Support Gems. For durability, seek Armour and Maximum Life. Regeneration is not crucial if you have Defiance of Destiny, but a bit of it won't hurt. Remember that Runes and Idols are bonded.
|
Stat priorities on items:
|
 (Helmet) Rare Helmet - High Maximum Life, high Armour, and lots of Resistances. You may socket the Tzamoto's Soul Core of Ferocity here for Maximum rage, although this one is very expensive. (Helmet) Rare Helmet - High Maximum Life, high Armour, and lots of Resistances. You may socket the Tzamoto's Soul Core of Ferocity here for Maximum rage, although this one is very expensive. |
|
| Min. requirements: +130 to Maximum Life +40% total Elemental and Chaos Resistance Optional affixes: Strength Armour Accuracy Rating #% of Armour also applies to Elemental Damage |
|
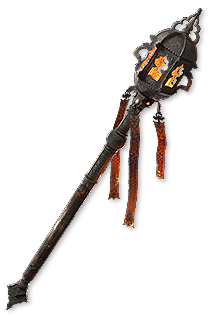
 (Weapon) Rare Talisman - A Talisman can roll up to 7 additional levels for Attack Skills, but it must also have very high Physical DPS; that includes Attack Speed, Added Physical Damage, and Increased Physical Damage. Extra Damage can be crafted with Essences. Maji Talismans are the best. (Weapon) Rare Talisman - A Talisman can roll up to 7 additional levels for Attack Skills, but it must also have very high Physical DPS; that includes Attack Speed, Added Physical Damage, and Increased Physical Damage. Extra Damage can be crafted with Essences. Maji Talismans are the best. |
|
| Min. requirements: +5 to Level of all Attack Skills high Physical DPS Optional affixes: Accuracy Rating increased Elemental Damage with Attacks Gain #% of Damage as Extra Physical Damage (Essence Prefix) |
|
 (Weapon) Fury of the King - Fury of the King is an expensive and powerful Talisman that upgrades the bear form and causes you to deal almost exclusively Fire Damage, so that Fire Exposure and Penetration are much more potent. It grants Molten Crash Skill. (Weapon) Fury of the King - Fury of the King is an expensive and powerful Talisman that upgrades the bear form and causes you to deal almost exclusively Fire Damage, so that Fire Exposure and Penetration are much more potent. It grants Molten Crash Skill. |
|
| Grants Skill: Level (16-20) Molten Crash (50-80)% increased Flammability Magnitude 30% of this Weapon's base Physical Damage Converted to Fire Damage (Hidden) Adds (503-589) to (647-713) Fire Damage (20-15)% reduced Attack Speed +(30-40) to Strength Bear Skills Convert 80% of Physical Damage to Fire Damage Skills which require Glory generate (2-5) Glory every 2 seconds Enemies in your Presence have Exposure |
|
 (Off-hand) Rare Sceptre - With Lord of the Wilds Keystone, you can wield a Sceptre in off-hand, but then you'll need additional Spirit. Here, look for Spirit, Purity of some Element, and Attributes. Finish off with Desert Rune or Rabbit Idol. (Off-hand) Rare Sceptre - With Lord of the Wilds Keystone, you can wield a Sceptre in off-hand, but then you'll need additional Spirit. Here, look for Spirit, Purity of some Element, and Attributes. Finish off with Desert Rune or Rabbit Idol. |
|
| Min. requirements: increased Spirit Optional affixes: Attributes increased Mana Regeneration Rate |
|
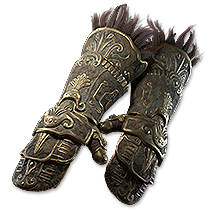 (Gloves) Rare Gloves - On Gloves, prioritize Level to all Melee Skills, Maximum Life, and Resistances. Accuracy, Attack Speed, Life Leech, and Added Damage could be great additions. Idol of Sirrius is a good socketable. (Gloves) Rare Gloves - On Gloves, prioritize Level to all Melee Skills, Maximum Life, and Resistances. Accuracy, Attack Speed, Life Leech, and Added Damage could be great additions. Idol of Sirrius is a good socketable. |
|
| Min. requirements: +100 to Maximum Life +2 to Level of all Melee Skills Optional affixes: Armour increased Attack Speed Accuracy Rating Elemental and Chaos Resistance Adds Physical Damage to Attacks Life Leech |
|
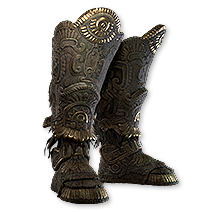 (Boots) Rare Boots - Movement Speed is Boots' priority. Use Farrul's Rune of the Chase to get more of it. Besides that, seek Resistances, Maximum Life, and Armour. (Boots) Rare Boots - Movement Speed is Boots' priority. Use Farrul's Rune of the Chase to get more of it. Besides that, seek Resistances, Maximum Life, and Armour. |
|
| Min. requirements: +100 to Maximum Life +40% total Elemental and Chaos Resistance 30% increased Movement Speed Optional affixes: Armour #% of Armour also applies to Elemental Damage |
|
 (Amulet) Defiance of Destiny - DoD is a good Amulet as it Recovers your Life instantly, before you get Hit. One of the strongest defensive picks. (Amulet) Defiance of Destiny - DoD is a good Amulet as it Recovers your Life instantly, before you get Hit. One of the strongest defensive picks. |
|
| +(10–15) to Dexterity (6–10)% increased maximum Life +(10–20) to Strength (25–40)% increased Mana Regeneration Rate Recover (10–20)% of Missing Life before being Hit by an Enemy |
|
 (Amulet) Rare Amulet - On the Amulet, look for +3 to Level of Melee Skills and Maximum Life. Spirit should not be needed, but it will help. Resistances and other stats are of much lesser importance. (Amulet) Rare Amulet - On the Amulet, look for +3 to Level of Melee Skills and Maximum Life. Spirit should not be needed, but it will help. Resistances and other stats are of much lesser importance. |
|
| Min. requirements: +100 to Maximum Life +3 to Level of all Melee Skills Optional affixes: increased maximum Life Elemental and Chaos Resistance Accuracy Rating Spirit Anointment: Vengeful Fury Unforgiving |
|
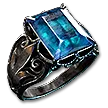 (Ring) Rare Ring - Rings will be used mainly for Resistances and Life, but you can go for Added Fire or Physical Damage if in need of more damage, although it won't be a significant upgrade. Life Leech and Mana Leech are easy to get, and they will most likely be mandatory. (Ring) Rare Ring - Rings will be used mainly for Resistances and Life, but you can go for Added Fire or Physical Damage if in need of more damage, although it won't be a significant upgrade. Life Leech and Mana Leech are easy to get, and they will most likely be mandatory. |
|
| Min. requirements: +80% total Elemental and Chaos Resistance +100 to Maximum Life Optional affixes: Adds # Physical Damage to Attacks Attributes Life or Mana Leech Accuracy Rating Life Regeneration per second |
|
 (Belt) Rare Belt - Maximum Life, Armour, Resistances, and Charm slots. There is no need for anything else; such a basic belt is easily replaceable with Headhunter, which most players will do at some point. (Belt) Rare Belt - Maximum Life, Armour, Resistances, and Charm slots. There is no need for anything else; such a basic belt is easily replaceable with Headhunter, which most players will do at some point. |
|
| Min. requirements: +80% total Elemental and Chaos Resistance +140 to Maximum Life Optional affixes: Charm slots Armour Life Regeneration per second |
|
 (Body Armour) Rare Body Armour - Body Armour should be rich in Armour and Maximum Life. Look for a mod that causes Armour to apply to Elemental Damage, and socket Iron Runes in it; Armour is your primary defensive layer after all. Spirit and Resistances are also good. (Body Armour) Rare Body Armour - Body Armour should be rich in Armour and Maximum Life. Look for a mod that causes Armour to apply to Elemental Damage, and socket Iron Runes in it; Armour is your primary defensive layer after all. Spirit and Resistances are also good. |
|
| Min. requirements: +120 to Maximum Life high Armour +40% total Elemental and Chaos Resistance Optional affixes: #% of Armour also applies to Elemental Damage Spirit |
|
 (Body Armour) Morior Invictus - This Body Armour can have up to 5 sockets if Corrupted. Most socketables have a bonus effect on us; that's why it's so good. (Body Armour) Morior Invictus - This Body Armour can have up to 5 sockets if Corrupted. Most socketables have a bonus effect on us; that's why it's so good. |
|
| (300-400)% increased Armour, Evasion and Energy Shield Has 4 Augment Sockets (Hidden) <3 random socket modifiers> |
|
 (Jewel) Rare Jewels - Ruby Jewels are the most suitable. Look for Rage, Armour, and increased Damage mods from the list. (Jewel) Rare Jewels - Ruby Jewels are the most suitable. Look for Rage, Armour, and increased Damage mods from the list. |
|
| Optional affixes: +1 to Maximum Rage increased Melee Damage increased Damage while Shapeshifted increased Skill Speed while Shapeshifted increased Armour Gain # Rage when hit by an Enemy Gain 1 Rage on Melee Hit |
|
|
If you have any other build requests please leave that in the comments below. We are always open to suggestions and constructive feedback.
Pictures used in this article are the intellectual property of Grinding Gear Games.