Escape from Tarkov Reserve Map Beginner's Guide
In-depth beginner's Guide Tarkov's Reserve MapEscape from Tarkov
Beginner's Guide to Reserve
Introduction
Tarkov's secret Federal State Reserve Agency, one of the Russian Federation's "Rosrezerv" bases, is a military facility charged with maintaining, safeguarding, and managing one of Russia's top-secret supply depots created in case of the World War III. Facilities of this type are usually placed in remote or inconspicuous areas, are well-connected via Russia's vast rail network, have hermetically-sealable storage depots (sometimes created in abandoned mines or cave systems), are heavily defended from enemy air and ground attacks (a company of Spetsnaz was likely stationed in Tarkov's Reserve), and hold enough supplies to let a small city survive a nuclear winter. Now, after Tarkov and its vicinity were evacuated, the base stands open for PMCs and Scav Raiders... and most of the supplies that were stored inside it are, most likely, still in place.
The Reserve is, in eyes of very many Tarkov players, the most competitive and profitable map in the game. Because of this, the competition during Raids is always fierce, squad vs squad firefights are very common, and getting shot is almost a given. Moreover, the abundance of easily accessible Weapon and Military-grade item spawns makes Reserve one of the best maps to play on as a Player Scav.
Here are some of the Reserve's main features:
- Usable Heavy-Weapon emplacements scattered around the map (including belt-fed machineguns and automatic grenade launchers (sic!)). If you'd like to play with the NSV "Utes" 12.7x10⁸ machine gun or the AGS 30x29 mm automatic grenade launcher, look no further.
- The fiercest NPC Boss of Tarkov roams around the area (around Pawn, Knight, and K-Station). Glukhar and his SIX heavily armed, armored, and well-trained guards are truly formidable opponents and engaging them solo, especially at long distances, is almost suicidal. However, their equipment is among the best available, so defeating them will make you rich.
- The abundance of high-end loot. Assault Rifle, Sniper Rifle, and military item spawns are quite common on Reserve (and many of them are located outside of locked areas). You will probably find more than you can carry on each Raid.
- ~29 usable Keys that sometimes unlock areas overflowing with valuable loot. If you go on a Reserve Raid without priority keys you will certainly miss out.
- One more thing, that is an outcome of the previous four... Reserve is VERY popular among high-level players and player squads. Don't go in unprepared.
Also, let us know in the comments below if you would like to see a similar Guide on Streets of Tarkov Map when it's out! Till then you can check our Streets of Tarkov Map Preview!
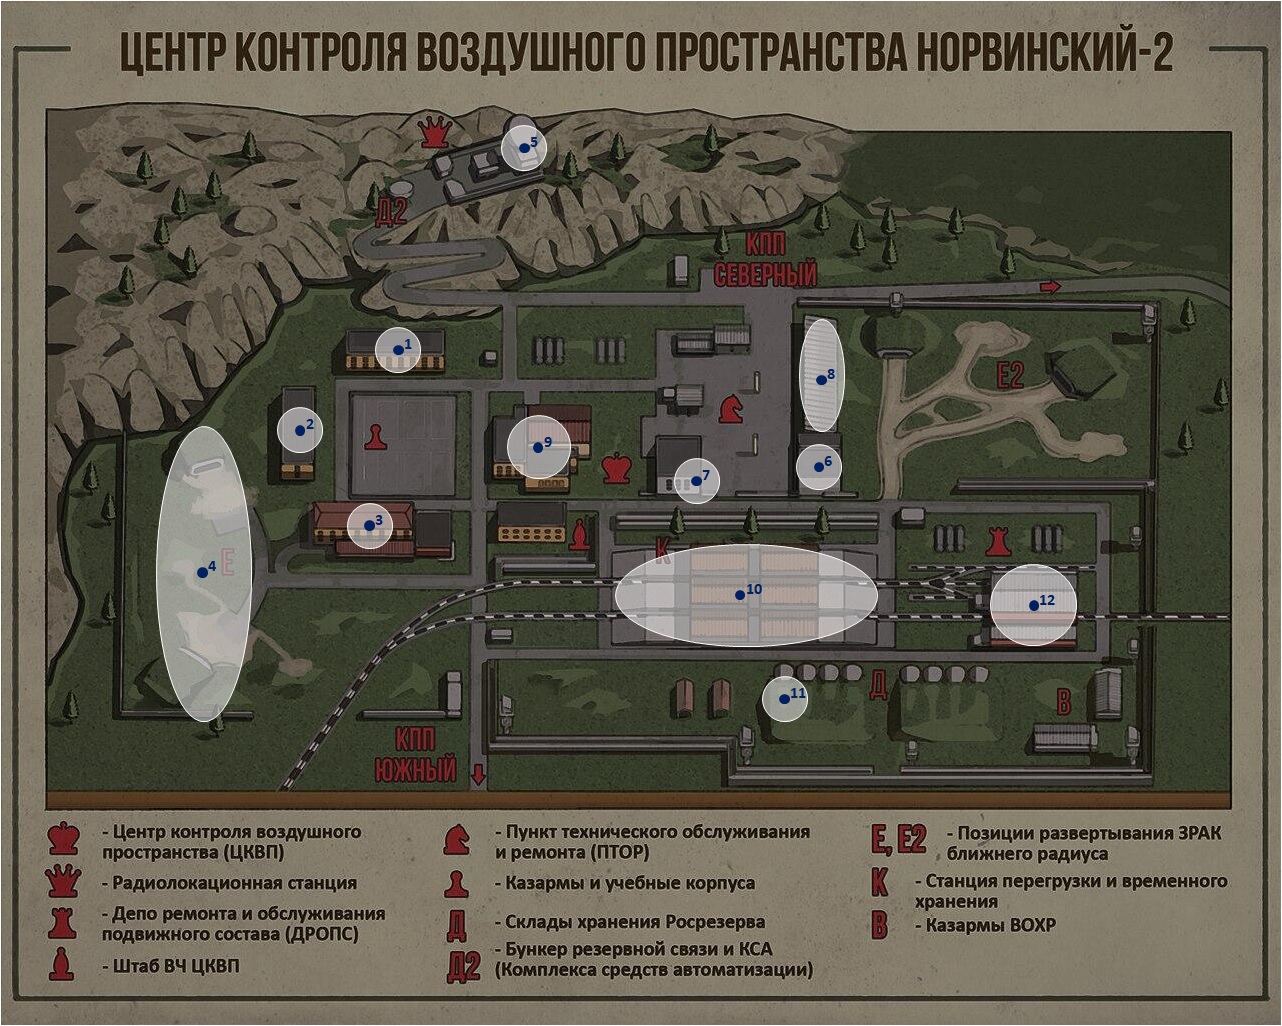
Points of Interest
Tarkov's military base is a very interesting (and dangerous) place. There is much to see and even more to scavenge here, as the military likes to keep its secrets and supplies inside of their bases (and they didn't have time to sweep it all when they evacuated); here are some of the most interesting locations (possible loot included).
Note1: Left-clicking on the map will open the full-sized version in a new window.
Note2: We plan on expanding this section of the guide and making it much more detailed in the future (some points of interest that are bulked together might be separated, others will be added, etc.).
 |
|
1. White Pawn / North Pawn Northern barracks building. This is where most of the base's personnel were accommodated. The building is quite large; it has 4 stories and an accessible roof that offers a vantage point (there is even some cover on it, so you will not be too exposed there, but you still can be easily seen from the Dome; try to always have some cover between you and it while on the roof). If you want to loot this building fully you will need the following two keys:
Note: In the middle of the plaza between the Pawn buildings, there is aa Helicopter. It can be used as a handy landmark (its nose points towards the School / South Pawn and its tail points towards the North Pawn / White Pawn). It also contains some loot, but hanging around it is very dangerous as you have to cross an open field to get inside. Note2: There is also a small Podium on the square, west of the Helicopter, and underneath it (entry through a small window) there is an unfortunate Scav... |
|
Location - Western part of the Reserve, just north of the Helicopter and south of the Dome/White Queen (west of the Gas Rigs). White Pawn / North Pawn is marked as number "1" on our Map. |
|
Possible Loot:
|
|
2. Black Pawn / West Pawn A building very similar to the White Pawn / North Pawn building (in both ex purpose and room layout - it also has 4 stories). This is where most of the base's personnel were accommodated. Unlike the White Pawn, the Black Pawn has a dark secret in its basement... a rumor has it that an occultist cult has set up a shrine there. And the cult that operates in the city of Tarkov is famous for using weapons as sacrifices which means that there are bound to be guns there. If you want to access the Reserve's Marked Room in Black Pawn's basement, you will need the RB-BK Key [RB-BK] (the key can be found on the Woods map in Shturman's stash). |
|
Location - Western part of the Reserve, just west of the Helicopter and south-west of the Dome/White Queen (south-west of the Gas Rigs). Black Pawn / West Pawn is marked as number "2" on our Map. |
|
Possible Loot:
|
|
3. School / South Pawn The academic building of the base's barracks area (despite being often called the "South Pawn", this is, in fact, the Black Bishop building). It features some locked areas and a heavy weapon strongpoint in a window on the top floor and on the roof. Also, the building has been fortified with sandbags, so it is possible to mount a defense here. If you want to fully loot this building, you will need the following keys:
|
|
Location - Western part of the Reserve, south of the North Pawn / White Pawn building, and east of the White Bishop Building. School / South Pawn is marked as number "3" on our Map. |
|
Possible Loot:
*Alternatively, you can drop down, onto the awning, from the 3rd floor (right-most window in the classroom above the RB-AK room) and enter the room through the window (which means that you don't need the key to loot this area). |
|
4. West Bunkers / E1 Bunkers One of two anti-aircraft emplacements of Tarrov's military base. This area features entrenched missile AA vehicles and tanks in the middle and two Bunkers (E1 south and E1 north). Although there are spawn points in the bunkers, they are still worth checking out, as there is a chance that someone has overlooked something of value (6-STEN-140-M military battery, for example). Be aware that you will be very exposed while traversing this open area; try to cross the open ground as fast as possible and dive into one of the bunkers or behind some other cover. |
|
Location - Western part of the military base, south-west of the Pawn area and west of the Station building. West Bunkers / E1 Bunkers are marked as number "4" on our Map. |
|
Possible Loot:
|
|
5. White Queen / Dome Military Base's radar station, easily recognizable by the white dome that dominates the immediate landscape. This is one of the more interesting areas on the Reserve and for some good reasons; there is a large underground bunker complex underneath the White Queen's smaller building (that is connected by an underground tunnel with the Pawn area; there are very many worthwhile loot spawns in the tunnels), and the area features an AGS 30x29 mm automatic grenade launcher fortified emplacement that can be used to shell a large portion of the base. On top of that here are two Guard Shacks, that might have something interesting hidden in them, here. Also, behind the Dome, there is a "Cliff Descent" extraction point, that can't be used if you are wearing armor, however. and requires a Paracord and an Ice Pick. |
|
Location - Northern part of the Reserve map, north of the White Pawn building. White Queen / Dome is marked as number "5" on our Map. |
|
Possible Loot:
|
|
6. White Knight Reserve's eastern workshop building, more widely known as the "White Knight". If you are after industrial or military loot, you will not be disappointed with this place. On the building's first floor there are maintenance workshops with an IFV (Infantry Fighting Vehicle) parked inside (it's most likely a Russian/Soviet БМП-2; BMP-2 for those interested). Unlike the Black Knight building, this one was fortified with sandbags, which makes accessing the second floor more difficult (to access it, you have to drop down through a hole in the building's roof, which might break your legs). To fully loot this area, you will need the following key:
|
|
Location - In the middle of the military base, north of the main Train Station building, south of the White Queen / Dome. White Knight is marked as number "6" on our Map. |
|
Possible Loot:
|
|
7. Black Knight Reserve's western workshop building, more widely known as the "Black Knight". If you are after industrial or military loot, you will not be disappointed with this place. The building is three-story-tall, the first (ground) floor features a large maintenance hall, workshops, and magazines. On the second floor, one can find a locked workshop with good loot opportunities inside, and on the third, there are mainly building's offices. Moreover, the building's roof is accessible (the roof is quite exposed as it can be seen rather easily from the Dome). To fully loot this area, you will need the following key:
|
|
Location - In the middle of the military base, north of the main Train Station building, south of the White Queen / Dome. Black Knight is marked as number "7" on our Map. |
|
Possible Loot:
|
|
8. Garages A large hangar/maintenance area by the Knight workshops. There are multiple different vehicles parked inside. At the northern end of the Garages, there is a grate-door that requires a key to open. To fully loot this area, you will need the following key:
|
|
Location - In the middle of the military base, north of the main Train Station building, south of the White Queen / Dome (the "long" building in the north-eastern part of the area). Garages are marked as number "8" on our Map. |
|
Possible Loot:
|
|
9. White King Tarkov's Military Base's Airspace Control Center (CPKV), more widely known as the "White King building". This large, three-story structure with an accessible roof is one of the more interesting areas on the map and its central position results in players often meeting here. Very welcoming "Welcome to Hell" writing above the main entrance pretty much sums up this place; expect all hell to break loose after you enter as there are bound to be other PMCs around. To fully loot this area, you will need the following keys:
|
|
Location - Dead center of the Military Base, east of the Pawn area, west of the Knight area, and south of the Dome / Queen area. The White King is marked as number "9" on our Map. |
|
Possible Loot:
|
|
10. The Station / K-Station The military base's freight station, complete with vast storage areas. This is where all equipment, fuel, armaments, and provision transports, that supplied the Reserve, were unloaded. Station's previous purpose means that, most likely, there still are valuable commodities hidden around its area. There are also two Weapon strongpoints in the area (one at each end of the station). Note: Reserve's NPC Boss, Glukhar, and his bodyguards sometimes roam the Station's vicinity. They are very hostile, extremely deadly, highly accurate, and surprisingly durable, which makes very formidable opponents out of them. If you meet them, try to break the line of sight immediately and, if you want to engage, close distance as fast as possible, because they are generally more dangerous at longer distances. |
|
Location - Middle of the Military Base, south of the Knight area and west of the Rook area. The Station / K-Station is marked as number "10" on our Map. |
|
Possible Loot: Loose technical loot; technical Crates in storage areas; 4 Weapon Boxes in train carts and storage areas; Industrial item spawns (including Fuel); Paracord spawn on a shelf in the station's workshop (by the Hermetic Bunker). |
|
11. Hermetic Bunker Large underground storage area located underneath the south-western Hangars/Storage Warehouses. A tunnel with a road that is large enough to support truck traffic gives the scale of this place (it is massive). There are 4 locked-off areas with good loot possibilities here, which means that it is always worth checking this place out if you have the needed keys. Caution is advised when you are down below, as there are multiple Raider spawns in this area. This area also features the "Bunker Hermetic Door" extraction point (by the western entrance to the Hermetic Bunker). To fully loot this area, you will need the following keys:
|
|
Location - Southern part of the Military Base, underneath of the western-most of the southern Storage Warehouses, South of the K-Station. The Hermetic Bunker is marked as number "11" on our Map. |
|
Possible Loot:
|
|
12. White Rook The Train Repair and Maintenance Depot. This is the place from which the Armored Train departs from (one of the possible extraction routes of the Reserve map). White Rook is a large hangar with an accessible roof that provides good (but somewhat exposed) vantage points that overlook the immediate area (including Military Guard Barracks, Hermetic Bunker entrances, and the K-Station). |
|
Location - South-eastern part of the Military Base, east of the K-Station building, north of the Military Guard Barracks. White Rook is marked as number "11" on our Map. |
|
Possible Loot:
|
Spawns and Extractions
| Detailed Extraction/Spawn map of the Reserve coming soon! |
|
Spawns Coming Soon! |
|
Extractions Coming Soon! |
Raid Strategy
| Coming soon! |
|
END NOTE Escape of Tarkov is a tough game with a steep learning curve. This is why we have decided to aim this guide at new players who tend to struggle with their first Raids and help them learn about different maps that the game has to offer. We hope that you have found this guide useful and informative. If we have missed an important piece of information, please let us know! Also, we will be happy to receive constructive criticism that will help us improve our future work so leave your suggestions in the comments section below. |
Pictures used in this article are the intellectual property of the Battlestate Games.
