
Plasma Orb Runemaster for Last Epoch
The best setup for the Runemaster that conjures the power of runes to unleash powerful Plasma Orbs to decimate your opponentsPlasma Orb
Runemaster Build
Updated for Patch 1.0
| Build notes: |
| February 28, 2024 -Build created |
Build Overview
The Runemaster is probably the most universal and complicated Class in the entire game. The key feature of this Class is the Runic Invocation Skill. When you use Elemental Spells you gather up to 3 Runes based on the Spell you use. You can use the Runic Invocation to unleash the Spell corresponding to the rune Combination. There are over 40 Spells at your disposal, but the Spell we are focusing on in this Guide is the Plasma Orb which requires you to combine Fire, Lightning, and Fire Rune. It creates an orbiting ball of fire that sends lightning tendrils at nearby Enemies for a short duration. Thanks to the Runebolt you don't have to focus on correct inputs and order. It is a combo Skill that creates all 3 types of Runes one by one, in a specific order. You can convert the Cold Bolt into Fire, which results in the combination of Fire, Lightning, and again Fire Bolts, which is exactly what you need for your Invocation. Your other Skills are focused on utility and defense.
The Plasma Orb deals mostly Lightning Damage, but you will have a lot of added Damage of other types. The Unique Items used in this Build are important factors to scale your Damage but are not necessary for Build functionality. The Mad Alchemist's Ladle is a Wand that grants you up to 48% more Spell Damage and a lot of Cast Speed but provides only a small amount of flat Spell Damage. For that reason, you should use the Mourningfrost Boots that grants flat Cold Damage based on the Dexterity. The Fundamental Criterion Armour grants certain bonuses based on the Rune Combination you use. In this specific situation, it grants us 3% more Damage for each Dexterity you have.
To survive incoming Damage you will be relying on the Ward, and a little bit of Health. To make it more efficient you should accumulate high amounts of Intelligence which grants you Ward Retention. You will also want to use the Twisted Heart of Uhkeiros Relic to generate Ward when you cast your Skills. The Ward is also sourced from your Critical Hits, Teleport Skill, and multiple Passive Tree Notables.
You can also view the full build on the Last Epoch planner here: Plasma Orb Runemaster Build
For the defenses, this build utilizes:
- High amounts of Ward;
- Life Leech to convert Health into Ward;
- Fast Movement Speed;
- Flame Ward and Teleport buffs.
You can also check our other Last Epoch builds and character guides
|
|
 Pros Pros |
| Very active and engaging gameplay that will never make you bored of the game. |
| Universally good in every type of content you want to engage. |
| Fast Movement Speed and access to the best travel Skill in the game. |
| Very durable thanks to excellent Ward generation and Damage mitigation from the Flame Ward Skill. |
 Cons Cons |
| Your other Elemental Skills will interfere with the Invocation combo. |
| You might run into Mana sustain problems occasionally. |
Passive Skill Trees
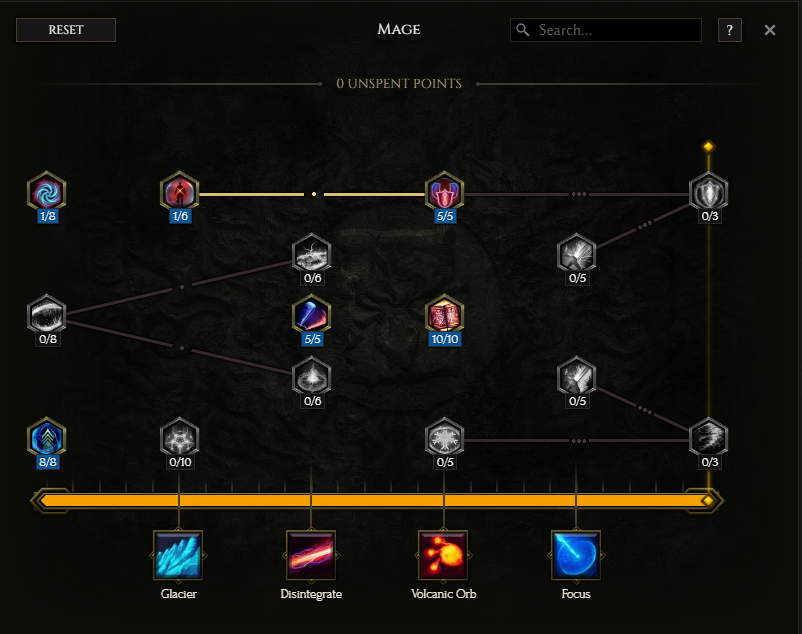 Mage Skill Tree (30 Points) |
|
Notable Passives: The Mage Skill Tree grants you the most basic modifiers, although they are instrumental to have. You will gain plenty of Intelligence, Resistance, and Cast Speed. The Warden grants you a lot of Ward Retention. The Knowledge and Destruction Notable is great for improving your Critical Strike Chance and Damage. |
|
|
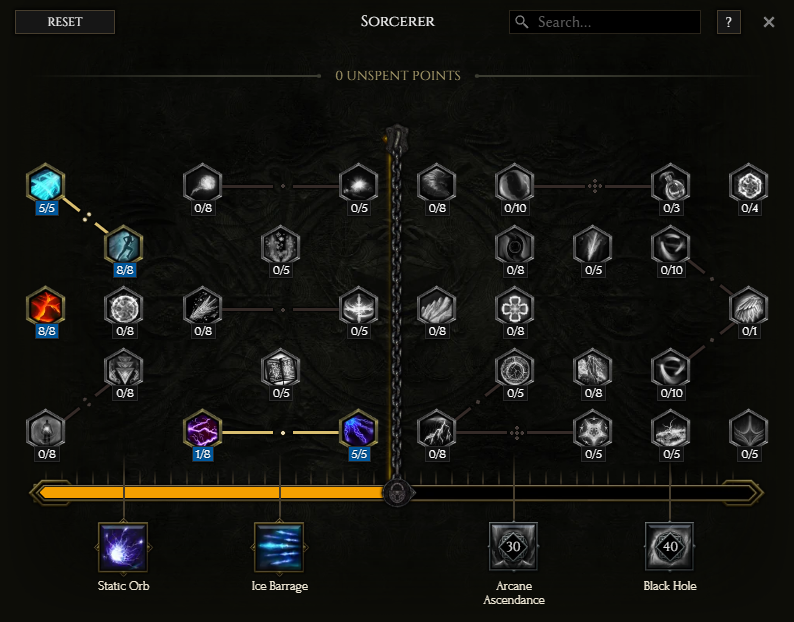
|
Notable Passives: The Sorcerer Skill Tree unlocks your access to the Static Orb Skill. You will also gain lots of Cast Speed, Movement Speed, and Damage just from continuously Casting your Spells, which you will do all the time. The Rift Bolt grants you a lot of Health Leech from the Lightning Damage, but you can skip it if you can get Health Leech from another source. |
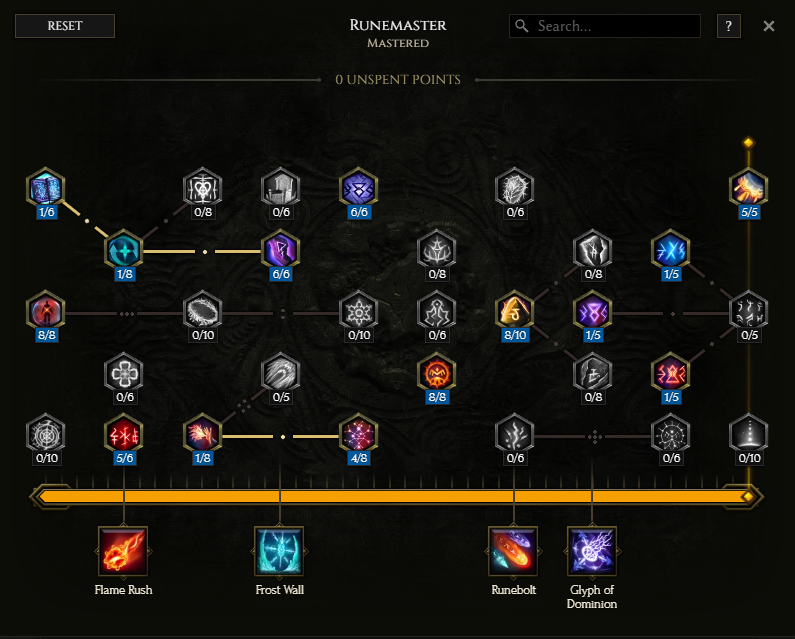 Runemaster Skill Tree (56 Points) |
|
Notable Passives: The Mental Catalysis and Inscribed Instruments are very strong notables that encourage you to use a Wand and Catalyst as your Weapons. The Runeword: Cataclysm greatly improves your Critical Strike Chance and Damage against enemies on Low Life. The enhanced effect of the Decree of the Burning Wind will be almost always active, giving you 10% more Damage against Bosses. The Jagged Veil will generate a lot of Ward, as you will Hit your Enemies very frequently, and it also improves your Damage with Critical Strikes. You can pick up the Celestial Doom to get very valuable bonuses, but only if you are sure to always apply the Brand on your Enemies. |
|
Your Passives will grant you a lot of Ward Generation and Retention, but only a little bit of Health. You will also get a lot of Intelligence, which allows you to focus your Items on Dexterity instead. The abundance of Cast Speed bonuses is also very impactful. You will be scaling your Damage primarily via Critical Strikes, however, applying Ailments such as Shock is still beneficial, due to interactions with your Sphere of Protection and the Mad Alchemist's Ladle. If your Mana sustain is not sufficient enough, you can sacrifice some Damage in favor of the Rune of Renewal or Decree of Bountiful Ocean Notables. |
Skills
Note: Left-Clicking on any of the ability trees below will open the full-size version in a new window.
|
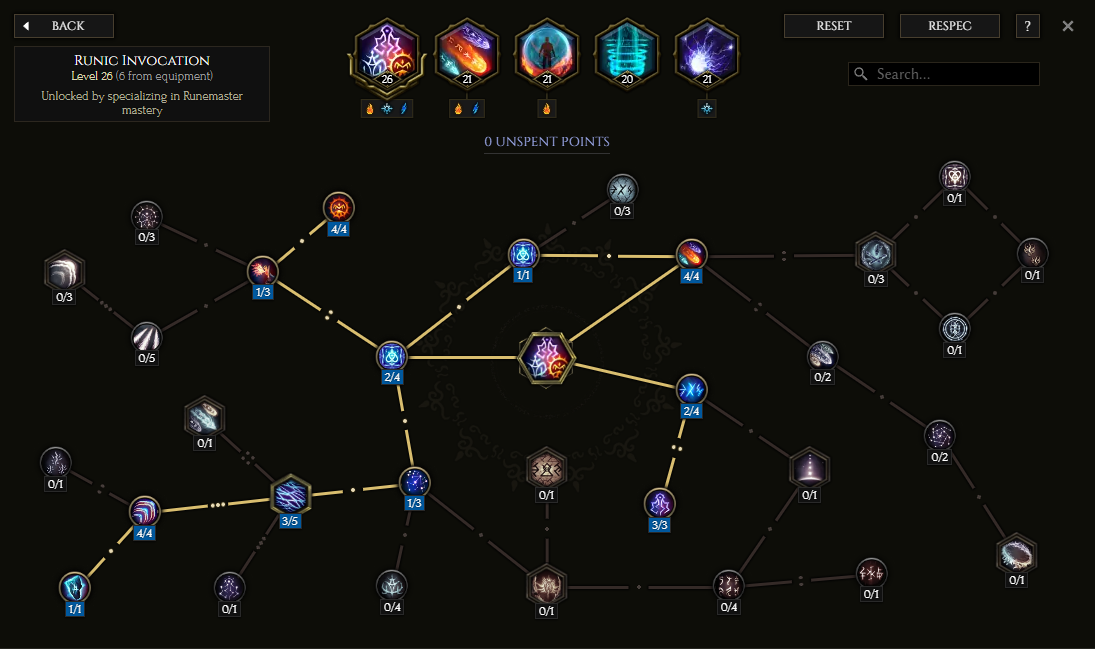
Runic Invocation - your main source of Damage is the Runic Invocation. The Plasma Orb created using the Fire, lightning, and Fire combo deals the most Damage in this Setup, but if you happen to use a different Rune combo, it will still deal plenty of Damage. |
 |
|
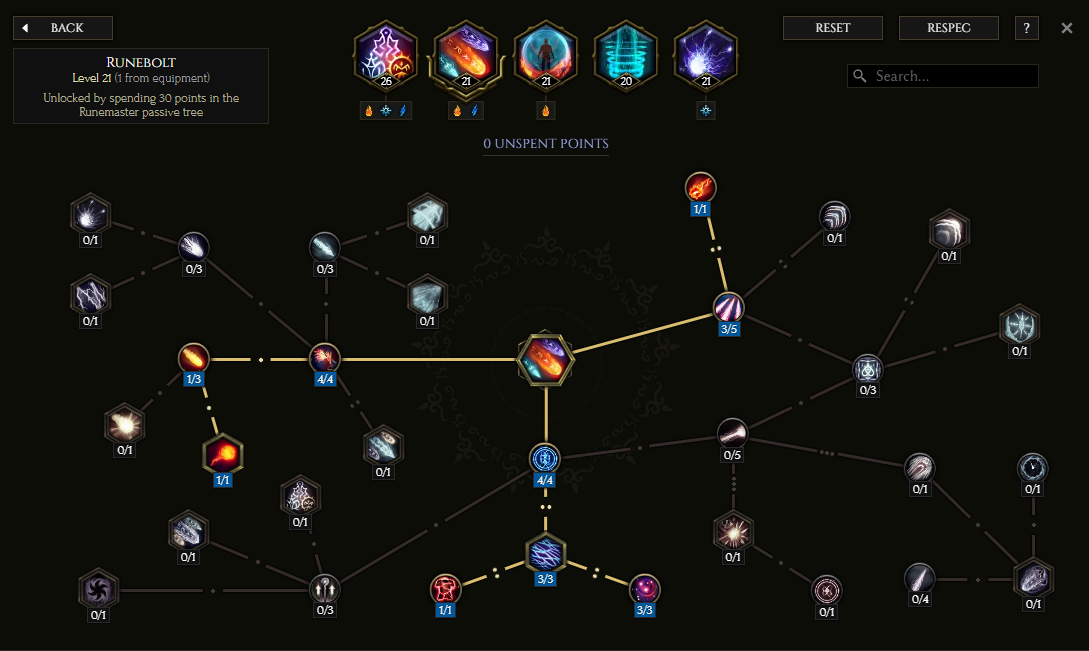
Runebolt - to generate correct Runes you will use the Runebolt Skill. It deals a small amount of Damage, but can grant you Mana on Hit thanks to the Arcane Restoration Notable. The Runeweaver and the connected Notables will grant you a lot of Damage, Crit Chance, Mana, and Ward generation. The Arcanist grants you even more Cast Speed, and the Arcane Overcharge improves your Mana recovery by increasing the total amount of Hits. The Searing Dart is a very important notable that disables the Cold Bolt, which allows this Skill to grant you the correct Rune order for the Invocation on its own. |
 |
|
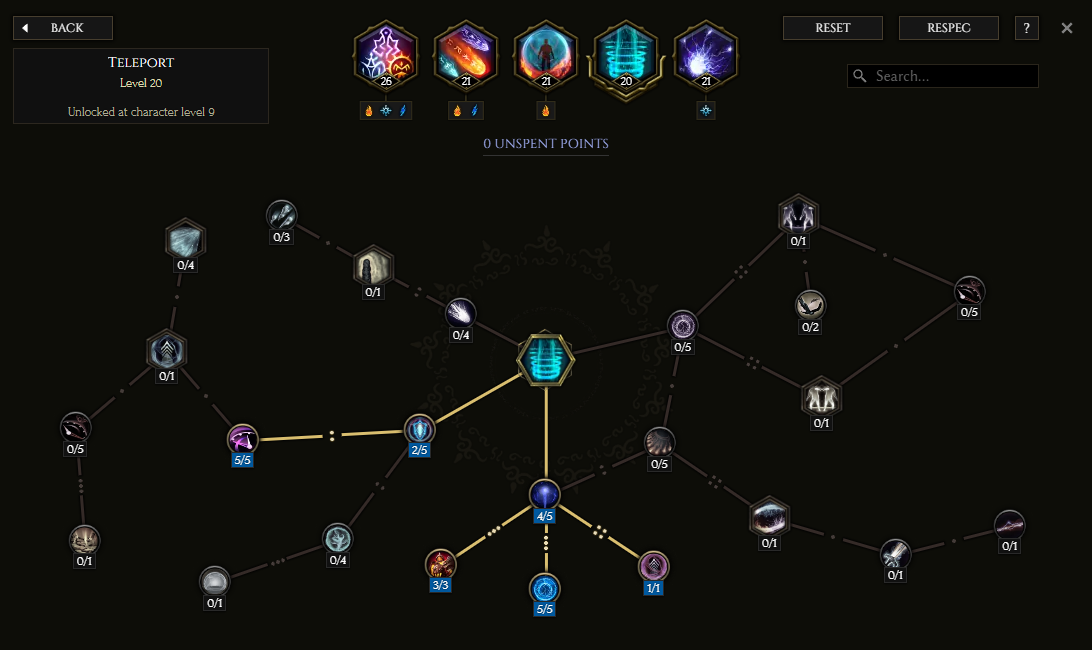
Teleport - it is your main Traveling Skill. It is undoubtedly one of the best Skills in the game for movement, as it instantly teleports you to the desired place. |
 |
|
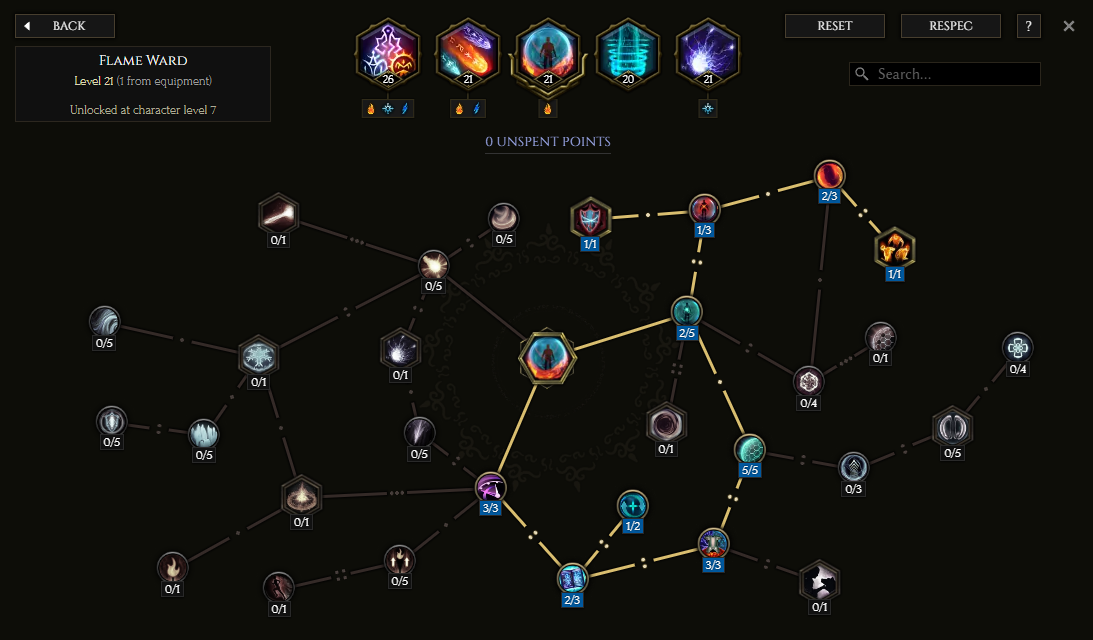
Flame Ward - this is probably the strongest defensive Skill in the game, you should use it often. It grants you a lot of Ward and significantly reduces the Damage you take during its effect. |
 |
|
Static Orb - in this Setup, this Skill deals a minuscule amount of Damage, but using it provides you with a Cold Rune if needed. Thanks to the Static Armor, using this Skill grants you a Lightning Aegis buff for a short duration, which slightly improves the Lightning Damage you deal, and reduces the Damage you take. You will need the Biting Force Notable to convert it to Cold, as by default it is a Lightning type. |
 |


Items
|
Stat priority: On your Rare Items and Legendary Potential bonuses, you should seek Dexterity, Intelligence, Critical Strike Chance and Multiplier, Spell Damage, and Cast Speed. Any flat Spell Damage is also useful to have, as in this Build you don't focus on a particular Element. You should always use a Wand and Catalyst as your Weapons. To improve your survivability you should aim for Health and Intelligence, as well as capping your Resistance. The Ward Retention or Ward Decay Threshold is also very important, although it can be rarely sourced from your Items.
|
||||||||||
|
Recommended Unique Items:
Mad Alchemist's Ladle - this Unique Wand offers you insane amounts of Damage by stacking 8 Negative Ailments on your Enemies, which you will apply very quickly. It also greatly improves your Cast Speed. It lacks a flat amount of Spell Damage, which is why you will have to get it from other sources.
Fundamental Criterion - it is probably the best Armour for every Runemaster that uses any combination of Runes. You could use a Sceptre to further improve your Damage, but it will be hard to find a Sceptre that could outperform your Wand. The 3% More Damage per Dexterity bonus and Levels for Runic Invocation are strong enough to use this Armour over anything else.
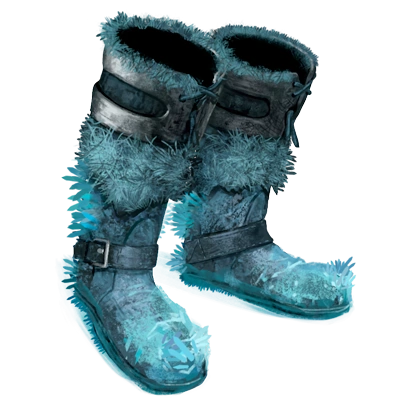
Mourningfrost - this pair of boots further encourages stacking the Dexterity, as it will grant you tons of flat Cold Damage for your Spells, on top of the More Multiplier you get from the Body Amour. However, as you obtain more Dexterity and Damage you must also gain more Cold and Physical Resistances on your remaining gear.
Twisted Heart of Uhkeiros - the additional Cast Speed and Spell Skill Level are quite useful on their own, but the main reason to use this Relic is the absurd amount of Ward you gain every time you Cast a Spell. Thanks to the Health Leech you will have an endless supply of Health to convert.
Boneclamor Barbute - this helmet grants you the two Attributes you care about the most, a decent amount of Necrotic Resistance, and plenty of Ward regeneration. Thanks to the Legendary Potential options you can amass double the amount of Dexterity the regular Rare Helmet could provide. |
||||||||||
|
Idols: You can get an absurd amount of Cast Speed on your Large Arcane Idols, as long as you keep your Lightning Aegis active. Those can also provide you with lacking Resistance. You can also fit in two Adorned Arcane Idols that grant you a decent amount of Ward Retention, and even more Resistance or Health. |
||||||||||
|
Recommended Blessings:
|


|
END NOTE This is the release version of our Plasma Orb Runemaster Build for Last Epoch, which focuses on one of the powerful Runic Invocations available for this Class. We had amazing results with the final form of this Build, and we can attest you won't be disappointed with it. If you enjoy high bursts of damage and don't like to worry about mana management, you have to try out this Build! Future Patches can change the performance of this Build, we will keep our eyes on it and update this guide accordingly to the game's growth. |
Pictures used in this article are the intellectual property of Eleventh Hour Games