Valheim Beginner's Guide
A complete Beginner's Guide for Valheim newcomersConquer the 10th World
A Beginner's Guide to Valheim
Introduction
We can safely say that Valheim is one of our most favorite games of all time, despite it still being in the early access. We've played it quite a lot (we might have played it a bit too much, in fact) and we've learned quite a few things about it in the process. Today, we want to share this knowledge with you, so your start in this great game is smooth and enjoyable.
Note: Left-Clicking the images will open their full-size versions in new tabs.
Valheim Beginner's Compendium
In this section, you will learn about the basics of survival in Valheim. In some cases, we will go into quite a lot of detail but we think it's necessary as complete knowledge is the best kind of knowledge. Moreover, some of the points might seem redundant and self-explanatory to Players who have played the game already, but we'd assumed that completely green Players will read this article as well. Because of this, we've decided to cover the absolute basics too (it's a Beginner's Guide after all).
Tip: You can skip the new Character introduction (being carried to Valheim by the Raven) by logging out immediately after the game loads. When you log back in, your character will be standing at the spawn point; The introduction gets boring after a while, so it's good to know.
|
Gathering Resources This is the first thing you will be doing after you enter the world of Valheim (and you will never stop - you will just transition to higher tier resources and better gathering tools). At the start, your main focus should be:
Important: About cutting larger trees with an Axe: Falling trees will damage You heavily, especially in the early game, if you don't wear solid armor - you can get one-shot by them (once you get ~40 Armor, trees don't hurt that badly). Keep this in mind while chopping down trees with an axe! Logs are the main cause of early game deaths - they are much more dangerous to your life than the wildlife in Meadows. Tip: Resources lay on the ground almost everywhere - stones, branches, and mushrooms are much more abundant than you might think. To spot them easier, head to Graphics Settings and turn Vegetation Quality Slider to Minimum. Doing this will prevent grass from rendering and make resources clearly visible; everything you see on the ground when using this trick is a resource you can pick up. If you don't like the look of the game without small vegetation, just turn the slider back to Maximum after you're done foraging. Tip: If you scare off a Deer, don't chase it - you won't catch it anyway. Assuming Sneaking Stance (default LCtrl) and waiting for it to return is a much better idea. Every mob in Valhaim will return to its spawning location once it breaks aggro/stops running away from you. The Deer should be back when you've found it in under a minute. You can re-try hunting it as many times as needed this way - it will always come back after a while, even if you've managed to wound it. |
|
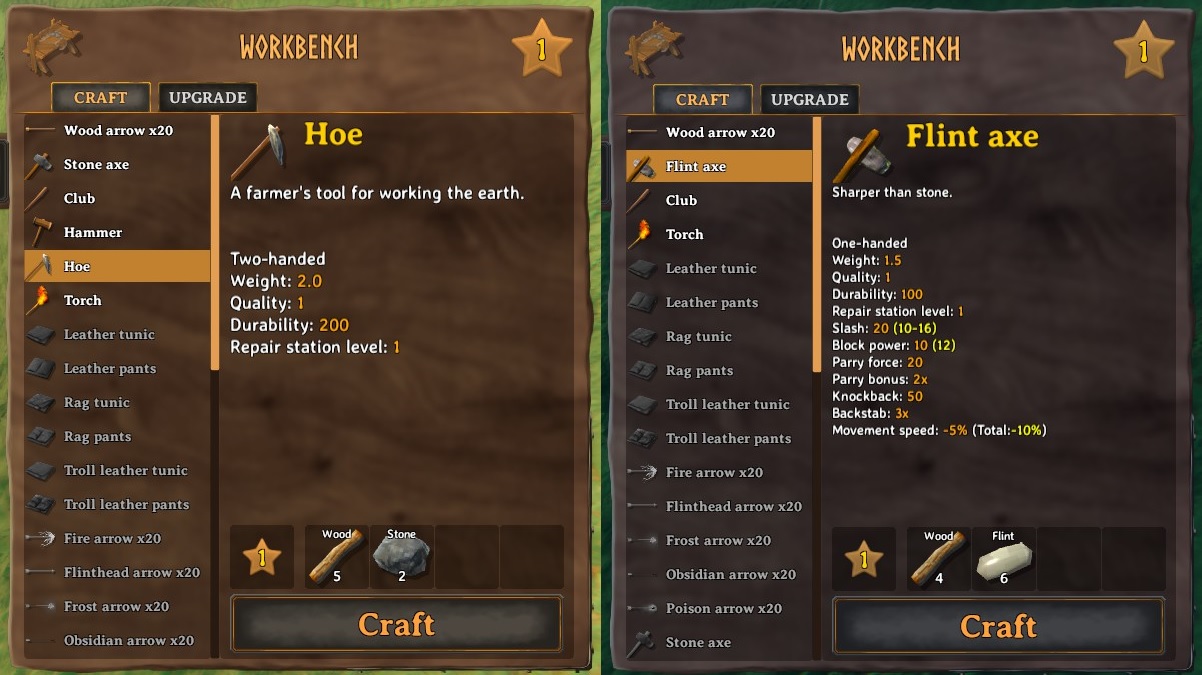
Basic Crafting Once you gather some Wood and Stone, you will be able to craft some basic equipment. You should gather enough Wood and Stone to Craft a Hammer and a Stone Axe (8 Wood and 6 Stone). After you craft both of these, you will be able to harvest Wood much faster and construct your first Shelter. Note: Crafting the Club is not necessary as the Stone Axe doubles as a Weapon in addition to being capable of chopping down trees. |
|
|
|
Note: You can access your Inventory and the basic Crafting window by pressing Tab - Inventory is located on the left and the Crafting Window on the right. Once you select an Item to Craft from the list, the required materials will be displayed right above the "Craft" button - if you miss any, they will flash red. |
| Note: You start the game with a Torch. It is much more useful than you might think (More on that in the next section)! You can craft more Torches, through the basic crafting window, out of Wood and Resin. | |

|
Basics of Combat While gathering resources, you will definitely come across the Meadows' wildlife. Some of the creatures you encounter will flee once you get too close (Deers and Gulls in Meadows), but most of them will attack you on sight (Boars, Necks, and Greylings in Meadows). Moreover, some creatures are scared of fire and will flee from it; you can use this to your advantage by equipping a Torch (These include Boars, Greylings, Greydwarfs, and Necks). The enemies you encounter will sometimes be experienced; there are three tiers of enemies - 0, 1, and 2-Stared. Each Star increases the Enemy's Damage by 50 % and doubles its Health, for example:
Note: Experienced enemies also drop more loot; 1-Stared double the amount and 2-Stared triple the amount. Valheim's Combat System is quite simple and very intuitive once you get used to it:
Important: Using Actions (Sprinting, Jumping, Parrying, Blocking, Dodging, and Attacking) will drain your Stamina - indicated by the yellow bar displayed on the screen each time you use an Action. Because of this, spamming actions is generally a bad idea - combat in Valheim is all about proper Stamina management (You can learn more about Stamina in the "Food, Health, and Stamina" Section). *Spears can be thrown, Swords can be used to Stun enemies, Maces can perform a slower but more powerful swing, Atgeirs can be used to perform a-360-degrees-AoE-swiping-attack, Knives have a built-in jump attack, and Two-Handed Axes have a forward stab that consumes less Stamina than their normal attack. **Parry is performed by pressing and holding the Block button just before an enemy attack would connect with you. A successful Parry is indicated by a bashing sound and a red visual effect (regular blocks are indicated with white visuals) and will result in the Enemy being stunned and pushed back (distance is indicated by the Parry Force). While Stunned, Enemies receive Double Damage. All Weapons and Round Shields (Tower Shields can't be used to Parry attacks) can be used to Parry incoming attacks. Moreover, maximum Damage blocked with a Parry is higher than maximum damage blocked with a regular Block (the difference is calculated by multiplying the Block Value of a Shield/Weapon by its Parry Bonus). Note: You can Parry Ranged Attacks as well! Doing this is quite tricky at times, but a successful Parry will Stun the shooter just like it would Stun an enemy in melee. Tip: Many attacks can be dodged by simply walking away from the enemy. ***While you are Sneaking, your standard crosshair is replaced by the detection indicator. The indicator resembles a closed eye; the more it opens, the closer you are to being detected. Attacks performed while undetected deal bonus damage (you can hack the Critical Multiplier in weapons' tooltips). Note: Sneaking up to Deers and stealthy taking them down is the easiest early-game tactic for hunting them before you craft a Crude Bow (they don't run out of Stamina while Sprinting and You do, so chasing them around is not the best of ideas). Damage Types and Resistances Different types of Weapons deal different types of Damage:
Some Ennemies you encounter in Valheim have strengths and weaknesses. For example, Greydwarfs are susceptible to Fire Damage and Skeletons are resistant to Pierce Damage. You can identify whether an enemy is weak or resistant against a damage type by the color in which the Damage is displayed:
|
|
The Very Basics of Building Base building is one of the main selling points of Valheim, and for a good reason - the game's construction system is very pleasant to use and allows for a lot of creative freedom. Basic building controls are:
Note1: All Buildable pieces require a Workbench close by to be built. Workbenches have a 20 meters influence radius - you can't build if you stand outside of it. If you are out of range, just place down another Workbench! Note2: Some buildable pieces will require a Forge (the ones with metal parts), a Stonecutter (the ones made out of Stone), or an Artisan Table (some high-end ones, like Blast Furnace). These three work exactly the same as a Workbench when the building of structures is concerned. Tip: Workbenches also block monster spawns in their Area of Influence! You can use this to your advantage by placing Workbenches in strategic spots (this also works with Campfires). |
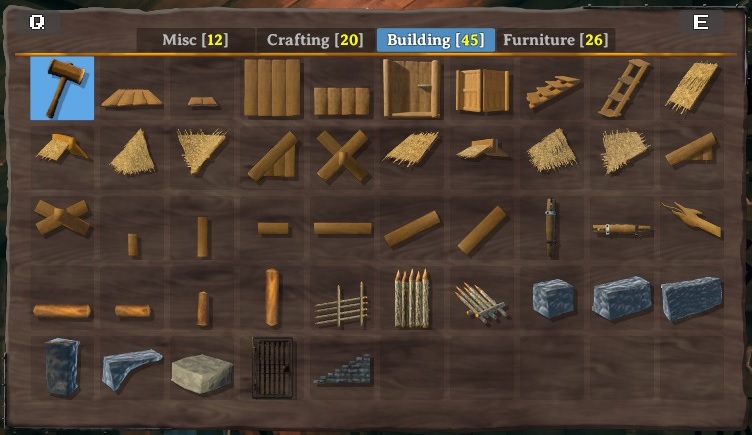 Building Tab of the Construction Menu. |
|
Workbench Shack and Your First Shelter Weather can be harsh in the 10th world. Moreover, Valheim's nights are very dangerous as monsters spawn at increased rates during them. Because of this, you should construct a rudimentary shelter as soon as you are able to (even the in-game tooltips say this!). The first thing you should build is a small shack that will house your Workbench; Workbenches can be used for crafting and repairing gear when they are "in-doors" (but they can be used for building structures when they are exposed). However, the game's definition of being "in-doors" is quite loose, so constructing something like this is enough: |
|
|
|
|
|
Once you have built a Workbench Shack, you should craft some more advanced tools. A Flint Axe and a Hoe will do (9 Wood, 2 Stone, and 6 Flint in total), but you might also want to craft some Armor* and Weapons** while you're at it. With your new Flint Axe, gather some additional Wood that will let you construct a rudimentary Shelter. Also, place a few Chests next to your Shack, for some additional storage space (they cost 10 Wood each to construct). Note: Constructing anything bigger than really necessary is a waste of time and resources as you will want to transition to a "proper" base as soon as possible, anyway. *A set of basic Leather Armor is the best you can manage at this point. Crafting all for pieces (Cape, Helmet, Tunic, and Pants) will require 22 Deer Hides and 5 Bone Fragments. Bone Fragments, only required for the Deer Hide Cape (it's only 1 Armor when unupgraded, so it can be skipped for a while), can be dropped from Skeletons - these can be found in the Meadows Biome, near Stone Graves, and much more commonly in the Black Forest (inside Burial Chambers and near entrances to them). A full set of unupgraded Leather Armor grants 7 points of Armor (6 without the Cape). Note: You will have to upgrade your Workbench before you craft the Leather Set. More on that in the next section. **We advise you to go for a Crude Bow and a Flint Spear + Wood Shield combo as Spears go well with Shields (When you Parry, enemies are knocked back and often go out of your melee range. You can throw your Spear at them to finish them off - the Spear's thrown attack deals extra damage, compared with its regular attack, and you get a damage bonus while the enemy remains stunned from the Parry). Crafting all three will require 25 Wood, 10 Flint, 14 Leather Scraps, and 4 Resin (Resin is sometimes obtained while chopping trees and drops from Greylings). Unlike the Leather Set, all three of these can be crafted at the Level 1 Workbench. We recommend the following shelter build. It is very minimalistic, but it works well enough. With it, you will get a place to rest (with Comfort 4) and Sleep through the nights. The following Shelter's resource cost is 46 Wood and 5 Stone, which brings the total up to 77 Wood, 7 Stone, and 6 Flint for Shelter, Flint Axe, Hoe, and the Workbench Shack: |
|
 Tools make life easier. Remember to repair them on a Workbench often. |
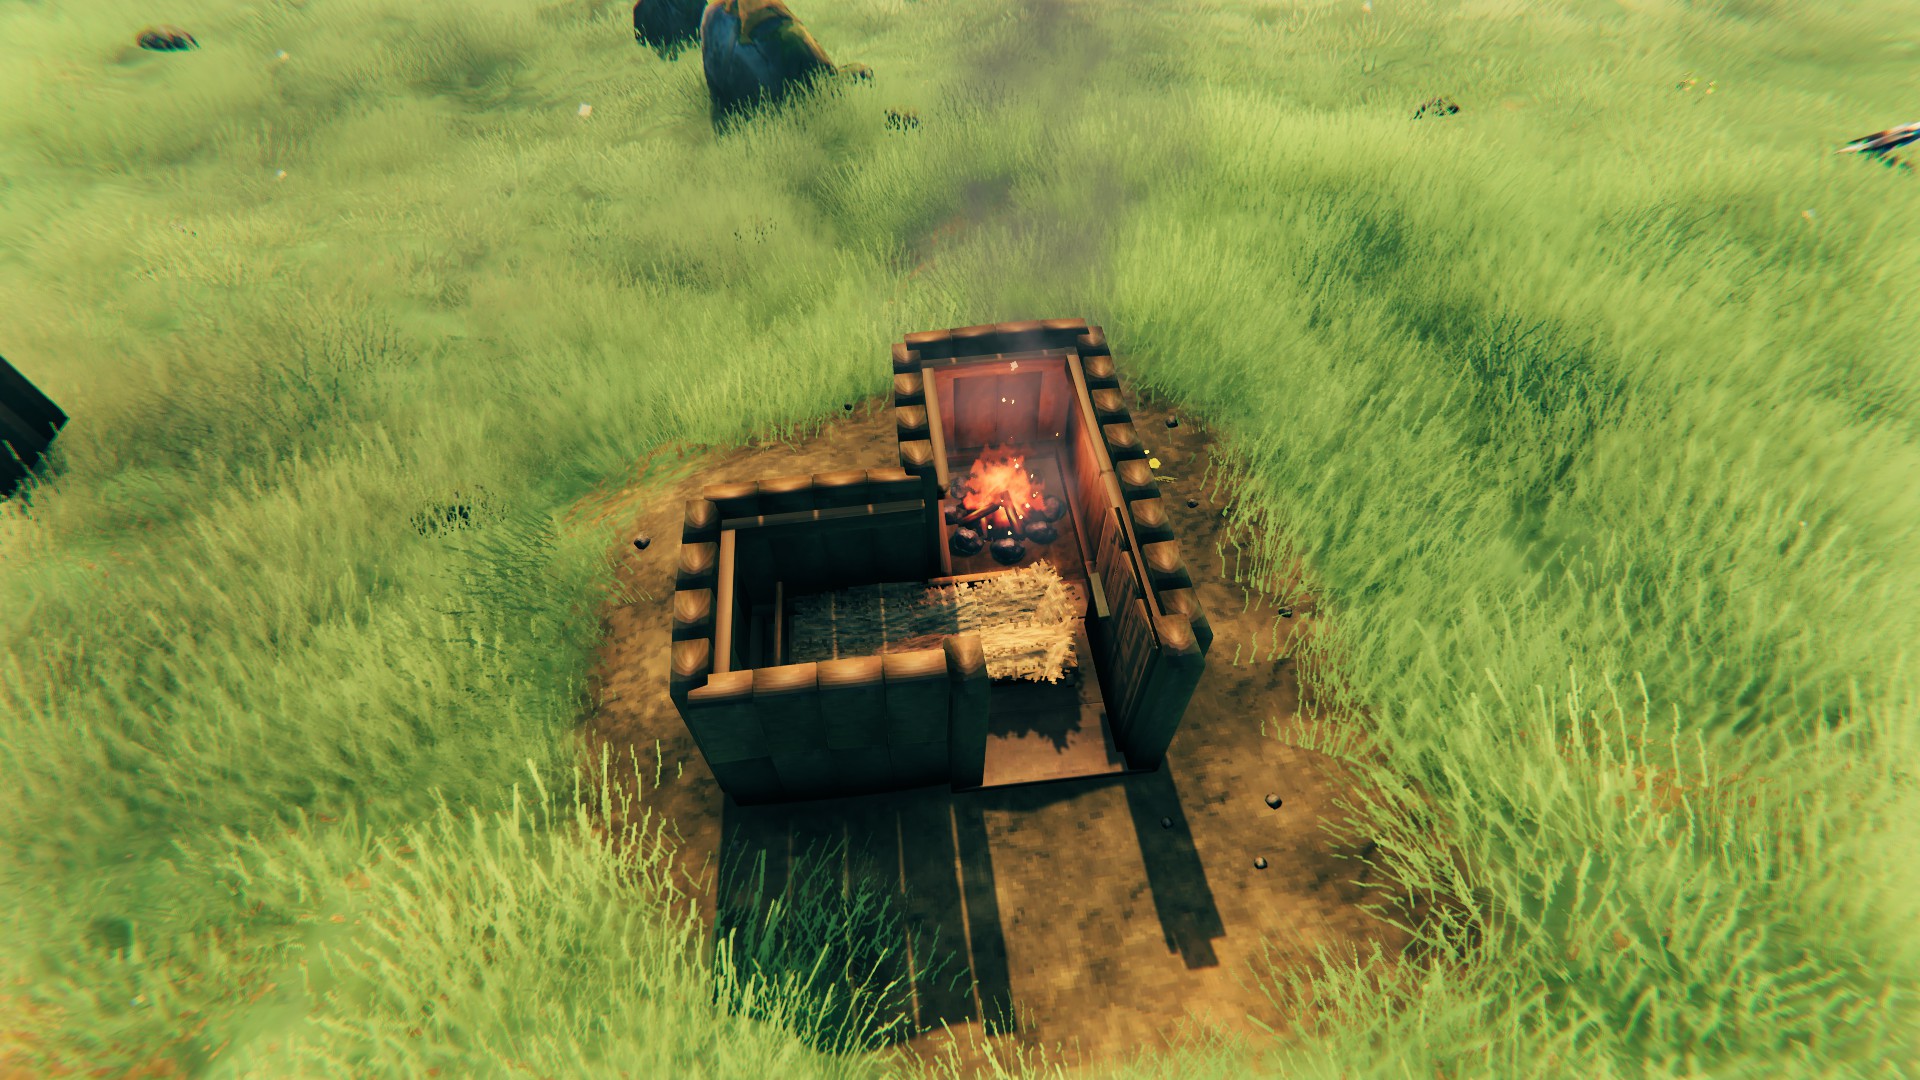 A Rudimentary Shelter only needs a Bed and a Campfire. |
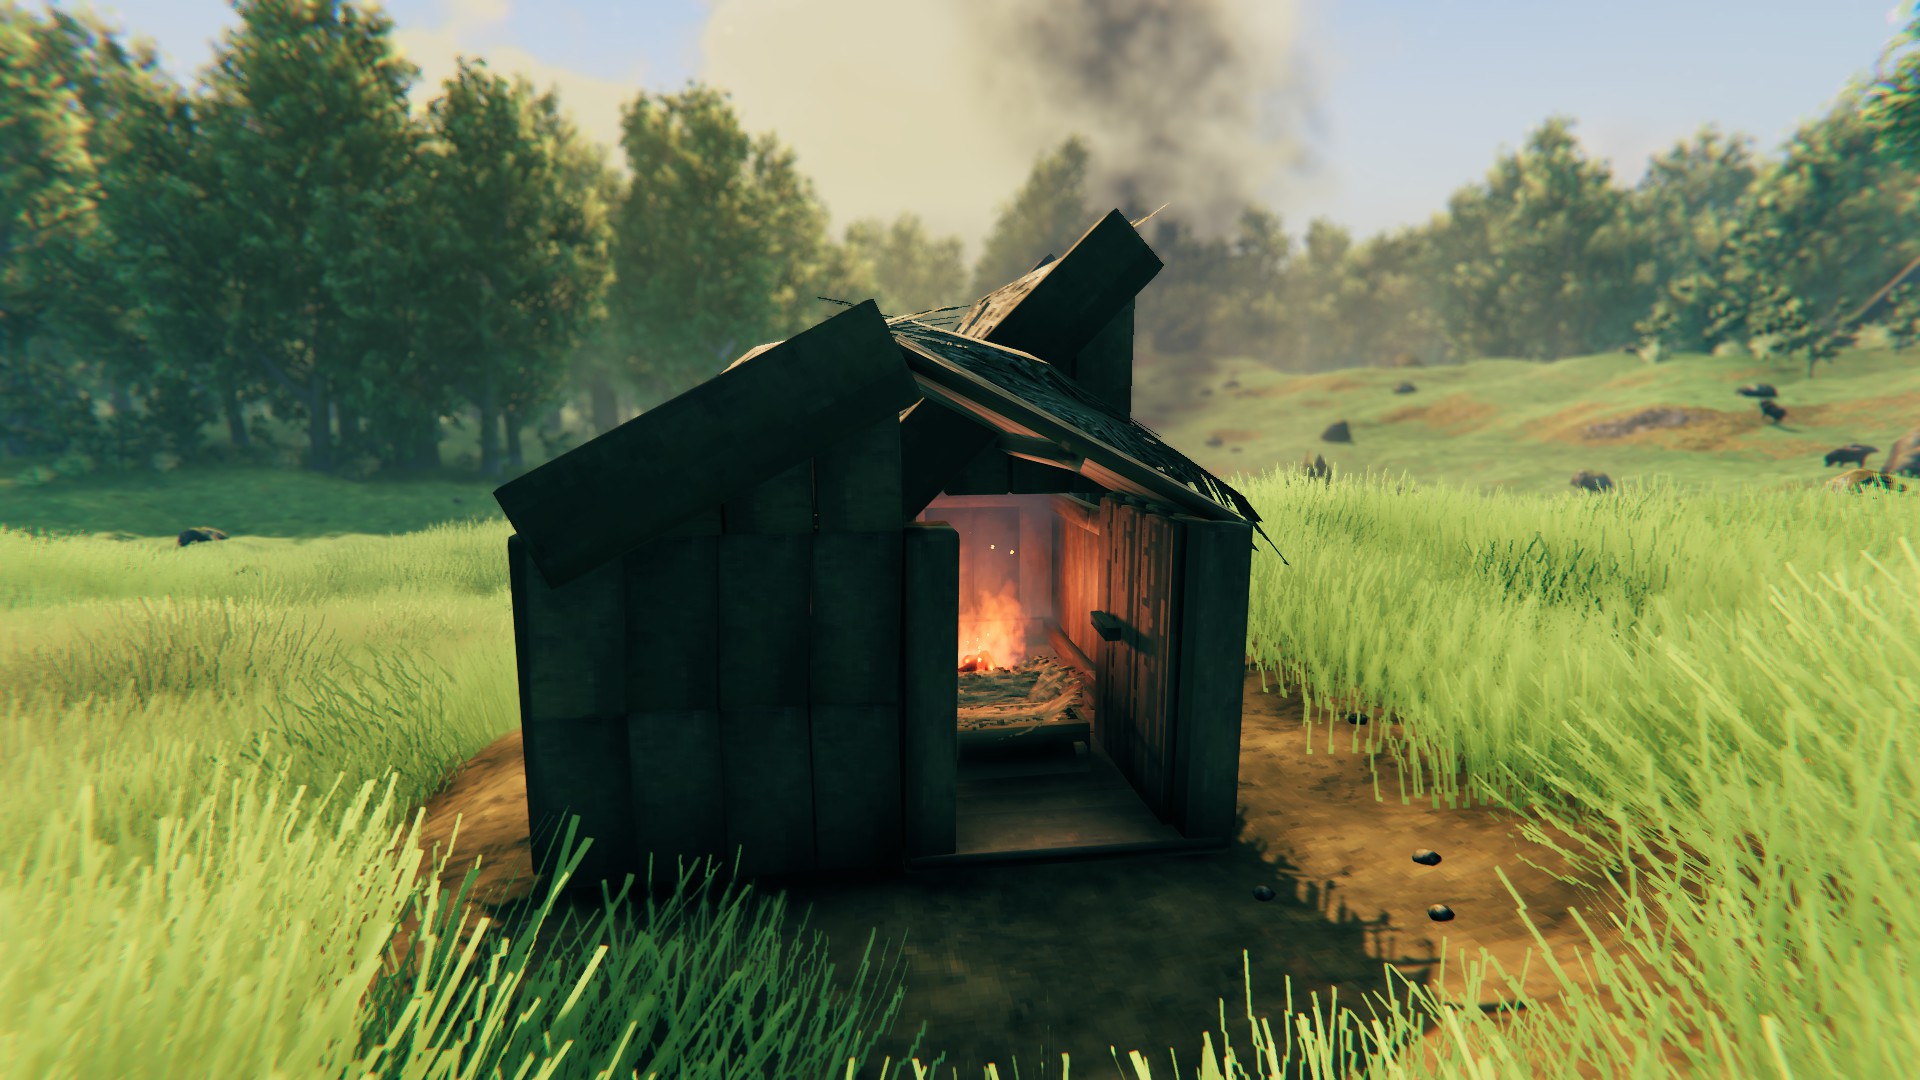 It has doors as well. |
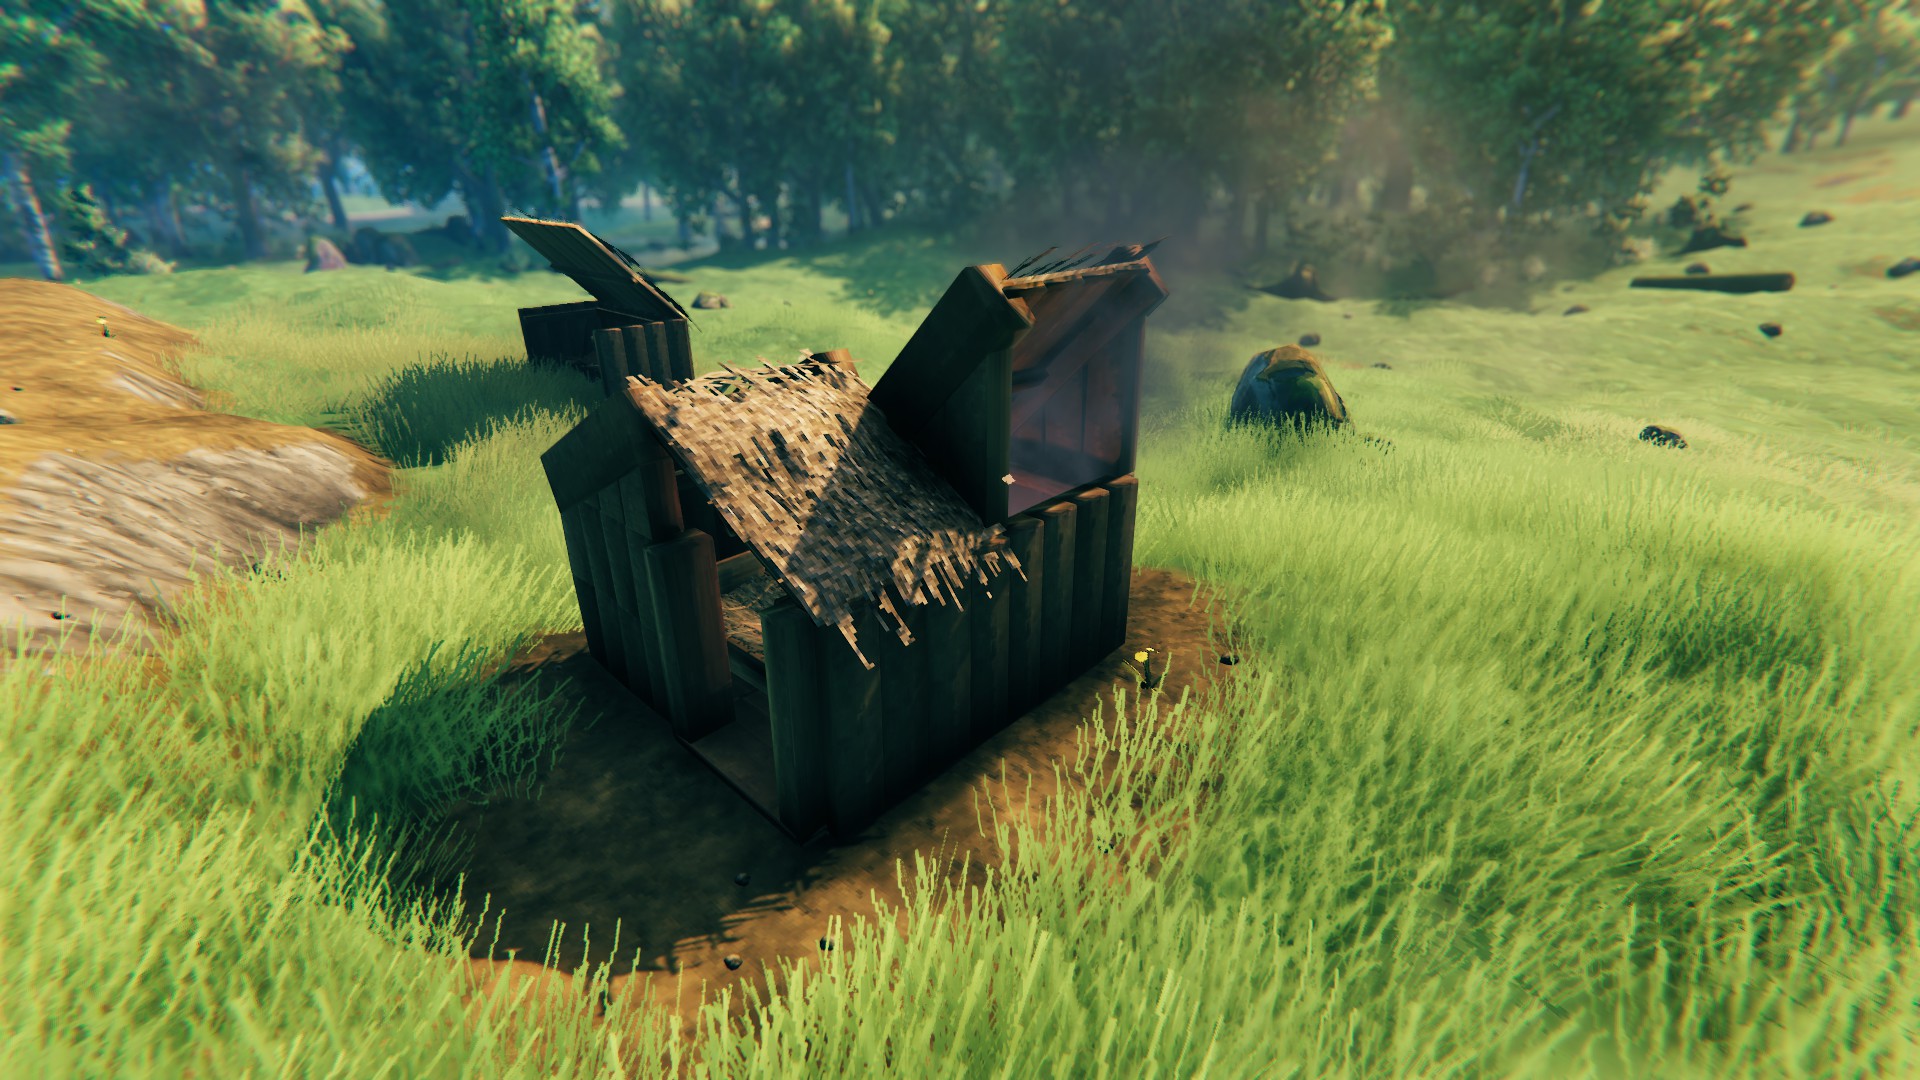 And a chimney! |
| Once you have built a rudimentary shelter, you can start thinking about constructing a proper base - this guide goes over that as well! You can skip right to it if you want to, but there's still a lot of basic information to go over. | |

|
Structure Stability If you had fiddled with Valheim's building system already, you have most likely noticed that some pieces break almost immediately after you place them. This is caused by the lack of structural stability - there is not enough support to hold these pieces in place. Elements of your structure will take damage and get destroyed over time if there are not enough reinforcing elements to hold them properly in place. While in the build mode (while holding a Hammer), when you hover your cursor over an element, you will see the level of support it has from reinforcing elements. The colors range from Blue - "grounded" which is 100% stable (trees and rocks also count as being "grounded" which means that elements attached to them will get 100% stability*), Green - very stable, orange - unstable, and red - threatening to collapse. If an element is fully-red it will take damage and fall apart. *You can use this feature to build tree houses or construct very tall towers - just use a tree as a backbone! Trees planted by Players also work, so you can freely choose the construction site. Note1: The stability of each element mainly depends on how horizontally far away it is from a part that is anchored to the ground (a pole or a wall, for example). This means that you will have to make supporting beams and columns if you want to create a large enclosed area. Note2: Stronger Wood can support more weight and thus is better for erecting higher and bigger structures. If you struggle to construct something with regular Wood, try Fine or Core Wood instead. If that also fails, you can use Wood Iron Poles as reinforcement - they are the strongest pieces for that purpose. Consult the images below for a visualization of how stability works in practice and how to add additional support to your structures: |
|
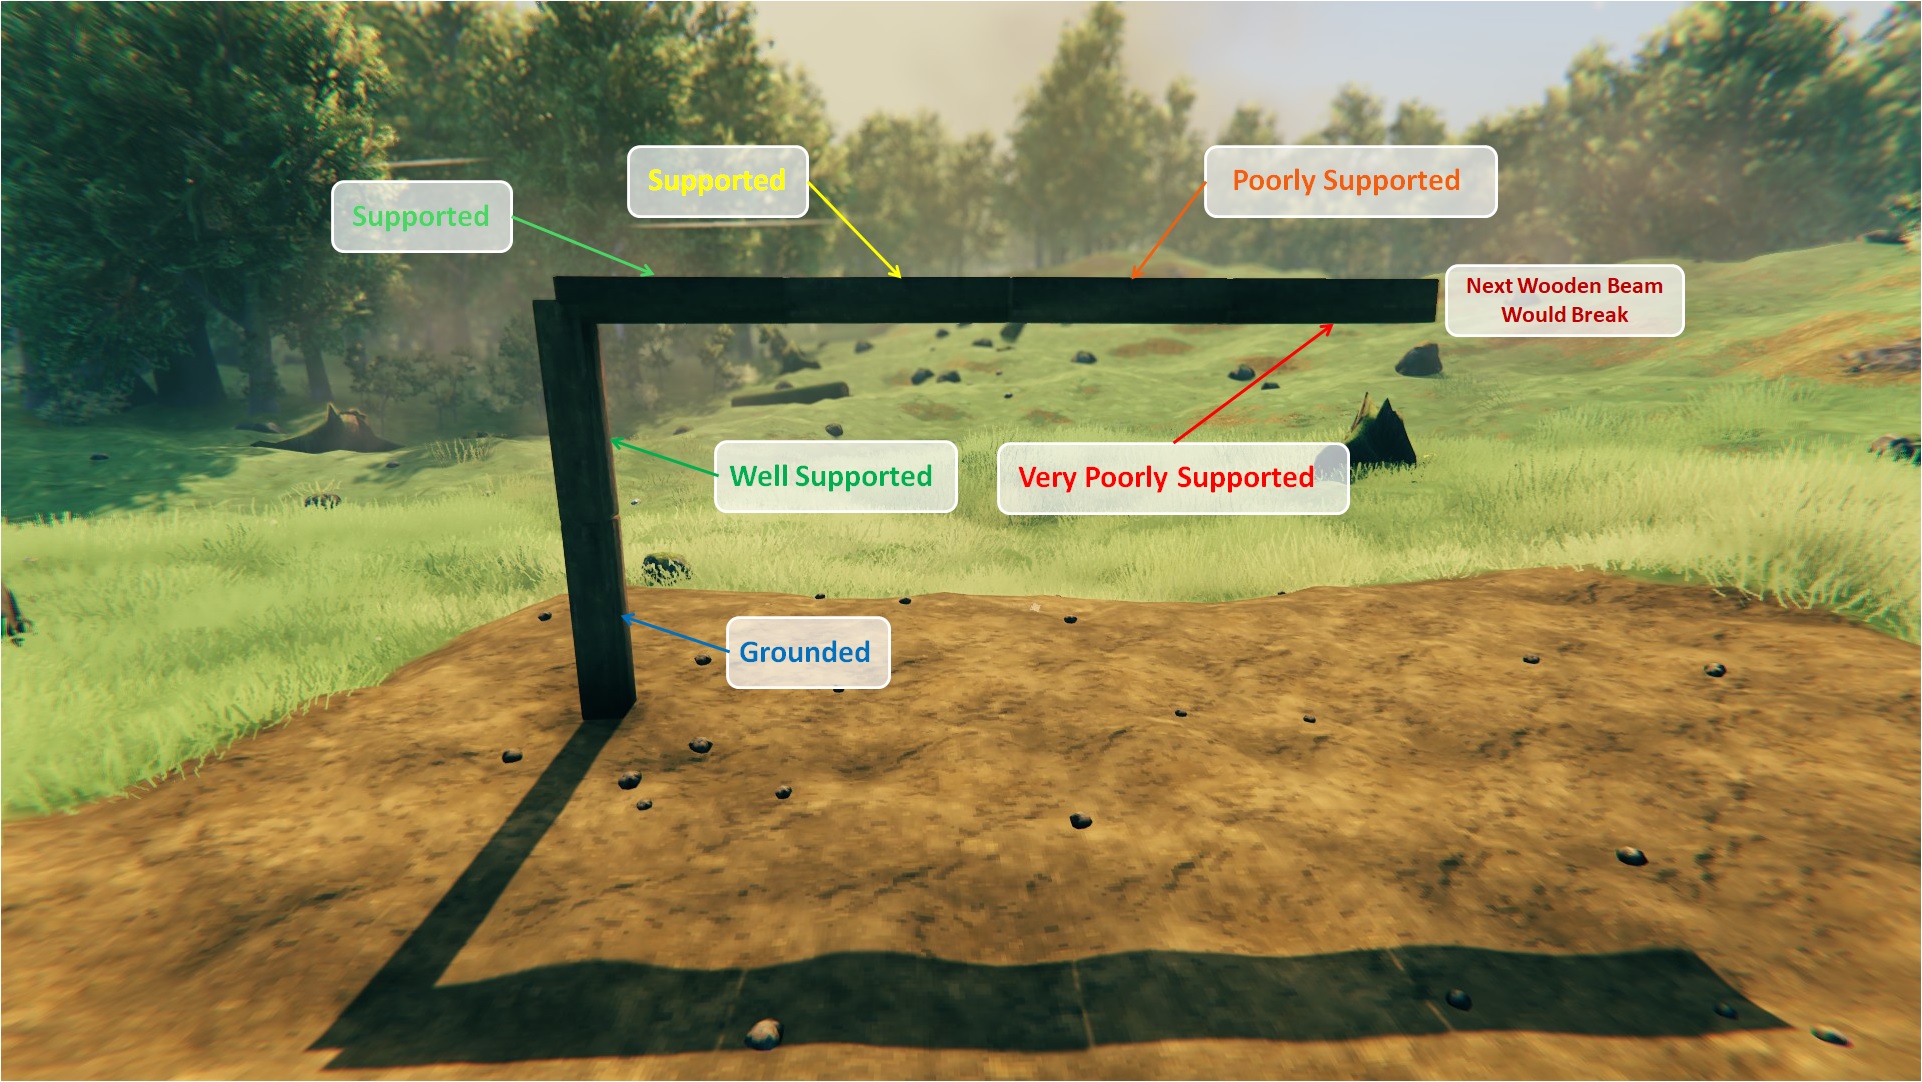 Stability changes with horizontal distance to grounded elements. |
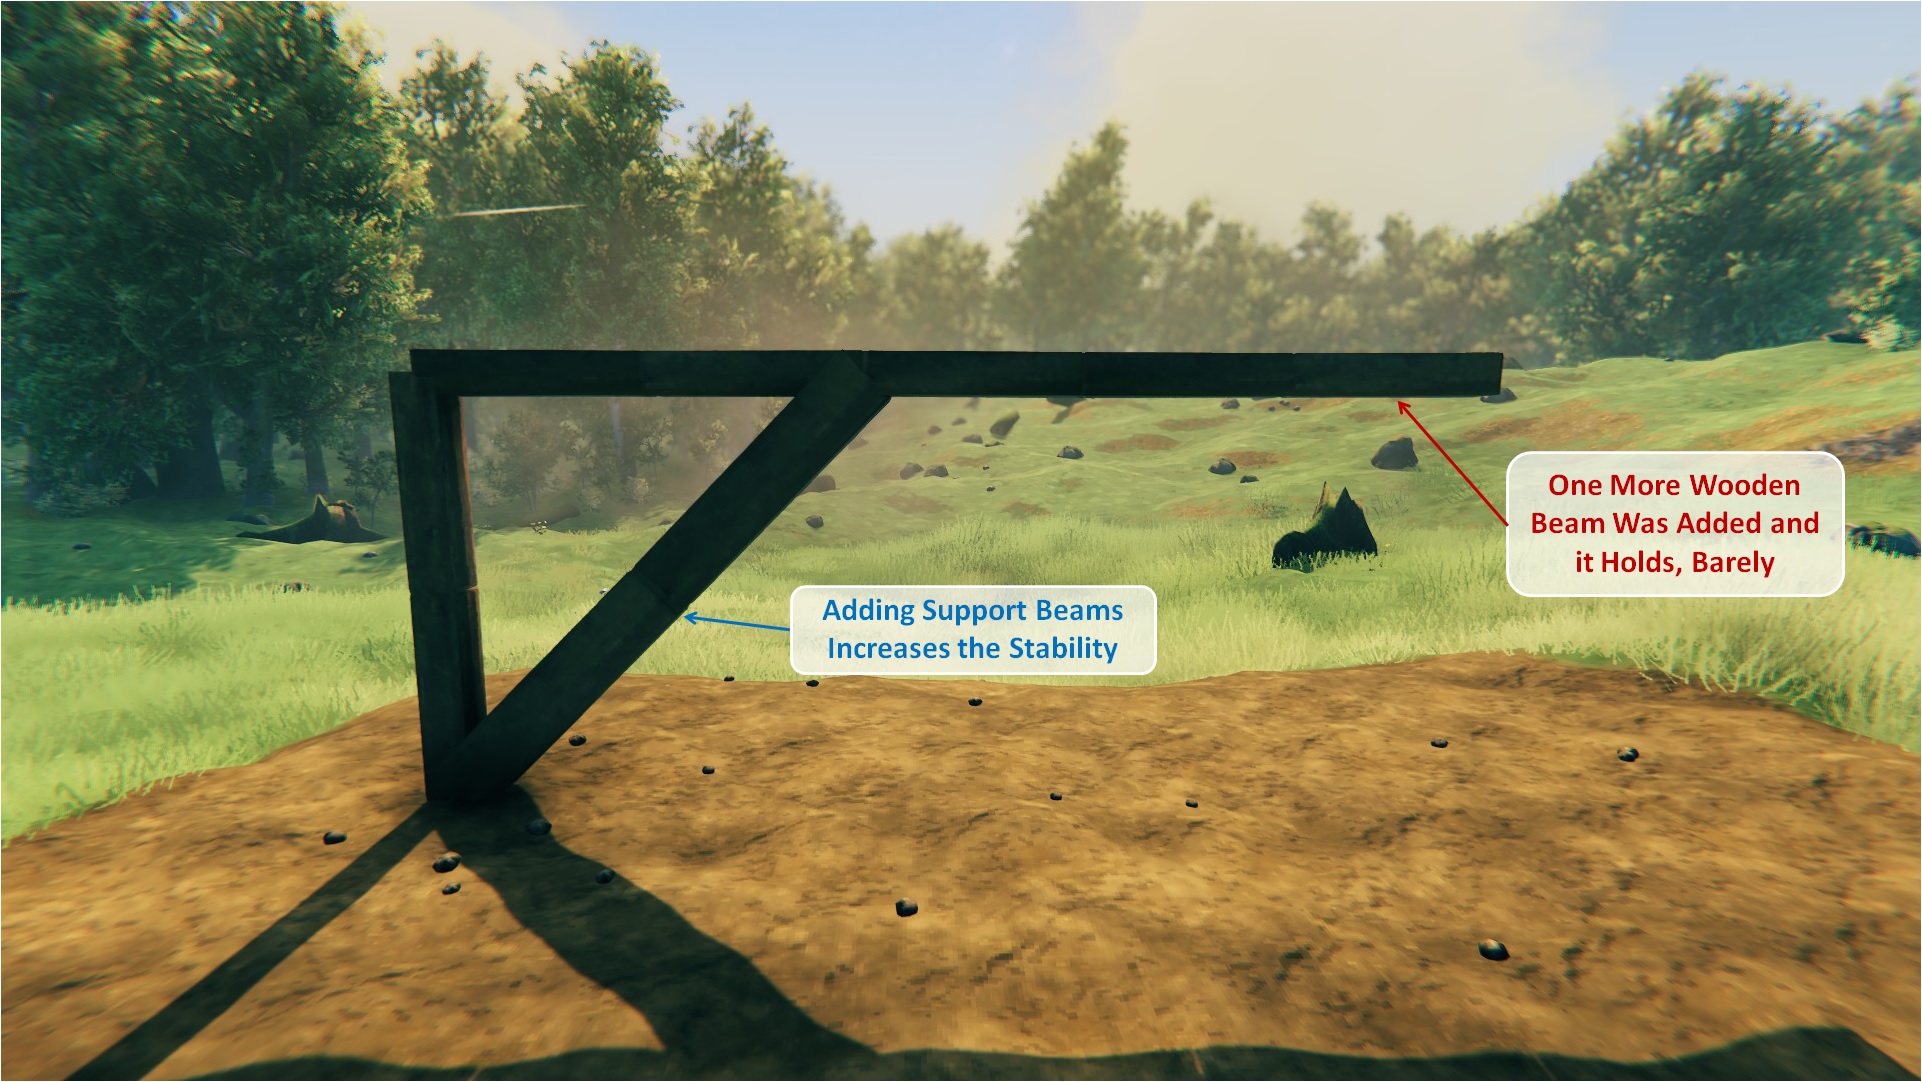 Supports add stability to beams that stick out too far horizontally. |
 With proper supports, you can build wide horizontal structures above the ground level. |
|
|
Upgrading the Workbench and the Equipment When you interact with your Workbench, you will notice a Star (in the upper-right corner of the pop-up menu) with a number that indicates its current Level. To unlock the full construction and upgrade potential of your crafting station, you will have to increase that level. You can do that by placing special Supporting Structures within 2 meters radius around the Workbench - these elements can be placed outside and will still work (as displayed on the image down below). The current maximum level of a Workbench is 5, but you can only reach Level 3 at the beginning as some of the upgrades require materials that only become available later in the game:
You should construct the Tanning Rack and the Chopping block as soon as possible - we recommend that you go out of your way to gather the required materials quickly. Doing so will allow you to make a set of Leather Armor (requires Workbench Level 2 to make) and upgrade your Equipment. |
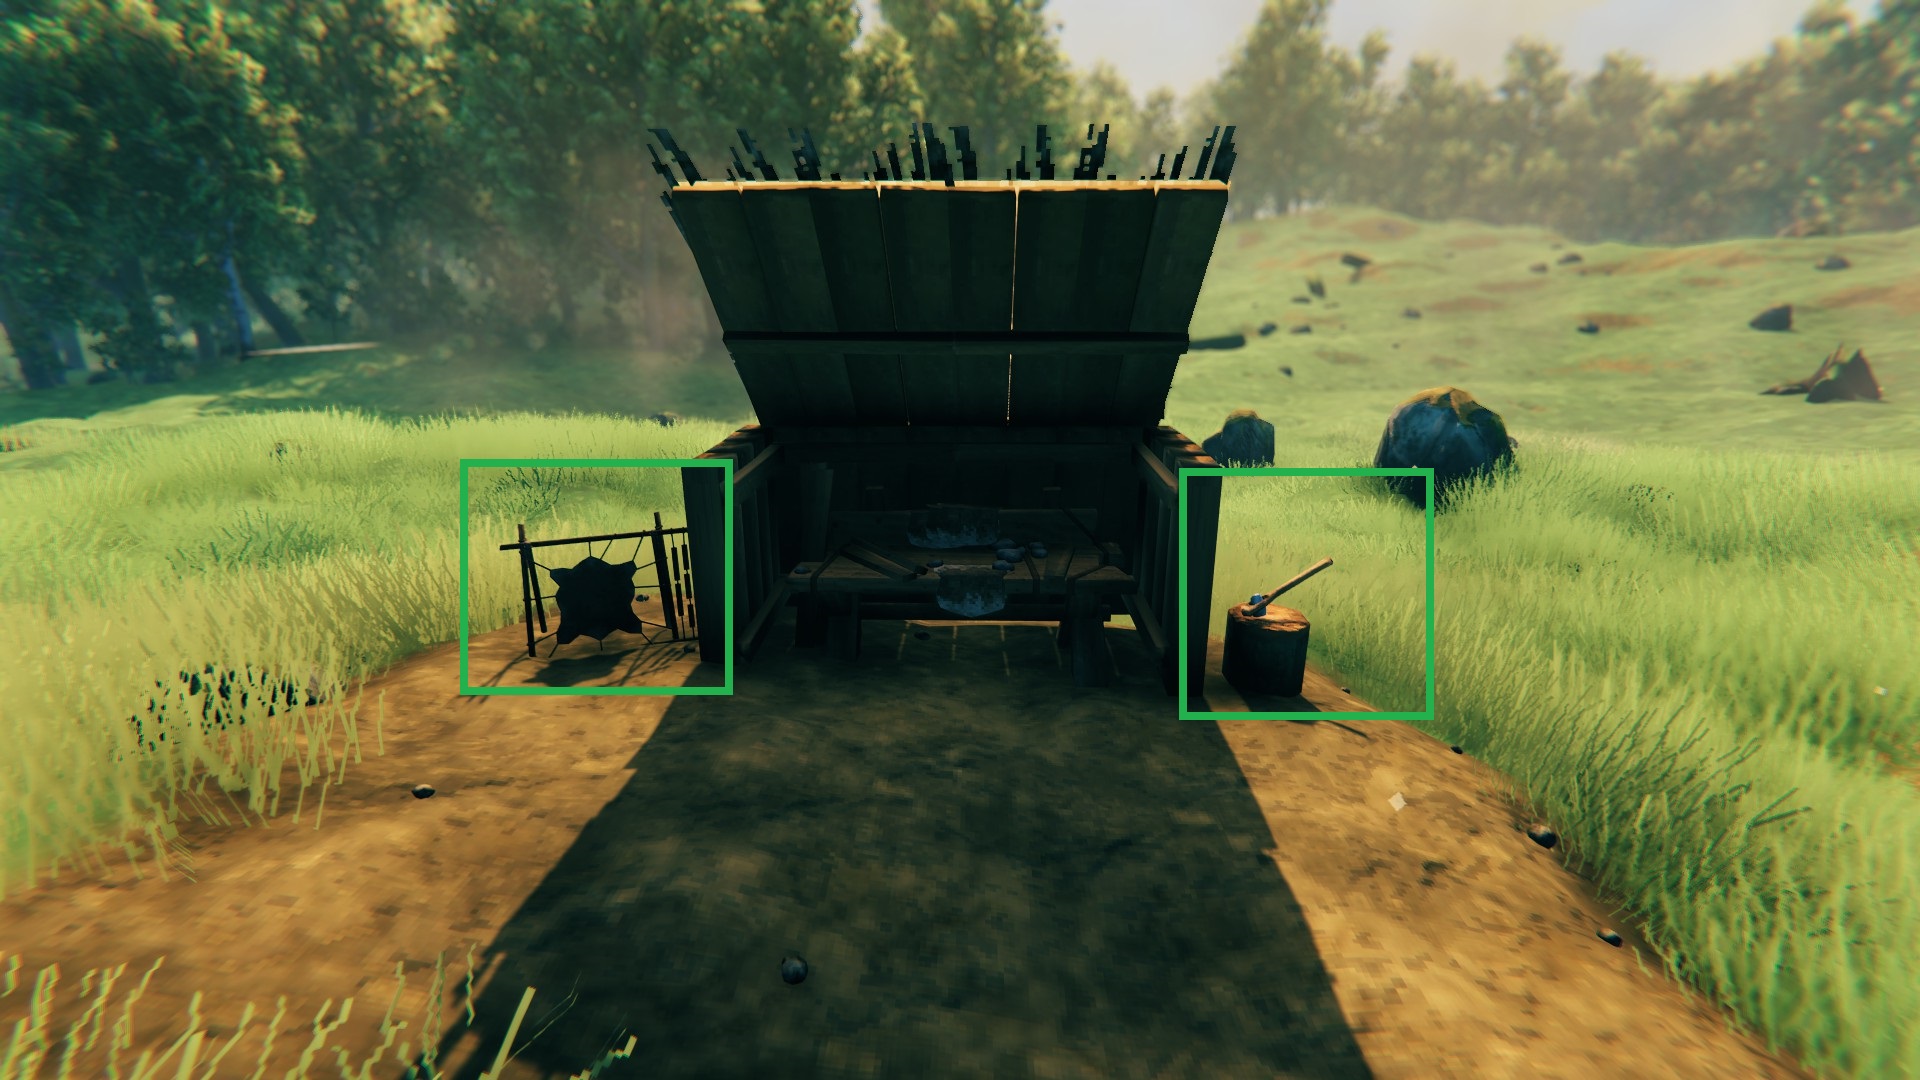 The Chopping Block and the Tanning Rack, like all other Workbench Upgrades, can be placed outside (like shown above), and will still work just fine. |
|
Equipment can be upgraded in the "Upgrade" tab of the Workbench menu. The current maximum quality of equipment is 4, however, some items have lower maximum quality (Shields have the max quality of 3), and some can't be upgraded at all (Antler Pickaxe). Each upgrade will increase pretty much all stats of an equipment piece (as shown on the screenshot below) and cost an increasing amount of resources - usually the same ones that were required to craft it in the first place. Upgrades to Armor and Shields are the most noticeable as increases in Armor and Block values greatly improve your overall survivability in combat - you will see the difference immediately. Weapons are of a bit lower upgrade priority initially, as early game enemies have very low Health values and damage increase is an overkill (you should upgrade your Weapons before entering the Black Forest, however)*. *Experienced players will often go for Weapon and Shield upgrades first as they trust their Blocking and Parrying abilities and don't have to rely on Armor to save them; If you're still learning how Combat works in Valheim, you should upgrade your Armor first in most cases, however. Important: Your Workbench will have to meet the Level requirement for the upgrade you want to make - better equipment and higher quality level upgrades will require higher Workbench levels, for example:
**Maximum Quality of some of the early game gear pieces can be reached only after it becomes completely obsolete, which is annoying... Note1: One of the most important benefits of upgrading equipment is the increase in Durability - upgraded equipment lasts longer before breaking. Note2: Forge upgrades work in exactly the same way as Workbench upgrades. |
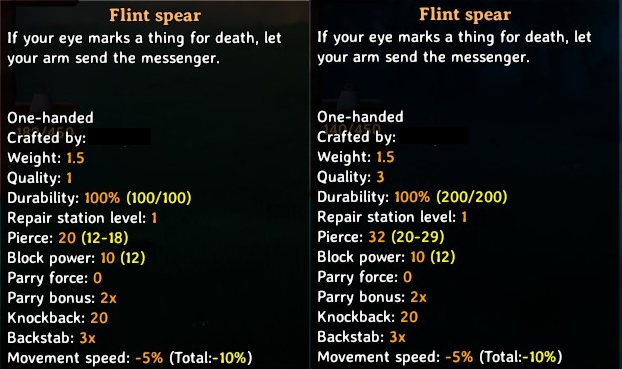 Upgrading your gear beforehand can make a big difference in a hard fight. |
|
Skills In Valheim, you become better at doing things... by simply doing these things. In other words, every Action that consumes Stamina is associated with a Skill (almost; building, repairing, and gardening aren't). Performing an Action gives Experience to the Skill linked to it (Jumping gives jumping Experience, Blocking gives Block Experience, and so on). Once enough experience is acquired, the Skill advances to the next level. Each Skill Level makes you a bit better at performing Action associated with it, for example:
Bonuses provided by individual Skill Levels are barely noticeable but they add up after a while; 5 Block will increase your Block Power by a mere 2.5%, but 50 Block will make the difference with a 25% increase. Bow Skills are the most noticeable as they not only increase the Damage of arrows but also make you draw the bow faster, substantially increasing the rate of fire (at Skill 1 you feel like a kid armed with a stick that has some string attached to it, at Skill 70 and above you feel like Legolas in comparison). Important: The Maximum Skill level is 100 and each subsequent Skill, for the same Action, requires more Experience to reach. You can easily google the exact formula, but let's just say that once you reach 76 in a given Skill, you're halfway to 100 experience-wise. Upon Death, you will lose 5% of your levels in each Skill. This penalty will not take effect more than once per 10 Minutes (the No Skill Drain effect prevents that). Note: Wood Cutting is a different Skill than Axes - while you chop wood, you will not get Experience in wielding Axes as weapons. |
|
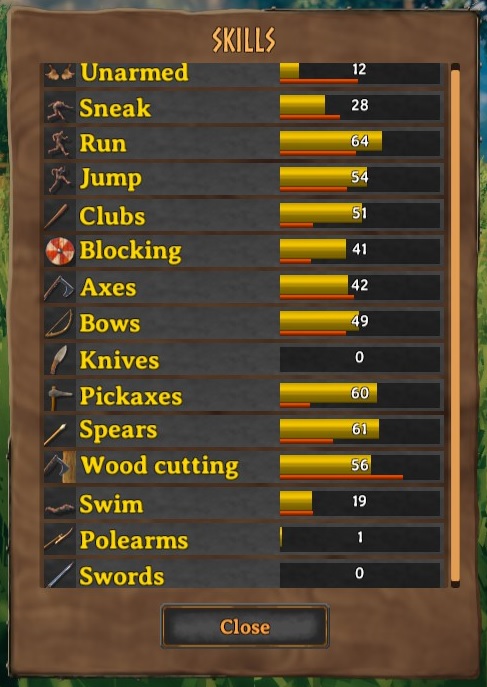 There are currently 15 Skills in Valheim. |
Leveling up your Skills can be very tedious and time-consuming, but there are ways to do that efficiently. We will go over them a bit later in the guide. |
|
Status Effects During your journeys in Valheim, you will fall under the effects of various positive and negative modifiers that will affect your character in different ways. Some of these modifiers are applied for a specific time while others are semi-permanent and last for as long as certain conditions are met. There are 14 different effects in the game but this number is very likely to increase as the game gets updated. We will not list all of them here - you can check what each of them does once they are applied to you in-game. Instead, we will mention a few, you should pay close attention to:
|
|
Comfort and the Rested Buff Rested Buff is a status effect that deserves a separate mention. It is applied to you while you're sleeping in a bed or after you remain sheltered for 20 seconds with the Resting Effect active. Rested Buff gives you the following modifiers:
These bonuses are very substantial, and you should aim to Have the Rested Buff Active on you at All Times. To do that, simply refresh the buff once it runs out - easy, isn't it? Ok, here's how to do it: Firstly, the length of the Rested Buff is based on the Comfort Level of the shelter, it gets applied in; Resting with Comfort 1 gives you 8 minutes of the Rested Buff and each level of Comfort increases the buff's length by 1 minute. Currently, the maximum Comfort Level is 17 (under normal circumstances), which gives 24 minutes long Rested Buff (more on Comfort in the "Building your First Serious Base" section of the Guide). You can refresh the buff in two main ways:
|
|
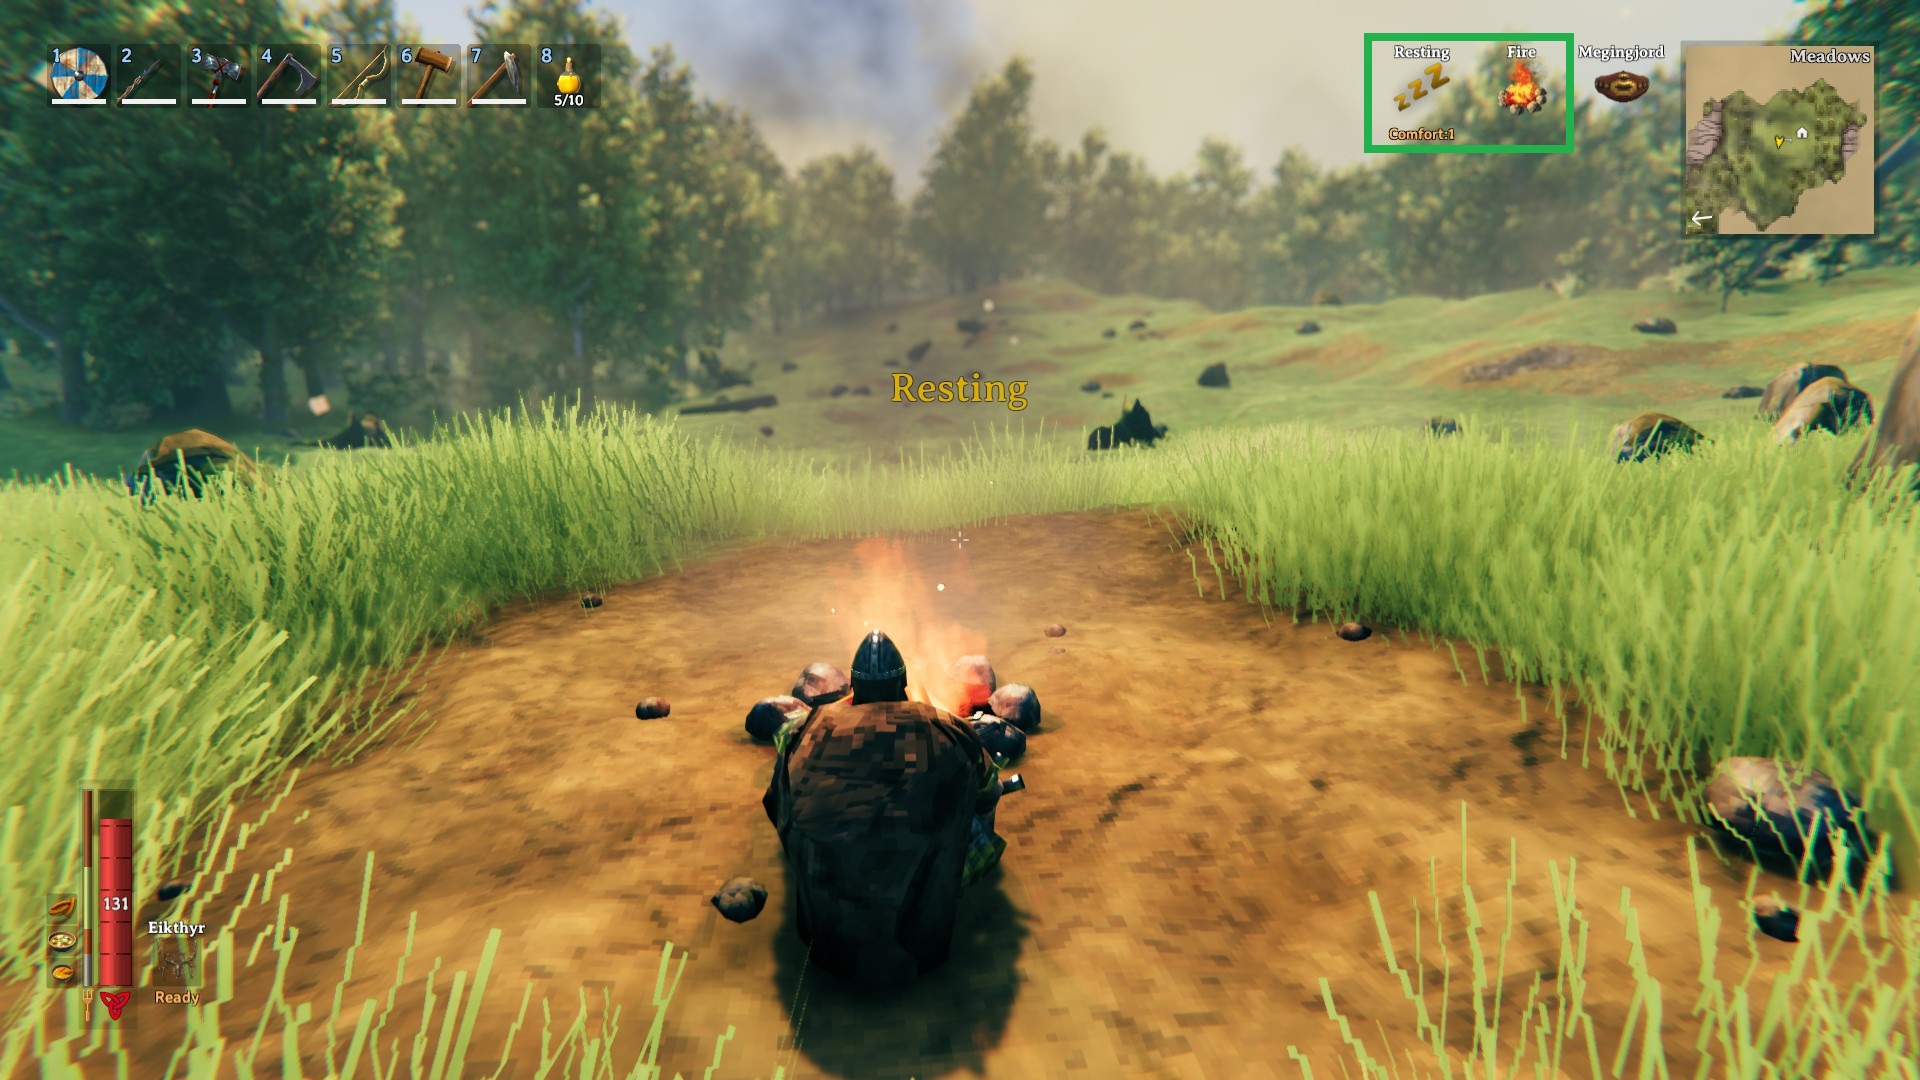 Sitting near a Campfire for 20 seconds will apply a Rested Buff to you. |
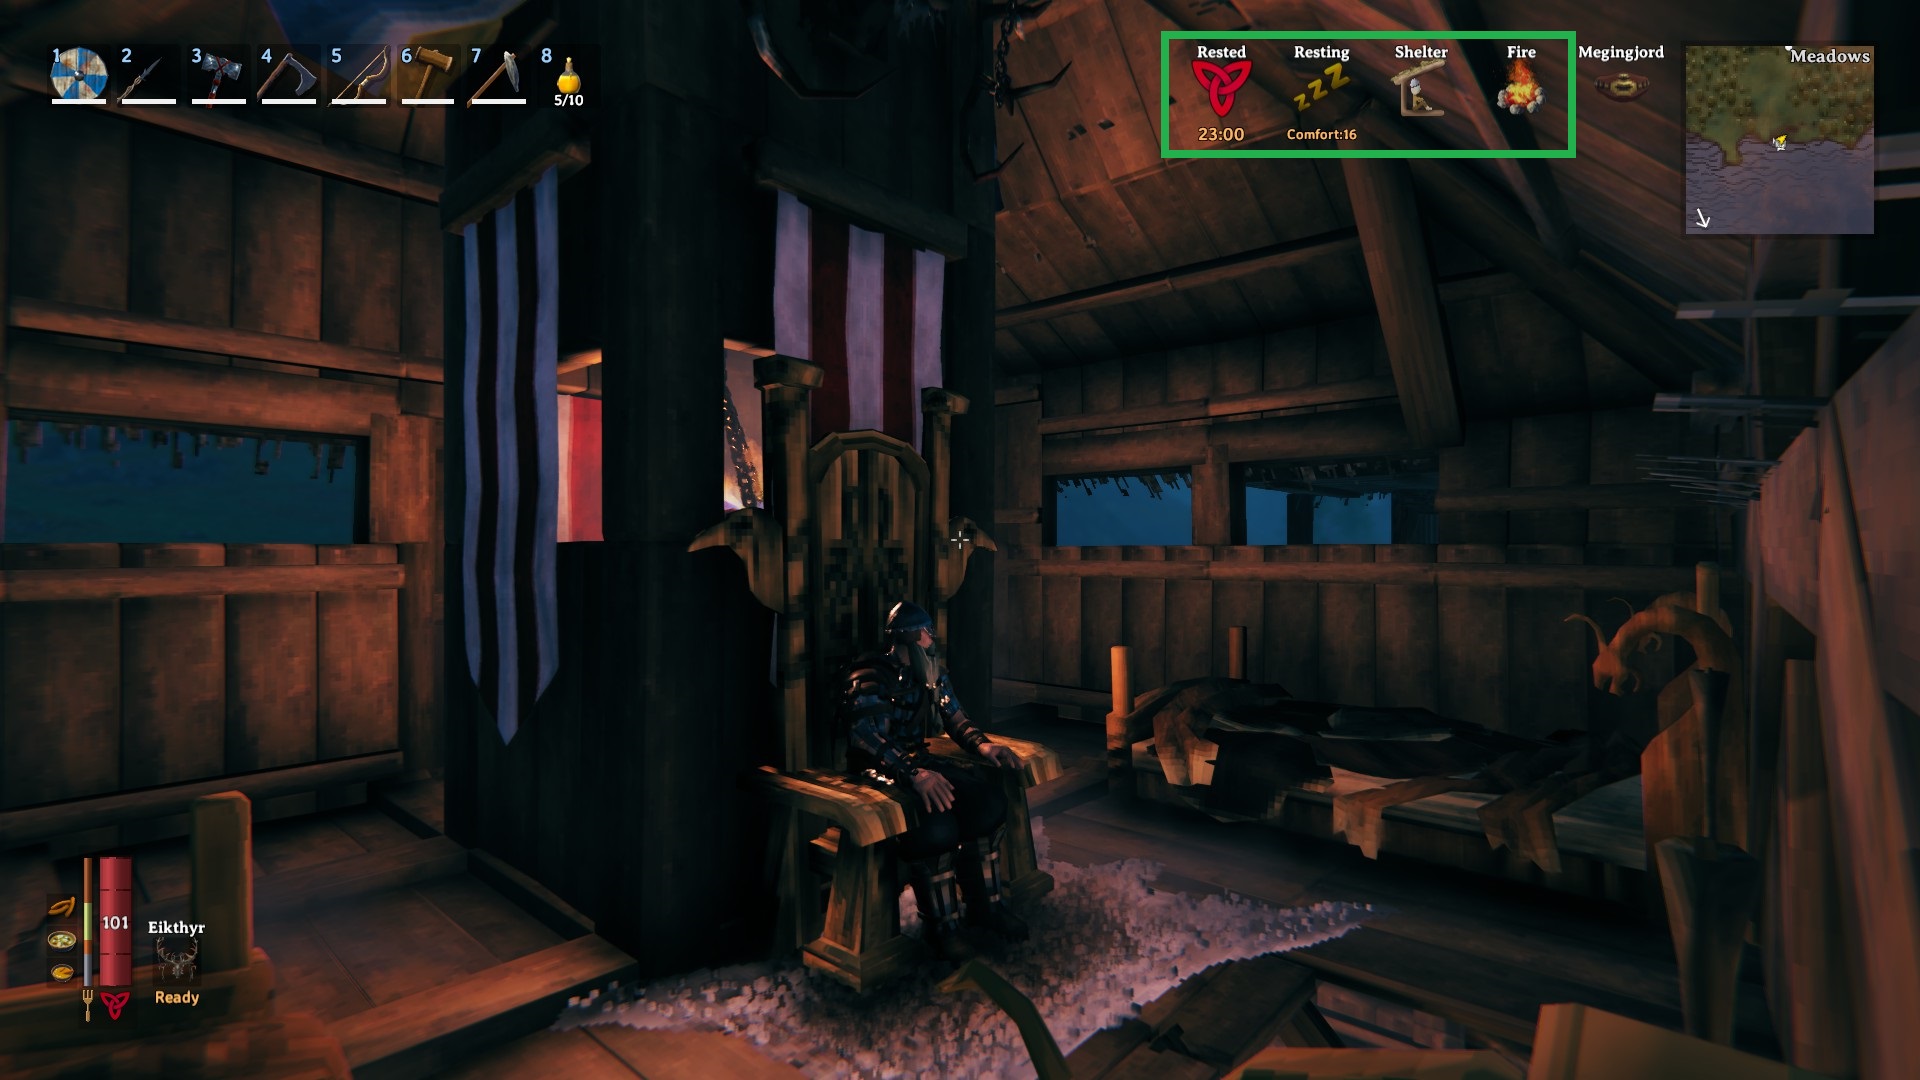 High Comfort Levels result in a substantially longer Rested Buff. |
|
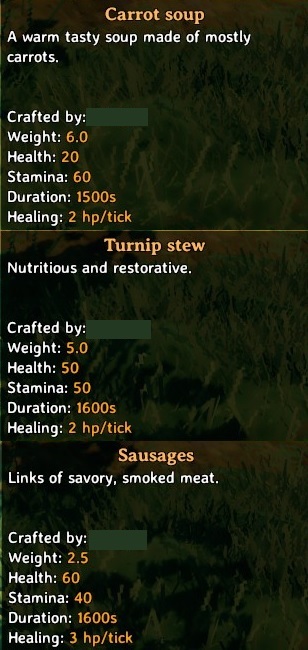
Food, Health, and Stamina Base Health and Stamina values are very low - you will quickly realize that once you get hit, try to sprint somewhere, or jump a few times. Luckily, you can increase these values by simply consuming Food that increases Health, Stamina, and provides Health Regen. There are three "food slots" you can fill by eating three different types of food (you can't ingest the same food twice, so you need three different foods for an optimal stat increase). Keep in mind that Stamina regeneration rate is not affected by Food; it's only affected by Status Effects you have active (both positively and negatively). Health regeneration, however, is affected by both Food and active Status Effects. Important: Different types of Food last for different durations and provide different Health, Stamina, and Health Regen increases - once they run out, you will have to eat more to refresh their effects. Moreover, the effects of Food decay over time - they are the strongest when you eat them and the weakest when they are about to run out. Also, you can't replace the currently active food buffs unless they are about to run out - watch out what you're eating or you might be Health/Stamina-starved for some time. Some types of Food are ready-to-eat once you collect them. These include Honey, Mushrooms, Carrots, and Berries. Most types of food have to be cooked before they are edible, however. Basic food (meat of various types) can be roasted on Cooking Stations (2 Wood) placed over Campfires - you can fit 6 Cooking Stations over one Campfire, as shown on the image below. Different meats have different roasting times - once they are ready, you will get a distinct sound cue and their color will change. Don't overcook your meat or it will turn into Coal - there are better sources of it. In the early game (in the Meadows Biome), you will only have access to basic food - Raspberries, Grilled Neck Tails, Cooked Meat, Honey, and Mushrooms. Out of these 5, Grilled Neck Tails, Honey, and Cooked Meat are the best; here's how you get them:
*Bees will attack and Poison you when you try to destroy their home. Their poison can be deadly if your Health is not high enough, so we recommend another approach: Construct a Workbench next to the Abandoned House, that has a Beehive inside of it, and break it with your Hammer - once you break the piece which has the hive attached to it, the hive will break as well. After that, simply collect the Queen Bee. Note: A bit later in the game (once you enter the Black Forest and then the Swamp), more advanced food types become available to you and you gain the ability to farm vegetables (Carrots and Turnips, by using the Cultivator Tool crafted from Bronze) which makes getting food a bit less grindy. Moreover, you can tame Boars to gain access to a constant source of Raw Meat - this is done by constructing a pen, luring a pair of Wild Boars inside, and feeding them Carrots, Turnips, or Raspberries (just be aware that regular Boars only have 50% chance to drop Meat - you should try to tame 1-Star ones at least). The taming and breeding processes are better shown on a video - head to everybody's favorite video-hosting website for a tutorial; type "Valheim Boar taming" in the search bar. |
|
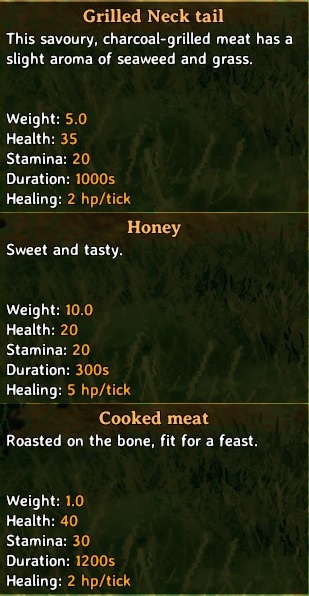 This set of Early-Game Food will give you 95 Health and 70 Stamina. Moreover, it will regenerate your Health by 9 per tick. |
|
 You can stack up to SIX Cooking Stations over a single Campfire. Doing this will allow you to roast much more meat at once and save you quite a lot of time! |
|
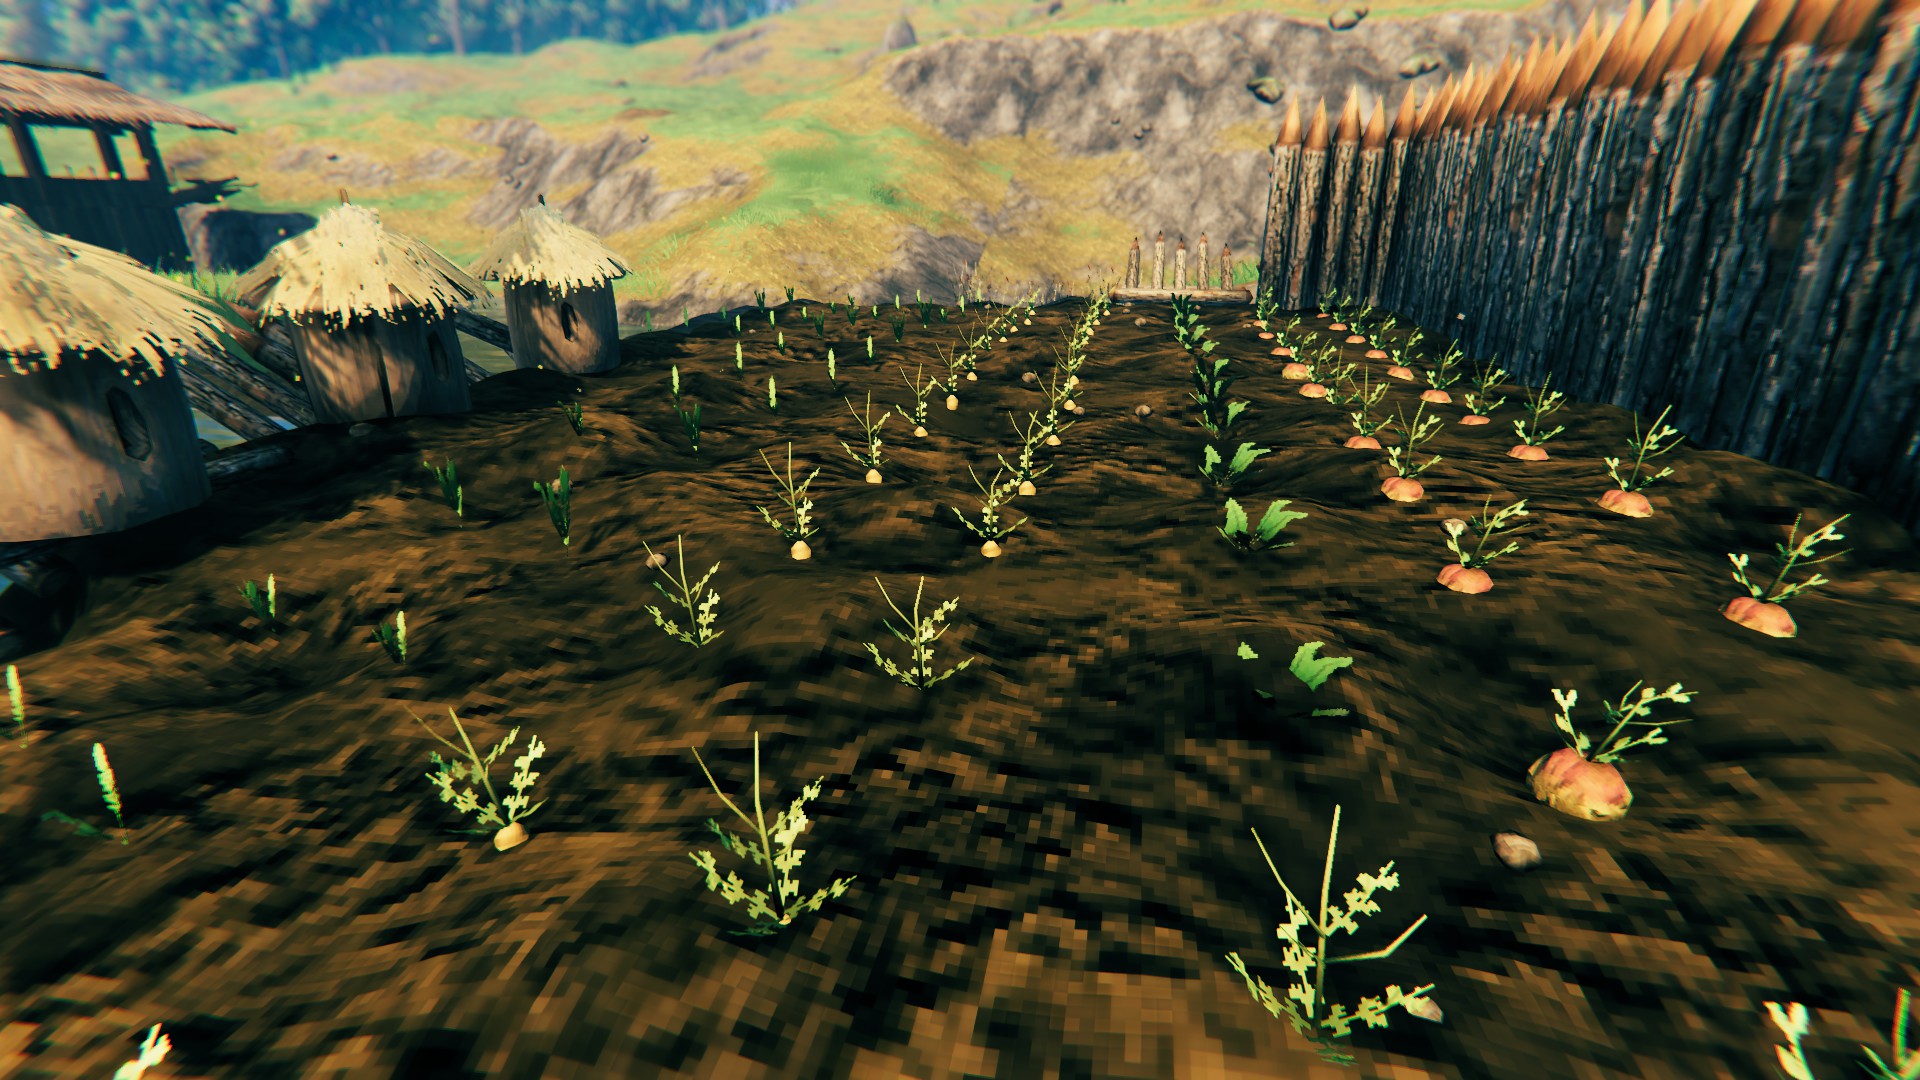 You can Farm Carrots and Turnips once you acquire their Seeds. |
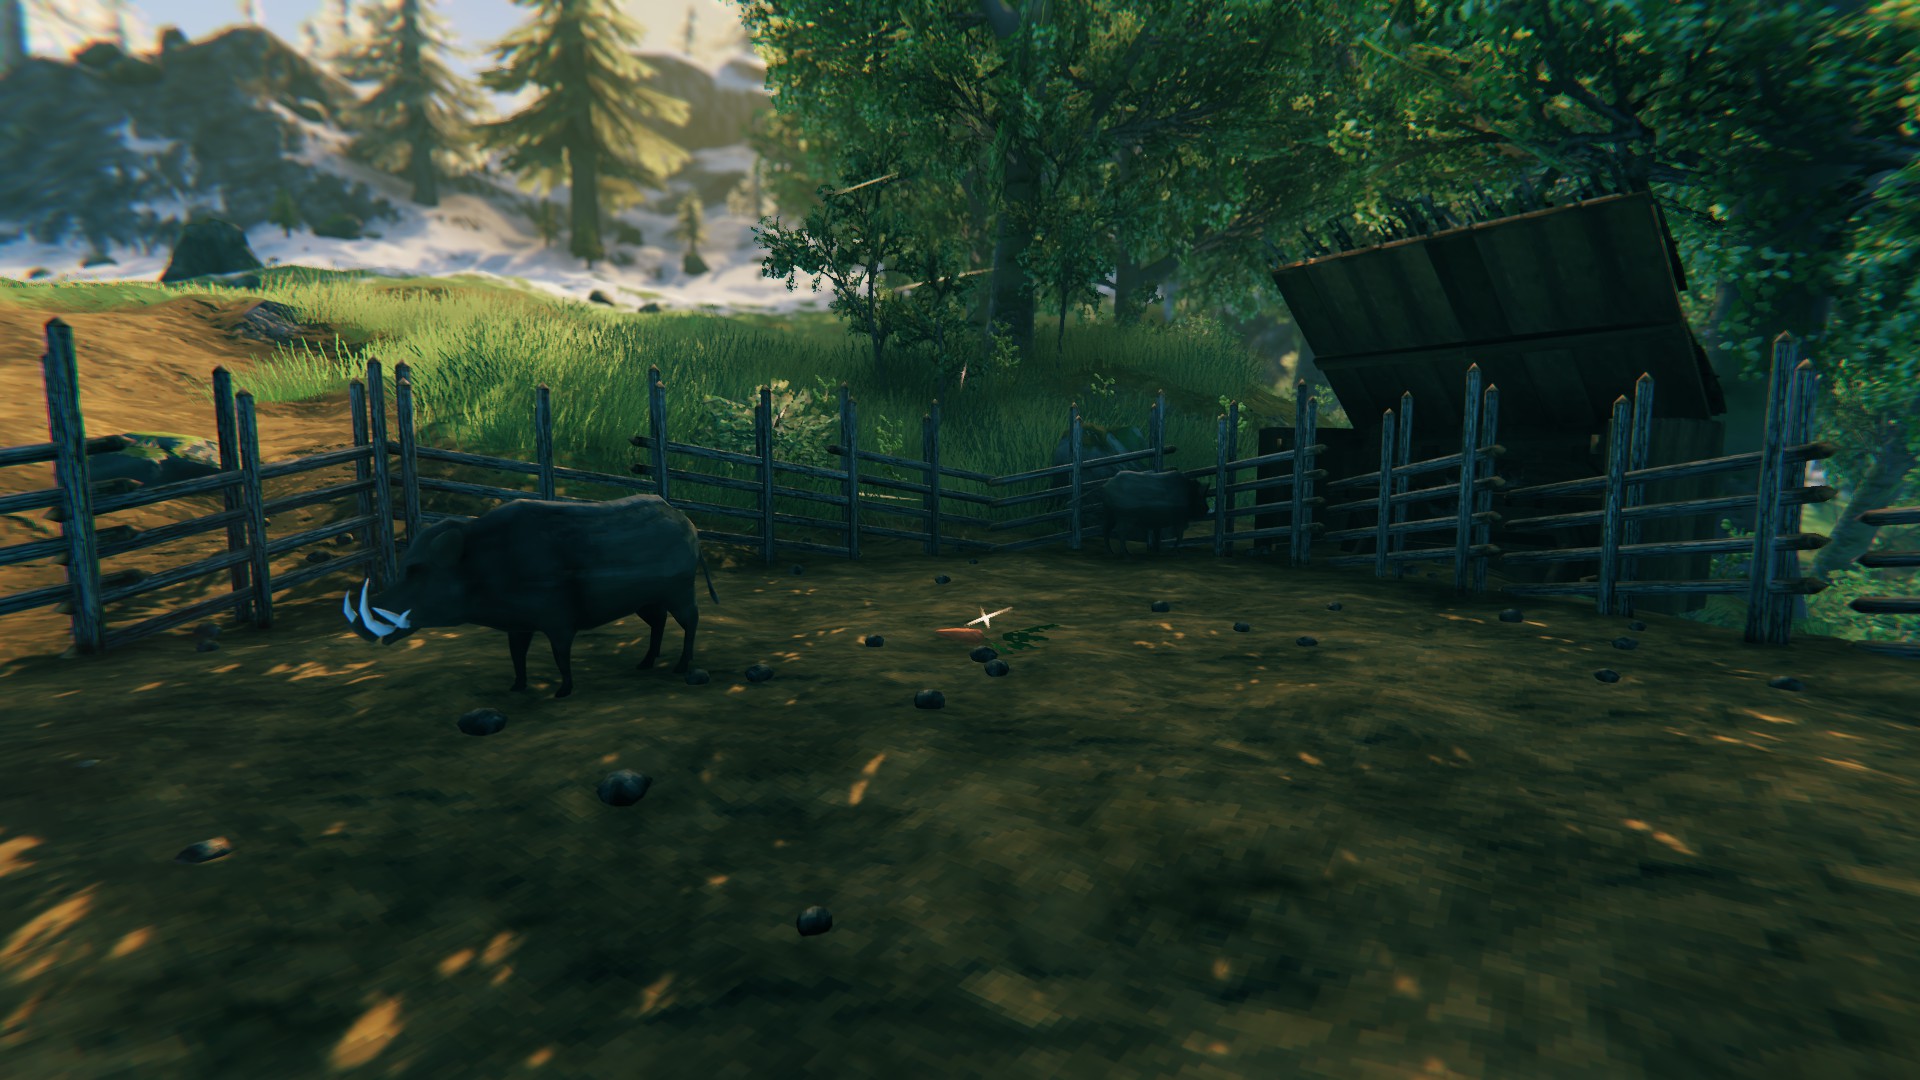 Animal Husbandry is also possible in Valheim. |
| Note: Carrot Seeds can be found in the Black Forest (look for white-flowered plants) and Turnip Seeds can be found in the Swamps (look for yellow-flowered plants). | |
|
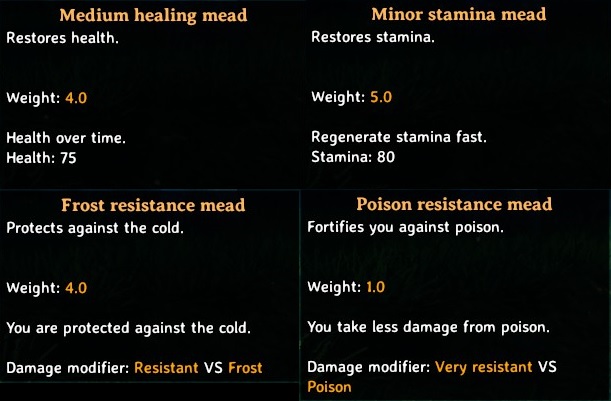
Meads After you've played the game for an hour or two, you might start thinking "my stamina depletes extremely quickly and regenerates very slowly, and my health seems to evaporate the instant I get myself into combat. I wonder if there are ways of getting myself back into shape quickly". Luckily for you, there are - they are just not available at the start. Once you defeat the first boss, craft an Antler Pickaxe, collect some Copper and Tin ores, and construct a Forge, you will be able to craft a Cauldron (10 Tin) and a Fermenter (5 Bronze, 30 Fine Wood, 10 Resin). With them, you will be able to boil mead bases and ferment them into Meads - Valheim's equivalent of Potions. Note: Cauldron also serves as an advanced Cooking Station in which you can prepare mid-game foods - those mentioned in the previous section, for example). Every Mead Base consists of 10 Honey - another reason to search for wild Beehives - and a bunch of other ingredients specific to it. Once it's boiled, it has to be put into a Fermenter for 2 in-game days before it's turned into a Mead. At first, you will have access to four recipes - Minor Healing Mead, Minor Stamina Mead, Poison Resistance Mead, and Tasty Mead; more potent brewages will become available once you reach Swamp and Plains Biomes. Healing and Stamina Meads do not work instantly, instead, they rapidly restore Health/Stamina over a period of time. Once used, they go on a 2-minute Cooldown - you can't spam them, so choose when to use them wisely! Moreover, using a Mead will slow you down for a while (for the drinking animation's duration), just like eating food does - make sure that you are out of range of enemy attacks before drinking! The other type of Meads available to you is Resistance Meads. As their name suggests, they provide resistance to various Elements/Effects:
|
|
 Carrying Meads is a good idea but they clutter your limited Inventory. |
Because of the limited inventory space, you should only take essential equipment with you. This includes Meads - if you are not planning on venturing into Swamp, you can live Poison Resistance Meads in your base, and so on. Also, Meads weigh 1.0 each; this might not sound like a lot, but carrying 3 full stacks will take 10% of your total carrying capacity! |
|
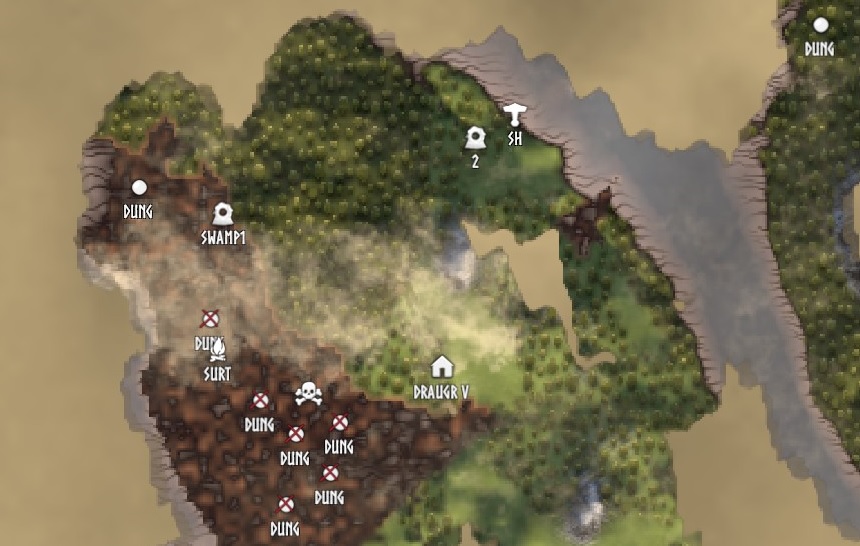
Map, Minimap, Portals, and the Trader Note: We wanted to address these four topics but decided that they not warrant their own sections, so we've bundled them into one - they're all connected, after all. World Map is one of the most important tools at your disposal - use it! You can open your Map by pressing "M" and soon it in/out with your mouse wheel. Hovering your mouse cursor on explored terrain will display its Biome in the upper right corner. In the lower right corner, there are 5 waypoint pictograms - you can select any of them with your mouse and place them on your map by double-clicking LMB. You can name these custom waypoints in any way you want (there's 20 characters limit on them). Left-clicking on an already-placed pictogram will cross it out and right-clicking will remove it. Waypoints are also visible on your Minimap. Important: When you die, a "death" marker will automatically appear on your Map, marking the exact place of your tombstone. Only ONE death marker will be present at any time! Because of this, it is a good idea to place a custom marker on top of the death marker - that way you will still be able to locate your tombstone, even if you die again on your way to retrieve it. The most important rule regarding your Map is - MARK EVERYTHING! You've stumbled upon a new Dungeon but you can't be bothered to explore it immediately? - Mark it. You've found a bunch of Mushrooms? - Mark the spot (they will respawn in the same place after some time). You've come across a new Copper Deposit? You guessed it - Mark it! You get the idea - mark every point of interest you come across, you never know when you're going to need the stuff you've marked. You should also cross-out the Dungeons/Dwellings you've already cleared, that way you will not waste time by re-checking them unnecessarily (to do that, click LMB on the marker). When it comes to the Minimap, there's not much to say except a few important things:
Portals The world is massive in Valheim and traversing through it may take a lot of time, especially later in the game when you have to travel to distant Biomes. Luckily for each of us, there is a way to travel considerable distances almost instantly by using Portals. Portals are structures you can construct once you discover Fine Wood, Surtling Cores, and Greydwarf Eyes (so they become available after you defeat the 1st Boss and venture into the Black Forest) - you will find them in the Misc tab of the build menu. To make use of Portals, you have to connect them (so, you need at least two) - you can do that by pressing "E" while looking at them and then naming them. Two Portals with the same name will connect and allow you to teleport between them - please note that Portal Names are upper/lower case sensitive. Important: Some Materials prevent you from teleporting. These include Metal Bars, Ores, Scrap Metal (Iron and Black Metal), and Dragon Eggs. Importantly, these restrictions do not apply to gear and processed materials, like Armor, Weapons, and Nails. Note: Naming a third Portal the same as two already existing ones will not connect it to them. Making Portals is quite resource-intensive, but we have a way around that. You only need two Portals in your Base:
With this setup, you save a lot of resources - just remember to mark permanent Portals on your Map and describe the markers with their Tags. Whenever you want to port to a different location, just change the Portal's Name in your Base. When you want to make a new Permanent Portal, all you have to do is:
The Trader A good example of the place, you want to create a permanent connection to, is the Trader's Camp. Haldor, because that's the Trader's name, can be randomly found in the Black Forest Biome*. He sells various items for Coins, some of them much more useful than others. You can get Coins from Trolls, find them in Dungeons, or exchange valuables for them with Haldor (He buys Amber, Amber Pearls, Rubies, and Silver Necklaces)**. *There are 10 pre-determined, seed-specific, spawn locations for him. He will spawn in the first spawn location discovered by the player. **There are no other uses for these items, so you can safely sell them. Important: When you come inside a 290 meters radius around Haldor's Camp, its location will get marked on your Map. Note: Haldor's Camp is surrounded by a barrier that prevents monsters from entering - you are safe while you remain inside. |
|
 Mark every point of interest on your Map! |
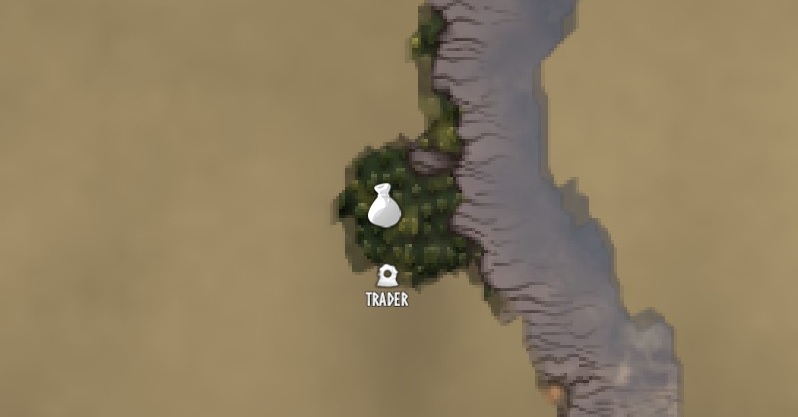 Trader's Camp will be marked on your Map automatically, once you discover it. |
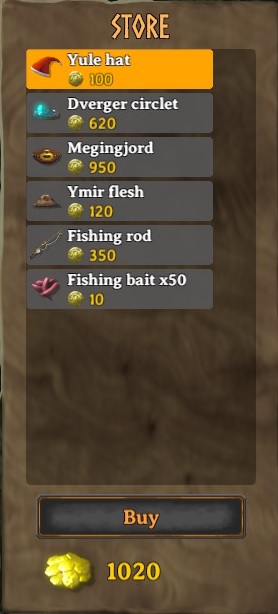 Haldor's Inventory is likely to be expanded in future updates. |
In particular, you should purchase the Megingjord - a Belt that increases your maximum carry weight limit by 150. It costs 950 Coins. Other useful items He sells, include a Fishing Rod and the Dverger Circlet that functions like a Headlamp (it uses the Helmet slot, however). |
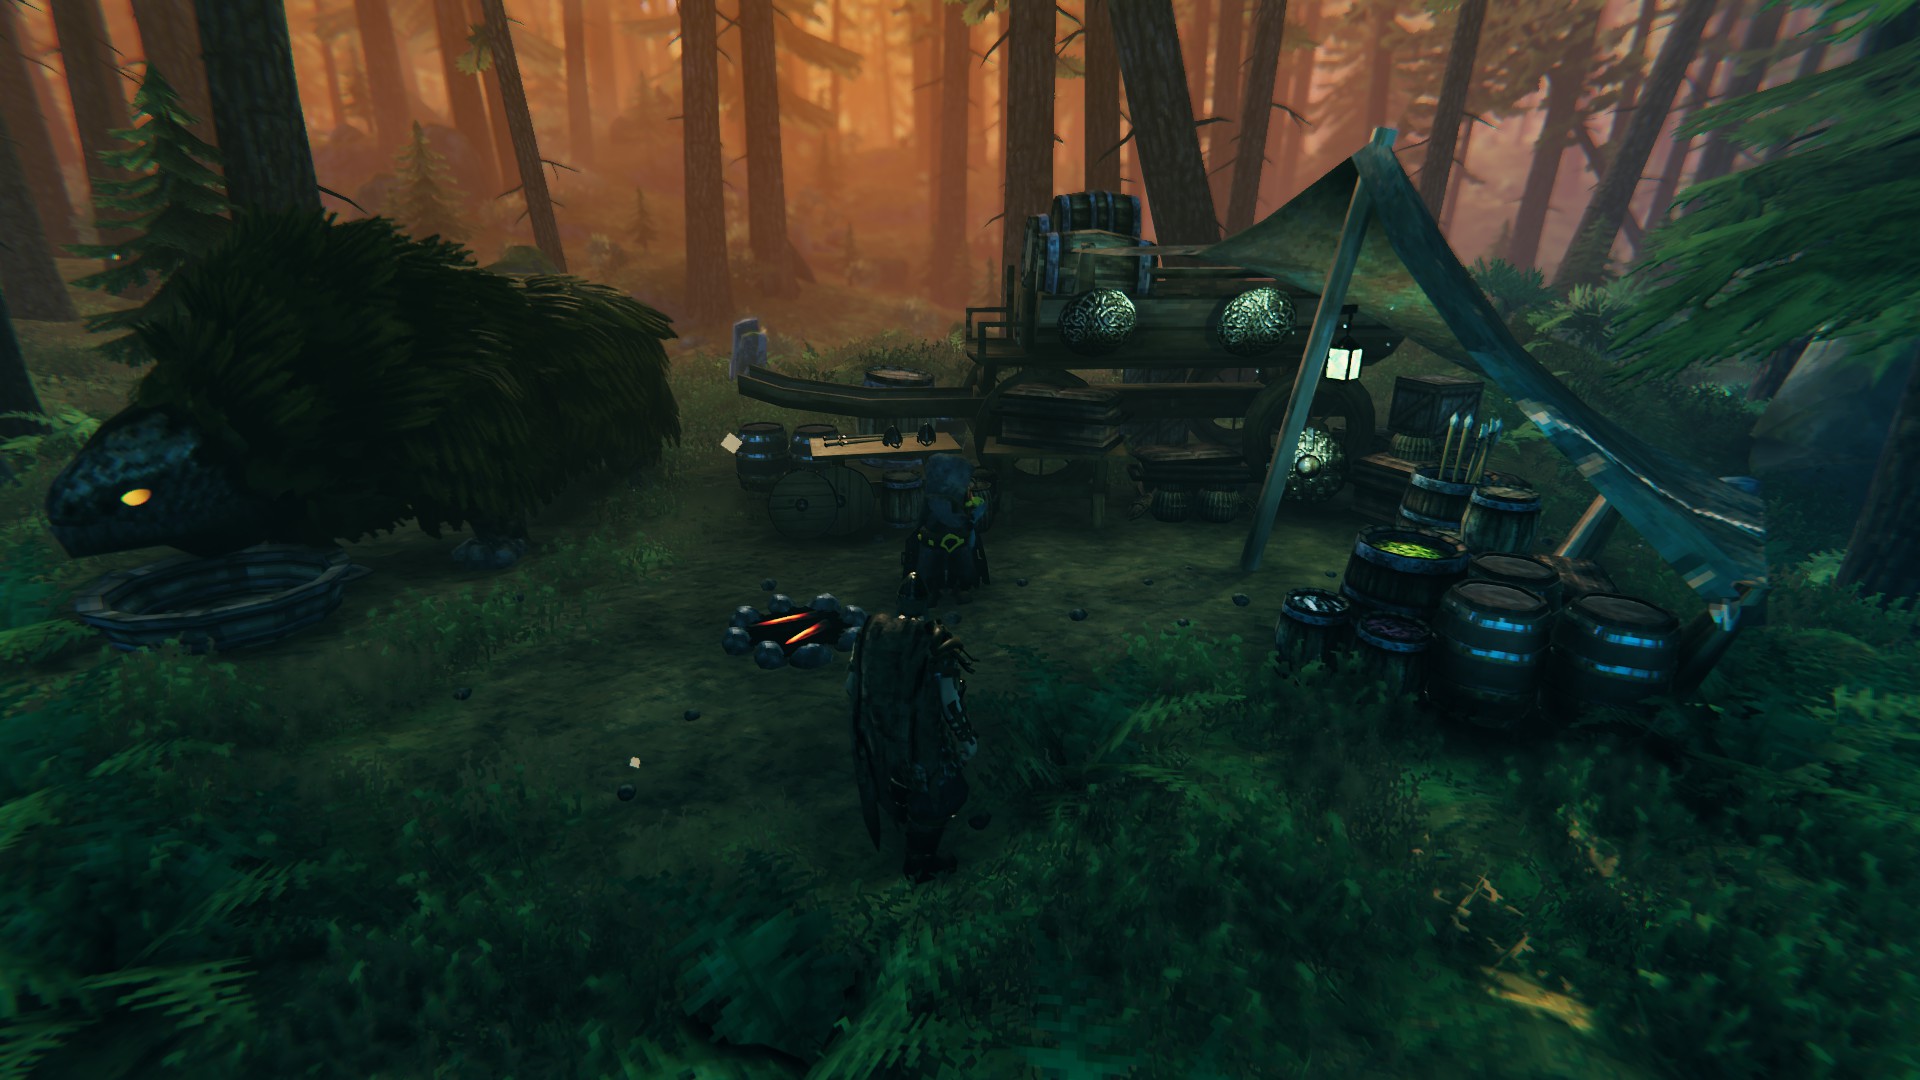 We wonder if He gets many clients in this wilderness... |
|
Building Your First Serious Base
In this section, we will show you how to build a rather simple, yet spacious and practical Base that will house not only a bed and a campfire but also dedicated crafting, storage, portal, and leisure areas.
|
Let's face it, a Workbench Shack and a tiny Shelter will only get you through the first couple of days. Once you build them and craft some basic equipment, you should start thinking about expanding your base. Before you begin your construction, you should choose a proper location. Preferably, it should meet these requirements:
|
|
 This hill looks nice, you won't recognize it once we're done. |
|
|
Note: It's a good idea to build your Workbench Shack and the Rudimentary Shelter near the area you want to build your base in. It's much more convenient that way. Building large structures requires A LOT of Wood so you should start your construction operations by chopping down trees until you get (at least) 10 full stacks of it. If you think that's too much, well... it might be, BUT Wood finds surprisingly many uses in Valheim so there's never enough of it, really. If you didn't craft a Flint Axe yet, now is the time - it's more durable than the Stone Axe and it chops Wood quicker. After you're done with collecting materials, it's time to prepare the area by leveling the ground. To do that, equip a Hoe and select the "Level Ground" option. Important: Hoe will try to level the ground to the height of the terrain you're currently standing on! Before you start, choose your desired height by positioning your character properly. Then, start leveling the ground around You but don't move. Once you've leveled everything in your reach, you can start moving around and expanding the leveled area. If you make a mistake, don't worry. Hoe can rise the ground as well, but it consumes 4 Stone each use. |
|
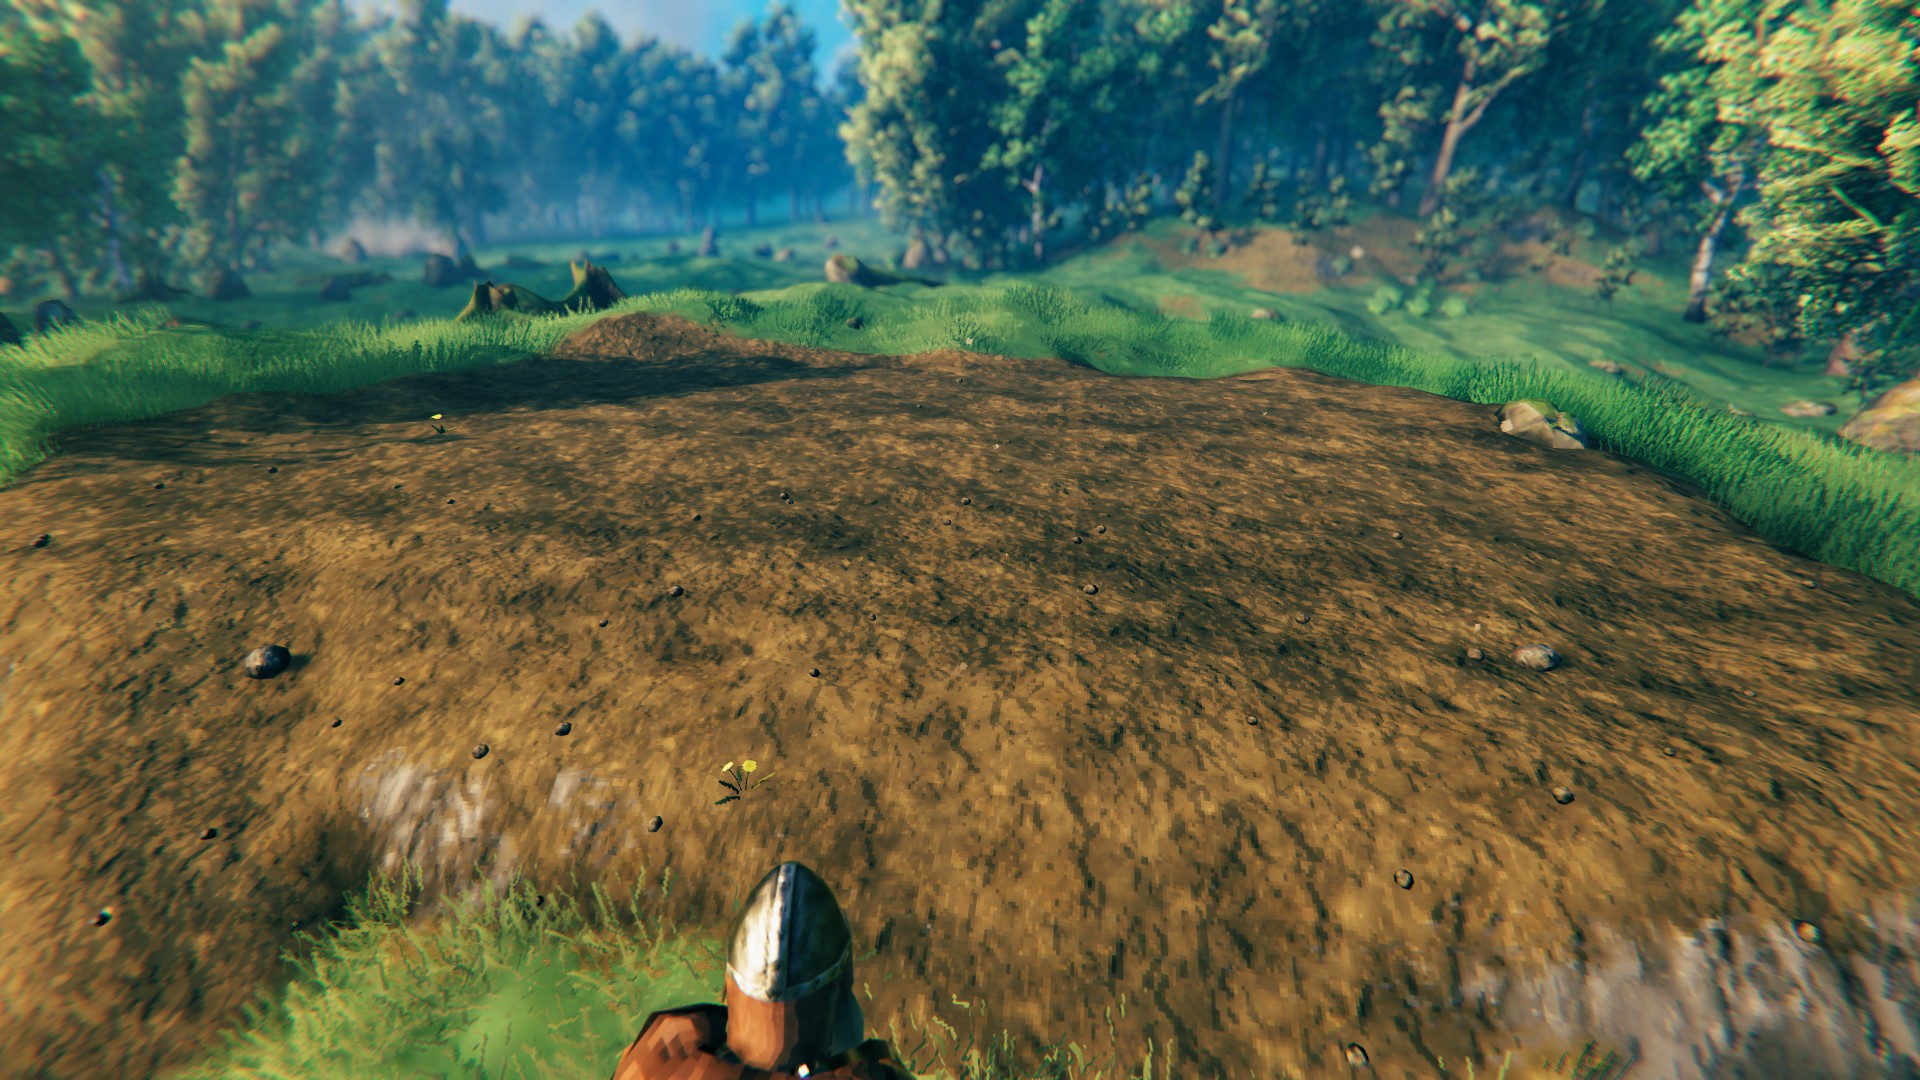 You will have to level quite a large area. Our build's dimensions are 14x22 meters (7x11 2x2 Walls). |
|
|
Once the ground is leveled, you should plan out your build. Start by creating a loose blueprint in your mind (you can also use a pen and paper!), so that you have a general idea of what you're constructing right from the start. In our case, we want our main base to have:
Note1: We've chosen to go for a simple build deliberately so you can copy it easily. Of course, we encourage you to create your own! Note2: If you run out of range of a Workbench, just construct an additional one! It does not have to be "in-doors" to let you build. |
|
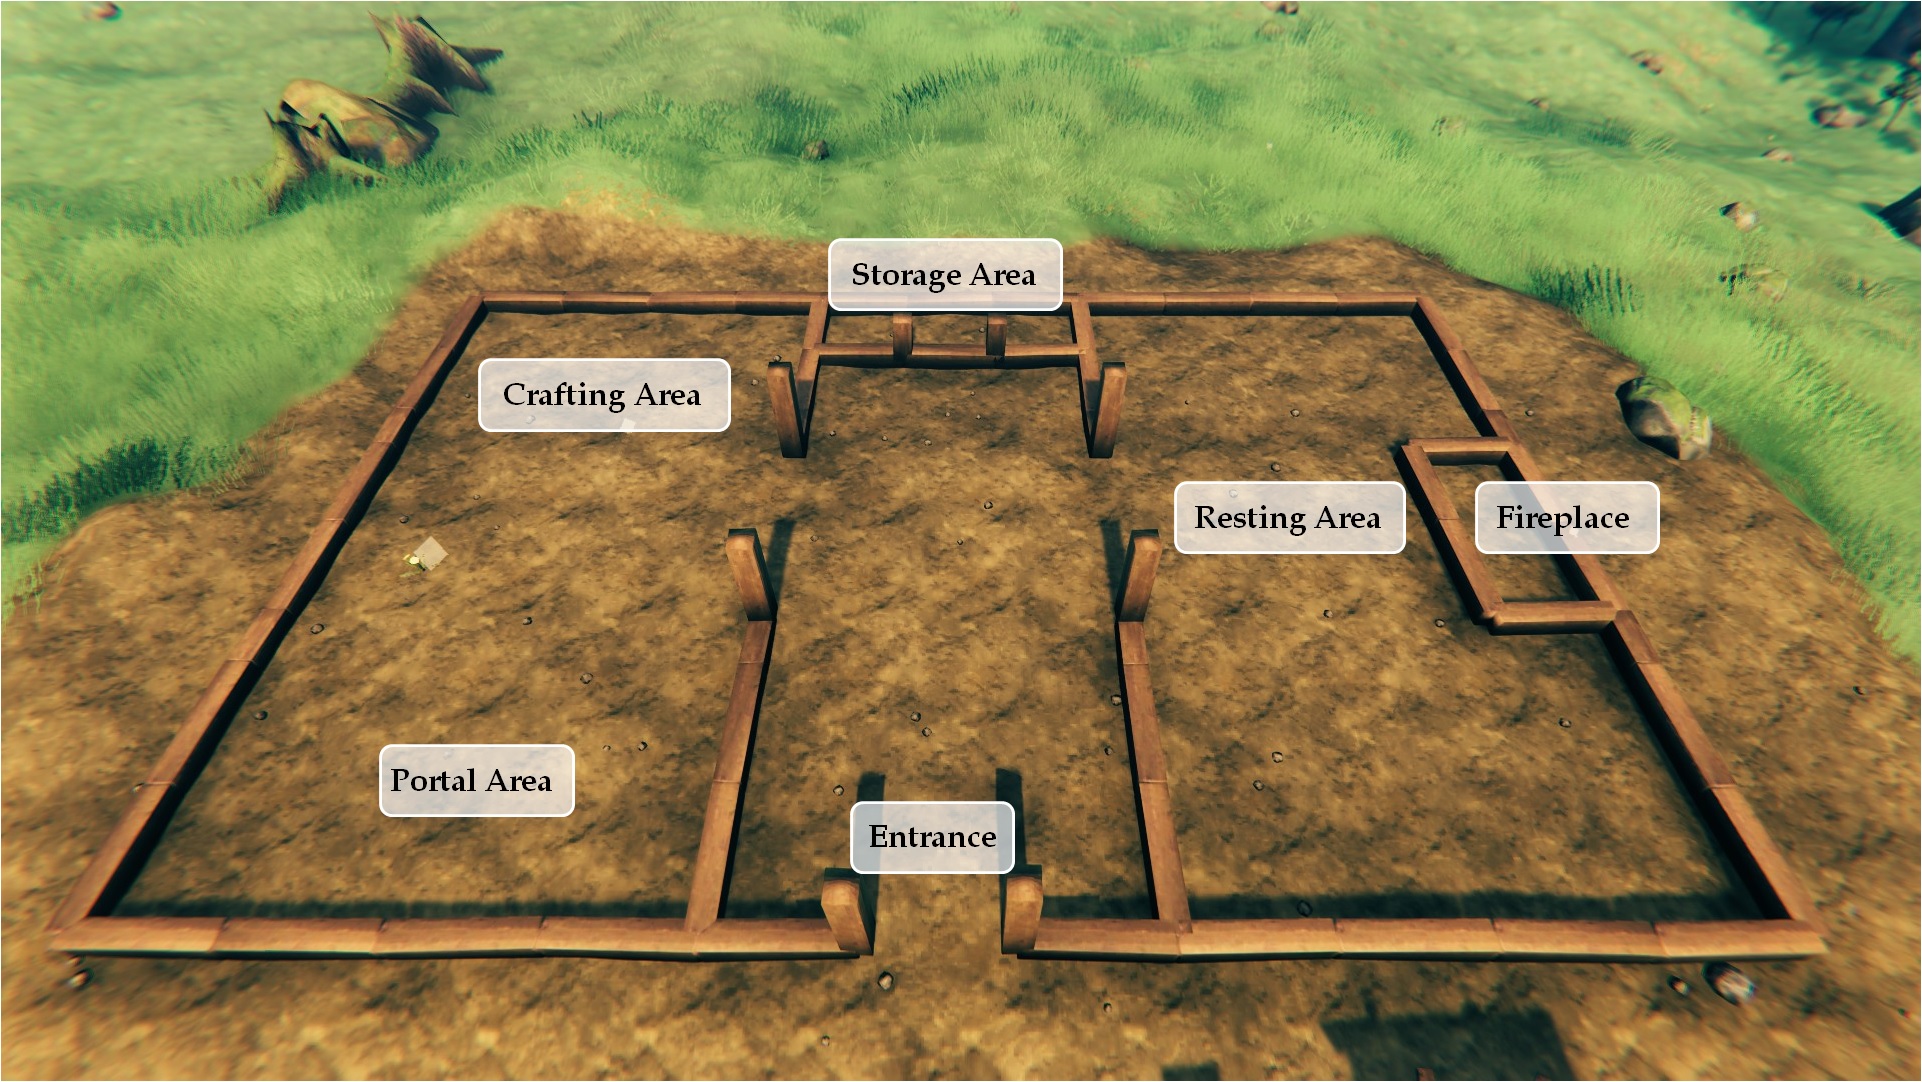 Simple, spacious, practical, and easy to expand if the need arises. |
|
|
After the foundations are laid out, it is time to build the floor, erect walls, and create supports for the roof. You might want to calculate/pre-build a section of the roof to check how tall your roof supports will have to be. To do that, simply place a single Wall Section and build a roof that will extend from it to the base's center. You will have to construct temporary supports, most likely. In our case, the main roof supports turned out to be ~6 meters high (2x 2m Wood Pole + 1x 1m Wood Pole + 1 26° Wood Beam + a Wood Roof Cross 26°); you can check how we've designed our roof supports on the attached screenshot. Once roof supports are ready, you should build a framework for the chimney. We have simply attached 45° Wood Beams on top of our roof supports and connected them with the Wood Roof Cross 45° - it had turned out very nicely! Now, you should place your Walls and plan out where the windows will be. Windows are not necessary, but they let in some light during the day and allow you to save some Wood. Note: If you want to use Roof Ridges, you should make sure that your build has an odd number of tiles. What we mean by this, is: Roof Ridge takes 1 2x2 tile and you will need to place an equal number of Tach Roof tiles on each side of it or your roof will not be symmetrical. In our case, the diameters are 7x11 2x2 Walls and we're building the roof on the shorter axis. |
|
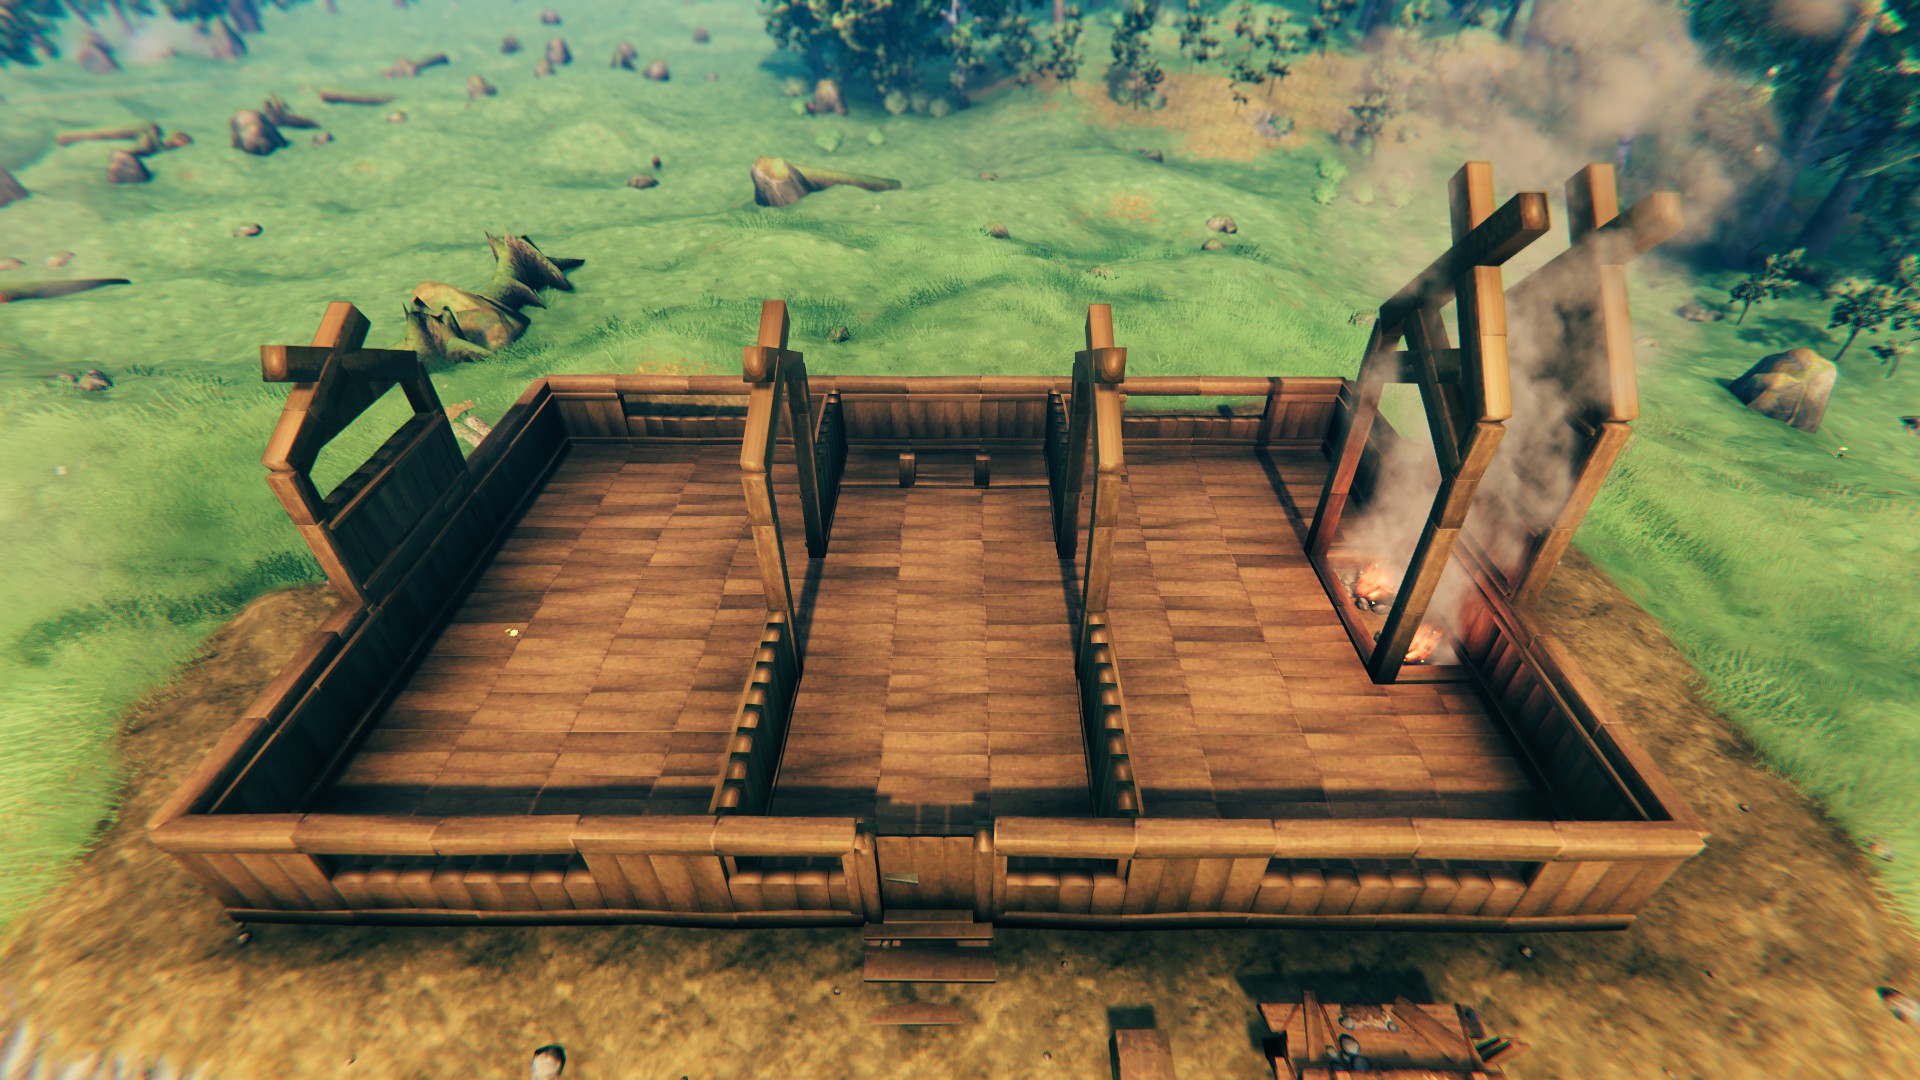 Our Base starts to take shape. You can easily copy the design of the roof supports from this screenshot - just remember to adjust their height to your base's diameters. |
|
|
Once Walls, Roof Supports, Chimney, and Windows are all in place, it is time to cover them all with a roof. We've chosen to construct 1 row of the Tach Roof 45° over the walls (it maximizes the usable area near them), follow it with 2 rows of Tach Roof 26°, and close it all with the Tach Roof Ridge 26°. For the chimney, we've just used a single Tach Roof Ridge 45° elevated on additional Wood Beams (as described and shown above). Note: You should place Tach Roof Ridges last so that they don't break from the lack of support. |
|
 It's ready from the outside, not it's time to work on it from the inside. |
|
|
The building is ready but it's just a building. Now it is time to turn it into a home! Start by finishing the chimney and the inside walls. The latter is not necessary - if you like open spaces, you can just leave the Roof Supports exposed. You should also try to increase the Comfort Level as much as you can. Note: Initially, you won't have access to much of the furniture pieces - they become available once you are able to collect Fine Wood and then iron (Iron Tier Furniture allows you to increase Comfort Level to 16 out of the max of 17 - all you'll miss at that point is the Lox Rug). Choose the spot for a Bed and place down a single Deer Rug - that's all you can do without a Bronze Axe (and thus without the Fine Wood). Doing this will get you to Comfort 5. |
|
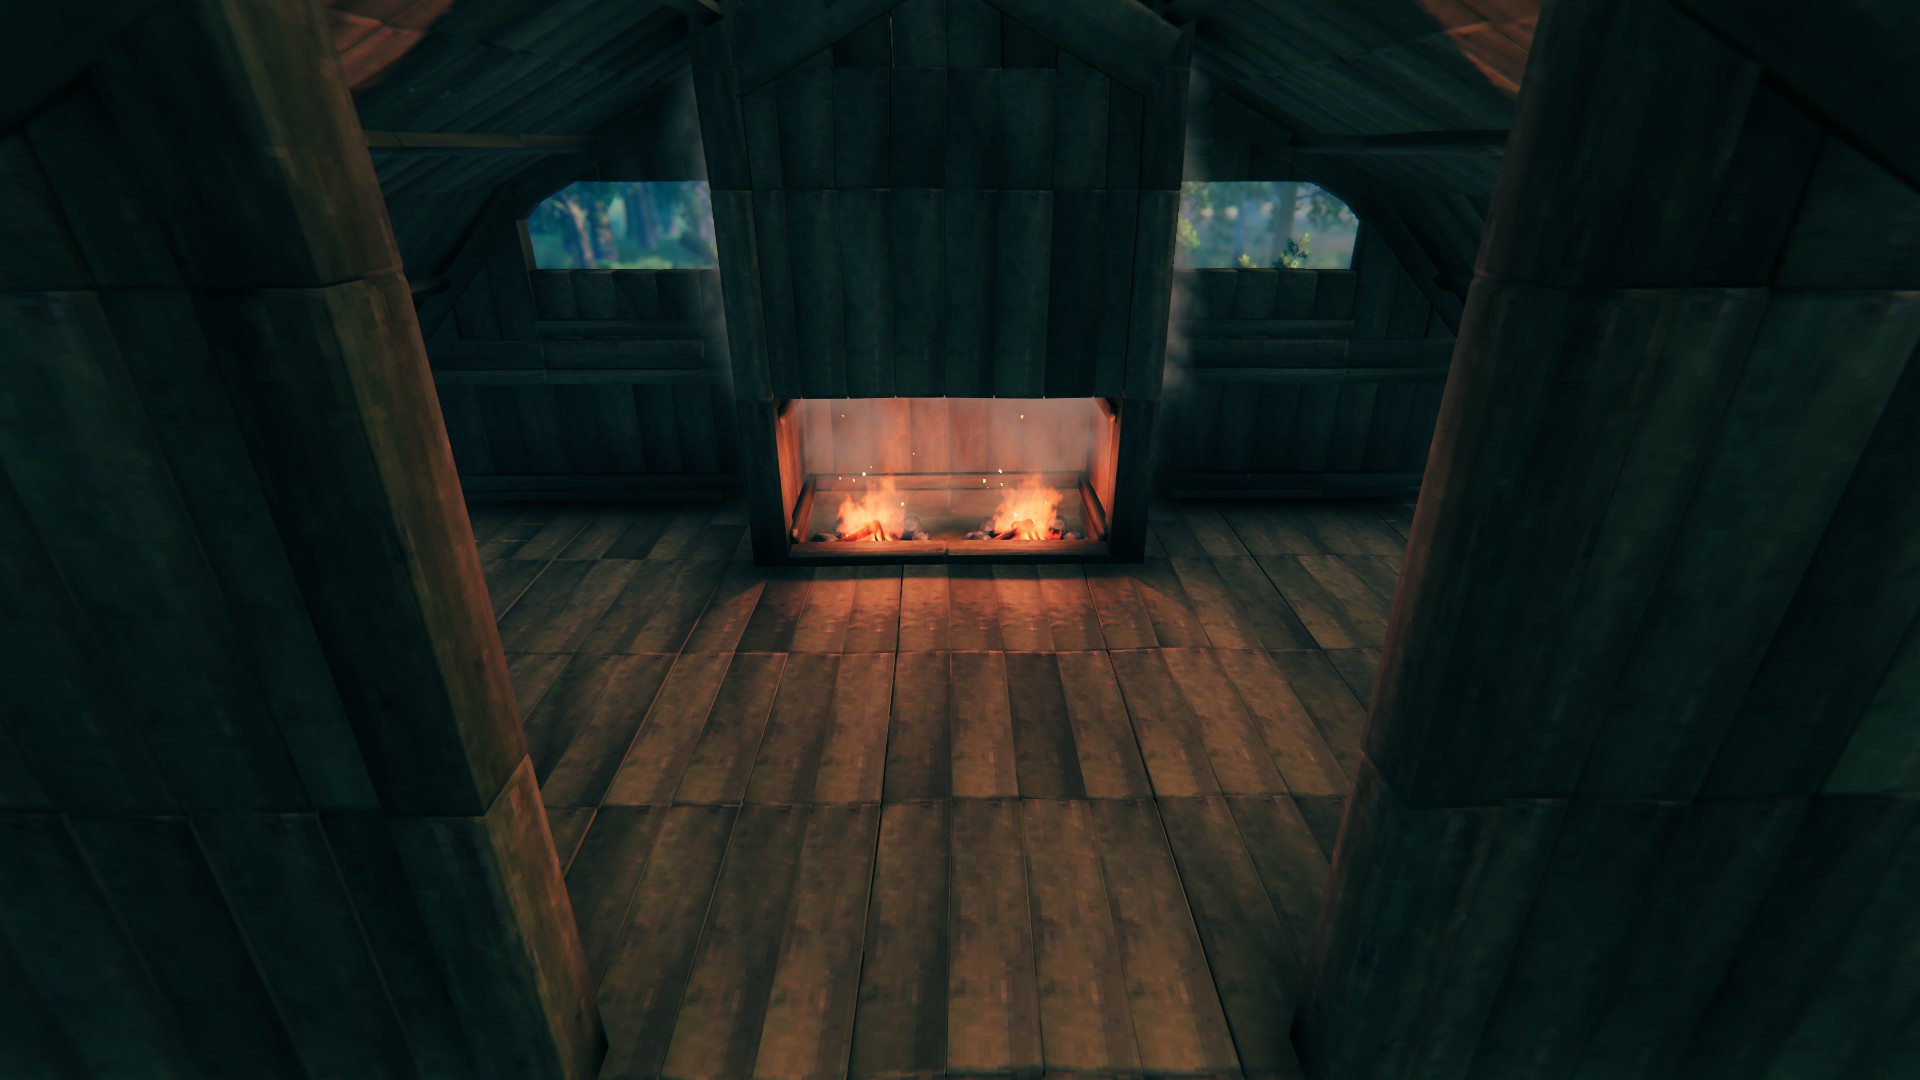 The fireplace has turned out rather nicely indeed. |
You can also cover the upper part of the chimney with angled Wood Beams instead of Walls - the smoke will not escape! If you use your imagination, you can make it look very nice with the clever placement of simple beams. |
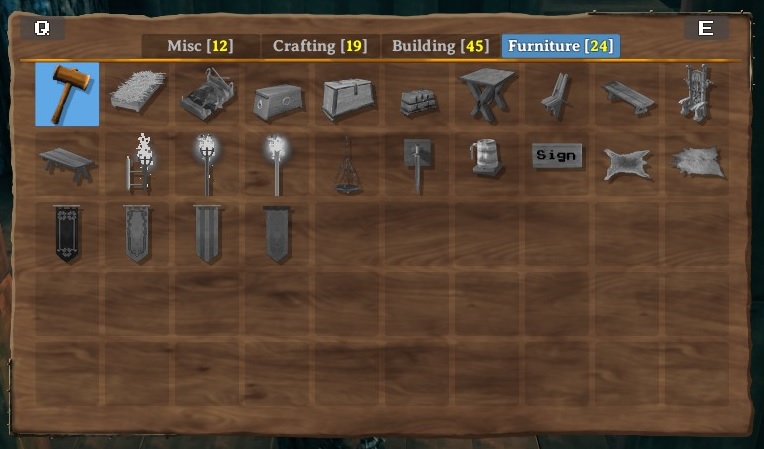 Furniture Tab is where you'll find Comfort-Increasing pieces. |
The importance of high Comfort Levels should not be overlooked - 24-minutes-long Rested Buff is much more convenient to have than a 12-minutes-long one! |
|
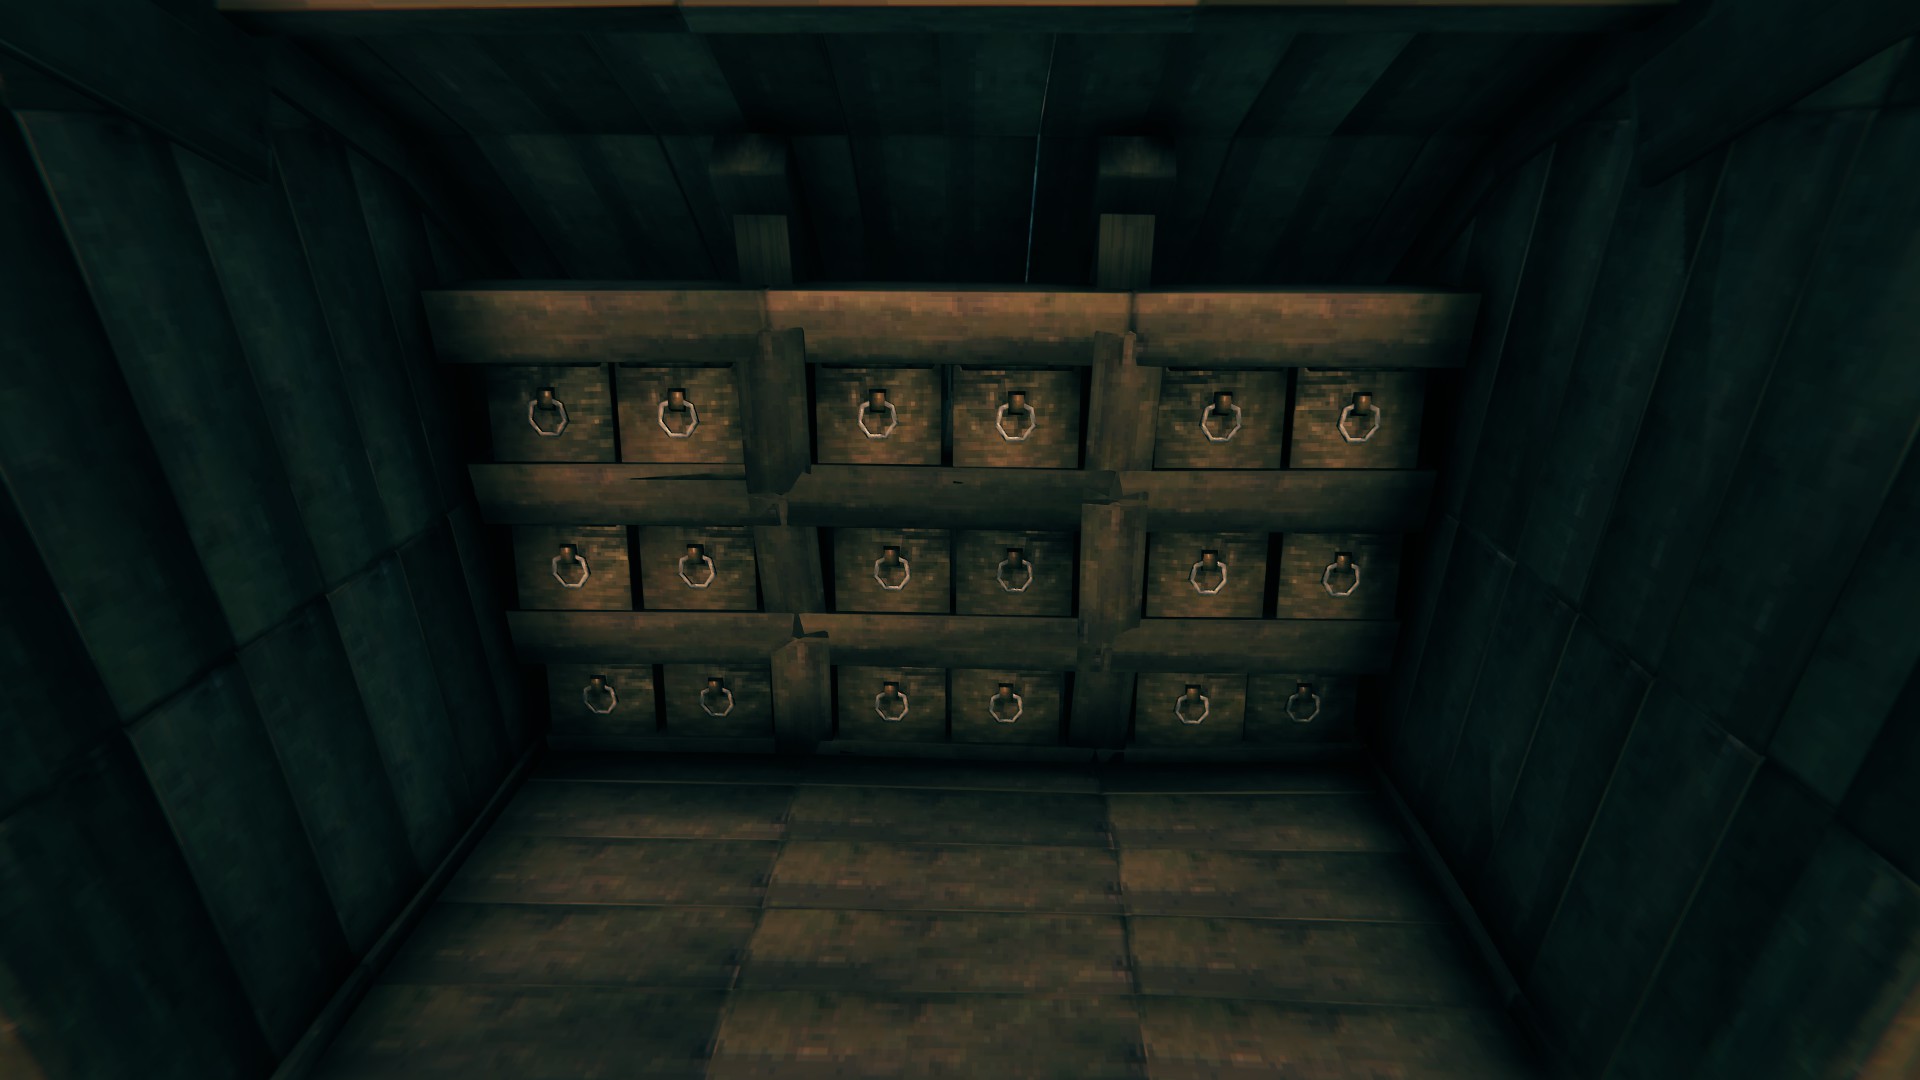
How to Build a Storage Area During your adventures in Valhaim, you will accumulate thousands, if not tens of thousands of various items. At the start, two or three chests might be enough but sooner rather than later every free piece of the floor inside your base will be cluttered with them... unless you build a multi-leveled storage system. Chests can't be stacked on top of each other, but nothing stops you from placing a floorboard above a chest and another chest on that floorboard. The height of a chest is ~1m, so 1m Wood Poles placed beside it will allow you to maximize space when building floorboards on top of it. If your base is 4m high (2 2x2 Walls), you can stack up to 4 chests this way! You should start with something like this: |
|
 We went with 3 floorboards width, walls between chests are not necessary but they help to snap floorboards in right places later. |
|
| Once you've completed the above-displayed setup, it is time to build the second row of chests on top of it - it's as easy as it sounds and it saves A LOT of space in your base. | |
 This is, more or less, how the scaffolding for the second row of chests should look like. Two 1m Wood Poles were added to make stacking another row easier. |
|
|
Tip: The higher you stack, the trickier it becomes to place chests properly. Remember to hold Left Shift while placing them to disable the auto-snapping feature. If you still have problems placing chests in the right places, elevate your character by building stairs and climbing up them. They are much easier to place from above. The finished storage looks like this: |
|
 If these chests were simply placed on the floor, they would take up three times more space... If you construct taller stacks, you can save up even more of it! |
|
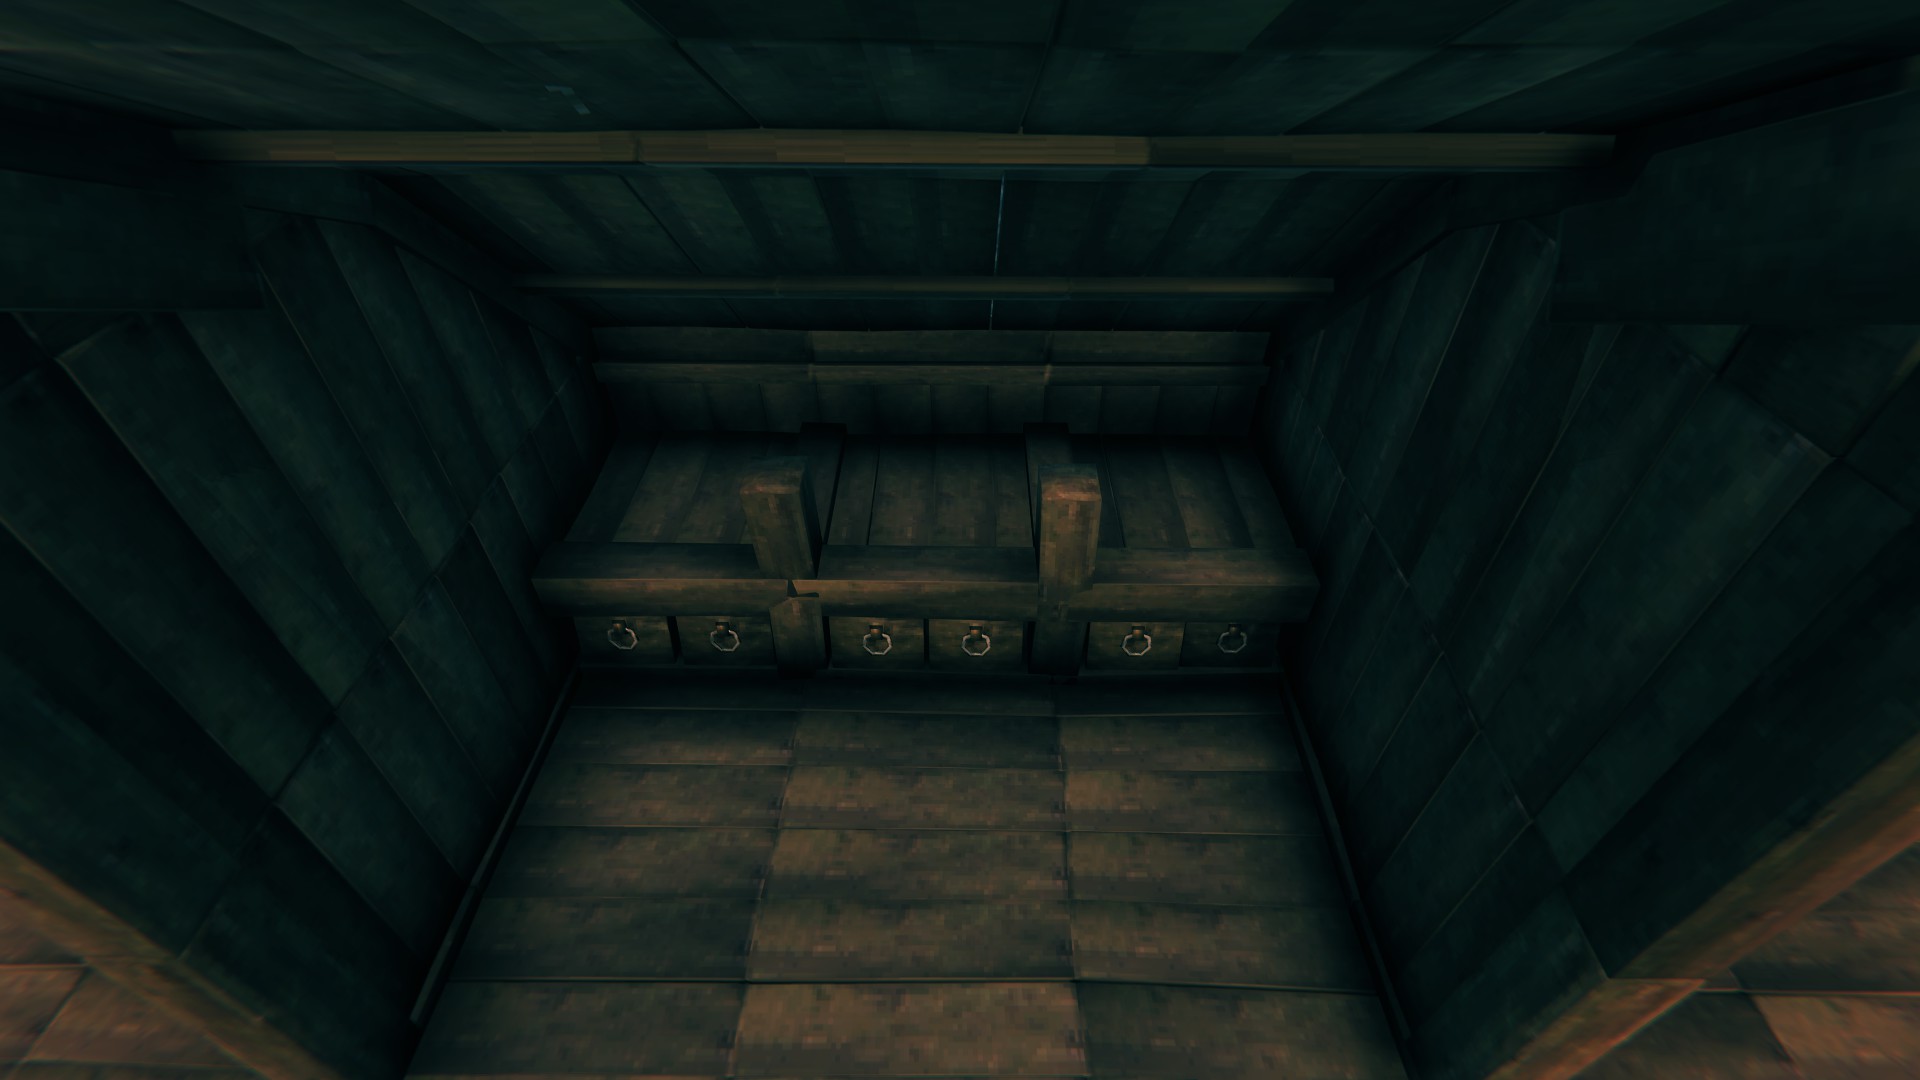
| Of course, you can modify this build however you want, the only necessary things here are 1m Wood Poles, chests, and floorboards on which they are placed. We have built Wood Beams between each row because we like to use Signs to detail what's inside each of the chests: | |
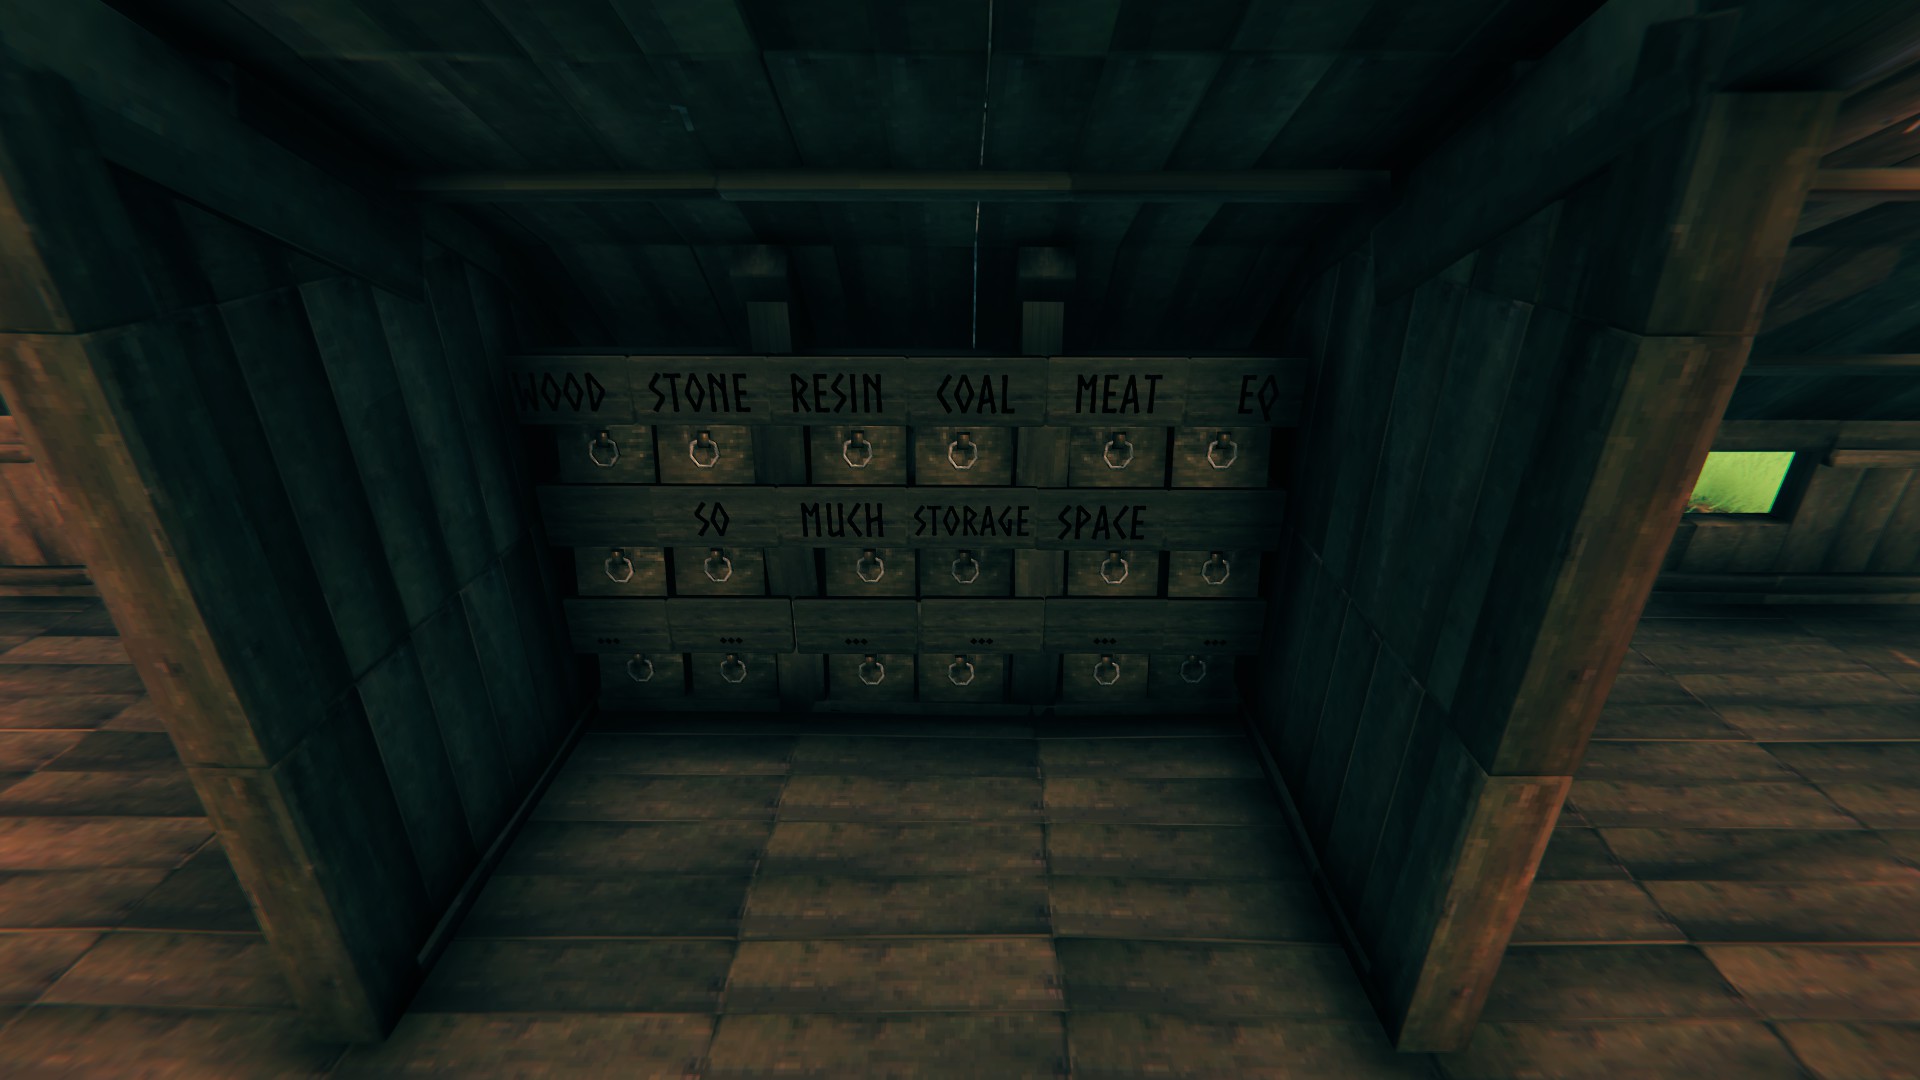 If you always forget what you've put into each of the chests, signs will be an immense help. And they make the storage look more well-organized in our opinion. |
|
|
Eighteen Chests will not be enough, not even close. You will have to expand the storage in the future. You might even want to build a dedicated warehouse once you start running out of place inside of your base. Note: If you stack more than 4 chests on top of each other, the higher ones (5th and above) become hard to reach from the floor level. |
|
Training Your Skills Efficiently
Here, we will share our method of increasing Skills with you. It is a variation of the well-known "rock" method, tailored for the early game (it does not require you to build any additional structures and allows you to train in your main base.
|
The most important thing about training Skills in Valhaim is the fact that you have to deal damage to increase combat skills. This means that you can't just swing your weapons in the air. Luckily, dealing 0 damage still counts as dealing damage so you can, for example, continuously pummel a rock. However, to raise your Skills quickly, you have to have the following two Effects active:
With These effects, you will regenerate your Stamina very rapidly and you will benefit from 100% extra Experience gain for all your Skills. With the theory out of the way, here's what you should do to train offensive combat skills: |
|
 A Target Dummy made out of 3 Stakewalls. |
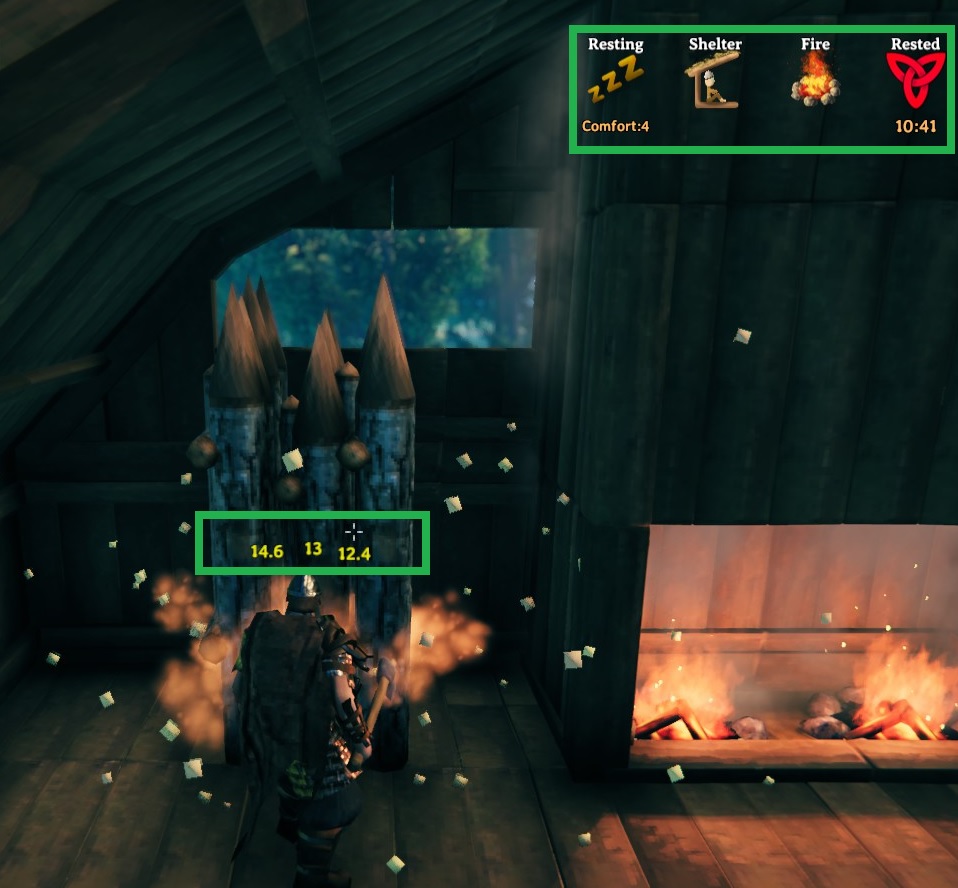 If you place Stakewalls properly, your Damage will split between all three of them. |
|
Once you've created your "target Dummy", all you have to do is spam Attack on it. Depending on the weapon type, you will do low to mid damage - Axes are the most problematic as they have a bonus when hitting wood but Stone Axe works just fine - you won't have problems if you place the Stakewalls like on the above-featured screenshot. You should use low-tier Weapons with this method (Club, Flint Spear, Stone Axe, Wood Arrows). Stakewalls will take Damage so you will be forced to repair them from time to time, but you can do that while you wait for your Stamina to regenerate. This method is especially well-suited for training Bows, Spears, and Clubs as they don't damage the Stakewalls as much as other weapon types. Tip: It is a good idea to train close to your Workbench to minimize travel time when you're going for repairs. Note: You can also go for the "rock" method. To do that, build a small house around a large rock and use the said rock as your target dummy. You will have to build a dedicated Workbench/Forge for quick repairs, though. How to train other Skills When it comes to training Sprint, simply run into a wall until you run out of stamina, wait for it to regenerate, and repeat. Jump is a bit more complicated as you have to create a training spot for it. It should look as follows: |
|
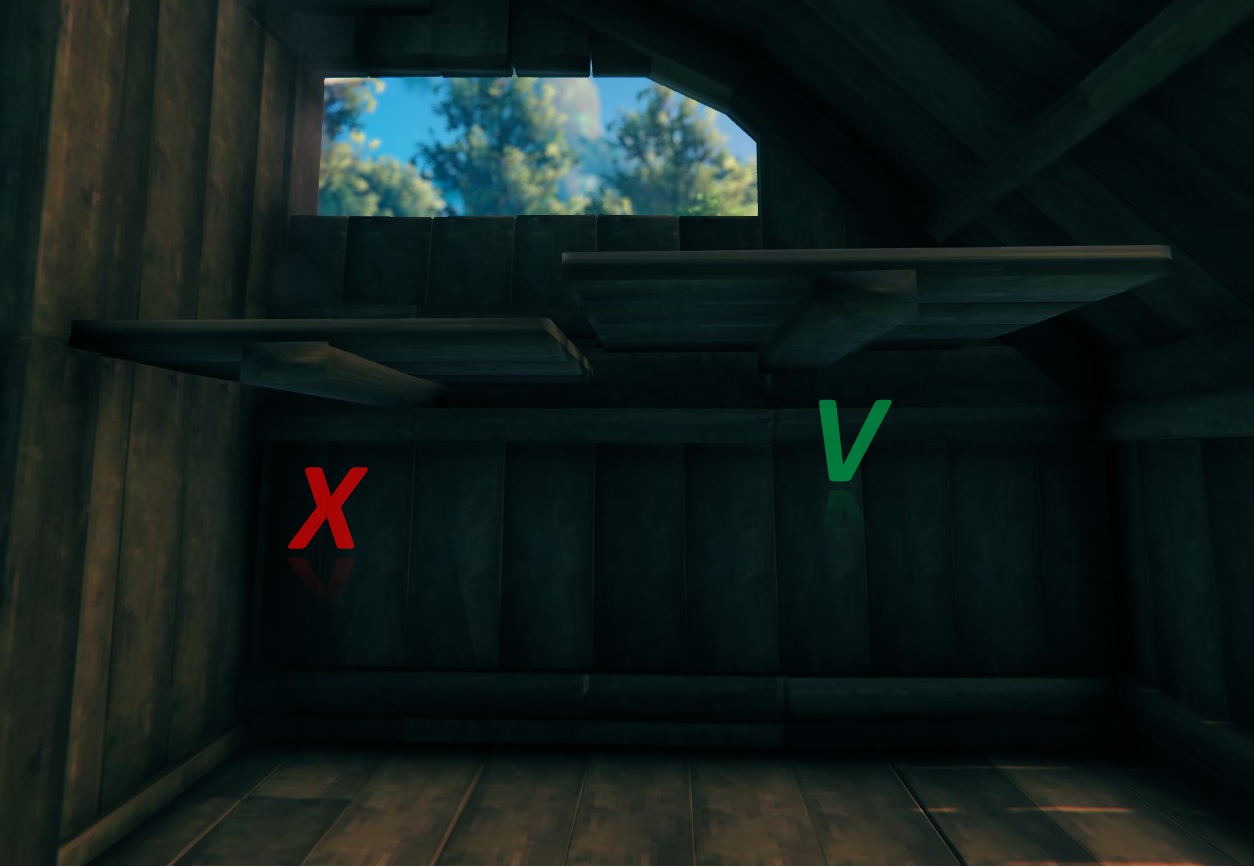
Place a 2x2 Floorboard just above the upper snapping point of a 2x2 Wall. To do that, hold shift and move it up over the default snapping point slightly. |
|
|
The floorboard has to be placed like shown on the featured screenshot as, otherwise, your character would clip through it. To train Jump, just position yourself under the floorboard and spam Space until you run out of stamina, wait for it to regenerate, and repeat. If you're wondering, the floorboard is there to block you after a jump, so you can spam-jump much quicker. Sadly, Block Skill cannot be trained solo while in the base (you need a training partner for that). What we like to do is lure three low-tier mobs, like Skeletons or Greylings, to a more or less safe spot and parry their attacks there. Remember to have the Rested Buff active while training! Important: Parrying an attack gives more Block Experience than regular Blocking, so you should always try to get parries while training Block. To train Swim... well, just swim. Just pay attention to your Stamina or you might drown (it does not regenerate while you're in the water!). |
|
Your First Boss Fights
Here, we will give you some tips on how to defeat the first two Bosses easily.
|
Note: With proper preparation and weapons, the first two Bosses are very easy to defeat. Eikthyr The first boss might look intimidating at first glance, but the truth is - he's rather weak. Here's how to defeat him on your first attempt:
Congratulations, you've defeated the first Boss, now you have access to Antler Pickaxe and thus Tin and Copper. |
 Eikthyr is not nearly as intimidating as He looks on this screenshot. |
|
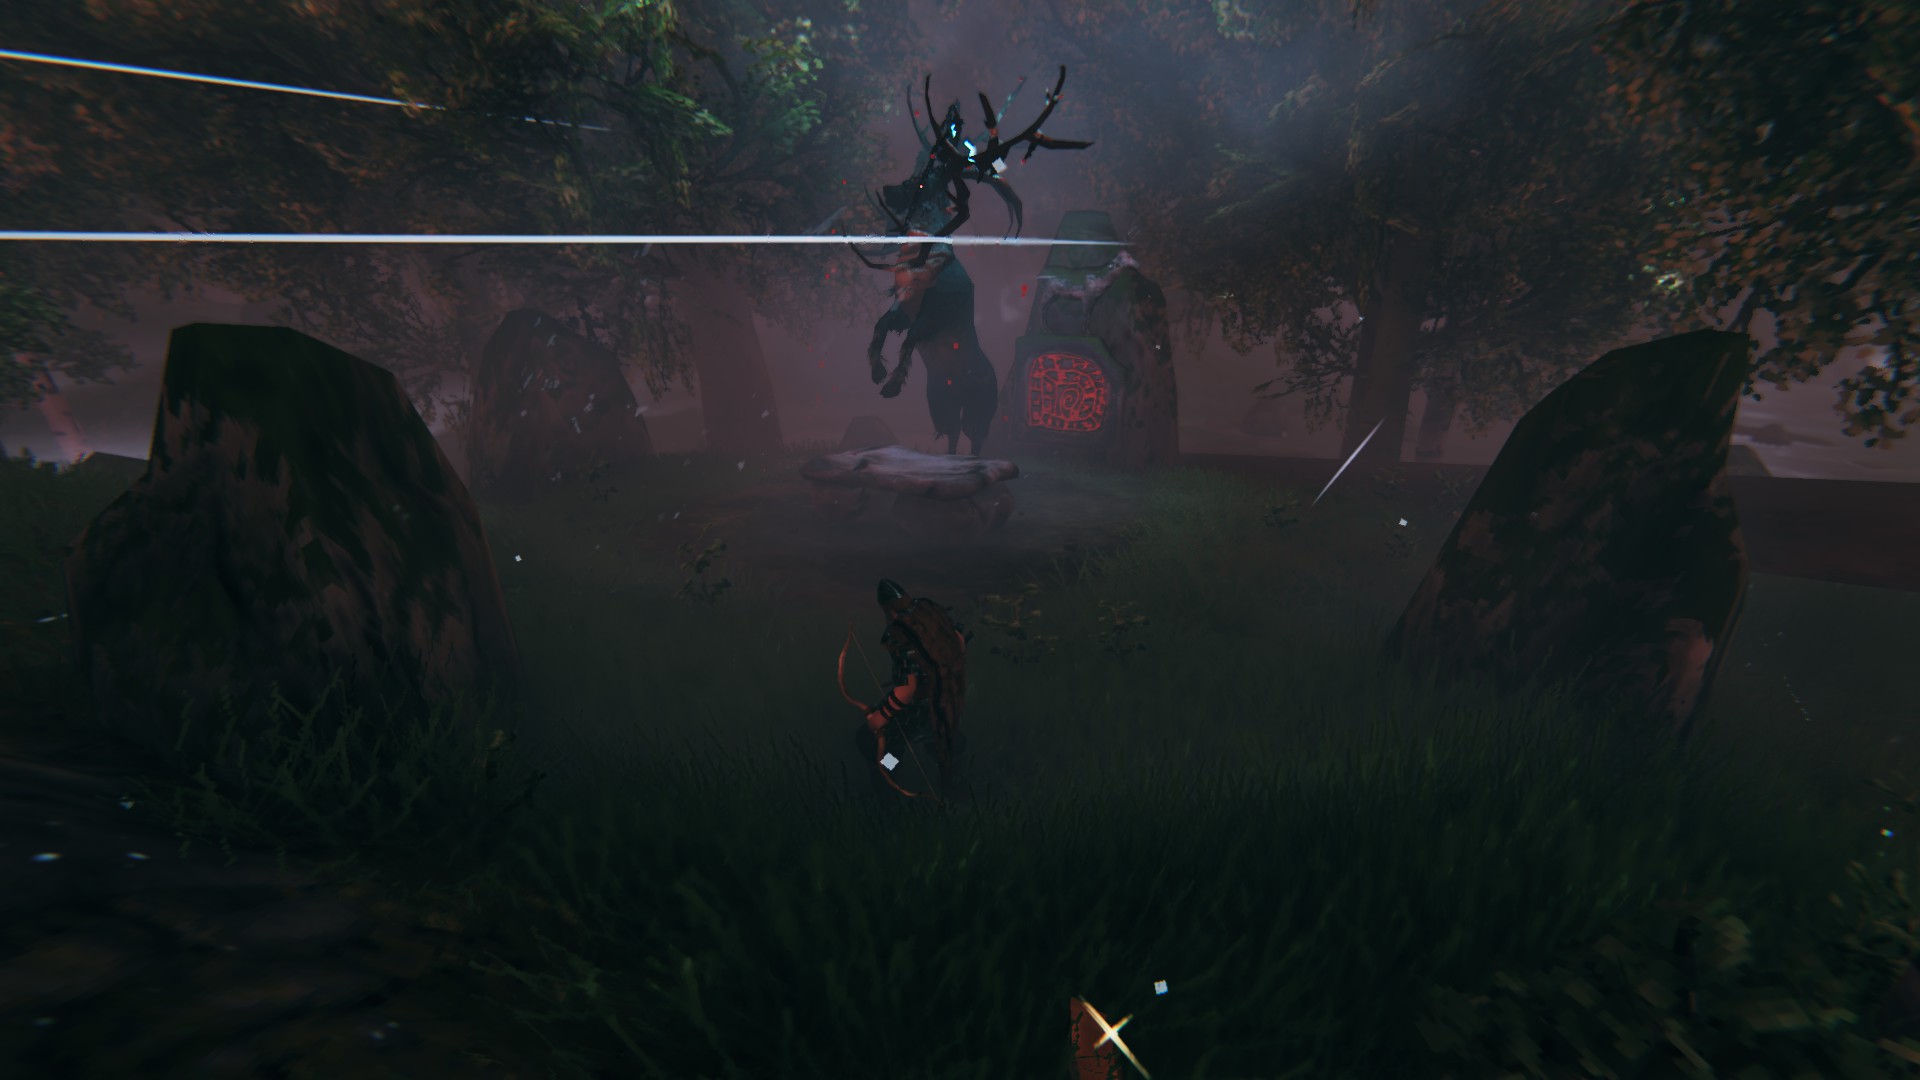
The Elder Fight against Elder is a ranged duel. You shot him with Fire Arrows until he burns to death, and dodge His ranged attacks in the meantime.
With the Elder defeated, Swamps stand open. |
| One last thing: If you don't like the idea of facing Bonemass in melee combat, try bringing Frost Arrows and kiting Him around! They are surprisingly easy to get - Obsidian is abundant in the Mountains and Drakes are laughably easy to shoot down with a Bow. Just don't forget to bring Frost Resistance Meads, avoid exploring Mountains at night, and remember to Parry the Wolves (they get stunned for a loooong time). Also, Wolves follow a combat pattern of 3 attacks and a retreat - use this information to your advantage. |
|
END NOTE If Valheim's early game causes you problems, this guide should help. We know that it's quite long, but there's always the search option (ctrl+f)! We hope that you have found this guide useful and informative. If you liked it and want us to add more guides such as this one, please let us know! Also, we will be happy to receive constructive criticism that will help us improve our future work so leave your suggestions in the comments section below. |
All Screenshots used in this article were taken in the game "Valheim", Developed by Iron Gate Studio and published by Coffee Stain Publishing. You can learn even more about the game on its official website, HERE.